Summary:
In this tutorial, we will show you not only how to create a blurred border very easily, but we will show you how you can create a customizable border for any photo. Along the way, we will give you tips and tricks such as keyboard shortcuts to speed up the process of creating a border in Photoshop. We will also give you examples of different types of customizable borders. Included is a 10 question quiz to make sure you fully understand this process of creating a border in Adobe Photoshop.
Currently we are using Windows Vista Home Premium 64 Bit and the Photoshop CS4 Extended 64 Bit version.
Knowledge You Need to Know:
If you are unfamiliar with certain areas that are not covered in this tutorial, feel free check out the other tutorials on our website. We have many different types of tutorials that can be downloaded (Video, PDF) or viewed online that will train you for free! Once you have the knowledge, feel free to come back and go through this tutorial again.
Preparing For This Tutorial:
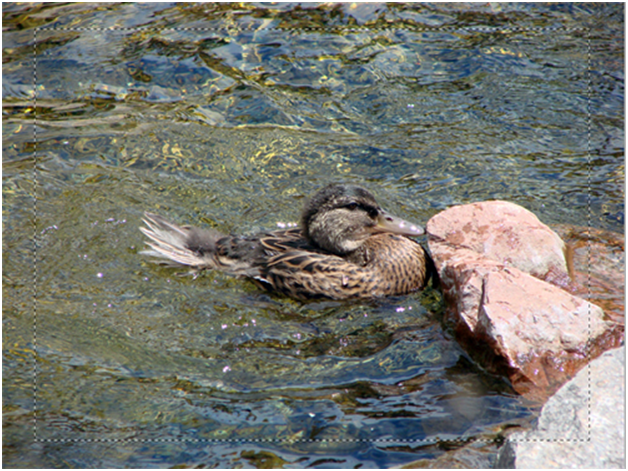
You will be using a picture of a duck in the water. If you do not have this image, please scroll down to the image of Click Picture To Download Supporting Files and download the image. Please open the image PE-DUCKB in the Photoshop Program.
Reason For Tutorial:
We recently received an email asking if there were tutorials on creating frames or borders in Photoshop. The user did not want a standard black border, but did not want anything too advanced. We responded to the user with basic instructions, but felt other users could benefit from this tutorial.
Blurred Border:
The first border we will show you is very basic, but looks good. It is a blurred border! Once you have the image open, duplicate the background layer (CTRL-J) and hide the background layer. Left click the top layer (Layer 1) in the layers palette. The layer palette should look like this now.
Now use the Rectangular Marquee selection tool and make a selection around the whole picture, except the area that you want to blur. You will than see the marching ants will be displayed.
Now it is time to Feather and curve the selection. When you Feather it extends beyond the selection and gradually blurs the edge.
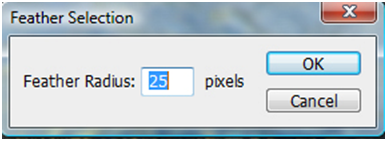
Left click the Select menu and move the mouse pointer to Modify. Move the mouse pointer to the Feather command and Left click.
A dialog box will be displayed. The Feather Radius is how far beyond the selection you want it to blur. For this tutorial, please enter 25 for the amount of pixels and Left click the OK button. Usually, a Feather Radius of 15-30 looks good.
Currently you are telling Photoshop to blur everything inside the selection. We need to change that so it blurs outside the selection. Left click the Select menu and Left click the Inverse command. Photoshop Tip You could also use the keyboard shortcut by holding down the Shift key on the keyboard and the CTRL key and pressing the I key. Release the Shift and CTRL key on the keyboard.
You will see 2 sets of marching ants. Anything in between the 2 sets of marching ants will now be affected.
Press the Delete or Del key on the keyboard to blur the border. Use CTRL-D to deselect the selection. Here is our end result for the basic blurred border.
You are not limited to only the Rectangular Marquee Selection Tool to create your blurred border. This time, follow the tutorial, but instead of the Marquee Selection Tool, use the Elliptical Selection tool.
Customizable Border:
Lets show you how you can create customizable borders. Use the Rectangular Marquee Selection tool and make a selection around the area of the image that you want to keep as the picture.
Inverse your selection by holding down the Shift and CTRL key on the keyboard and now use the I key. Release the Shift and CTRL key.
Now that you have the correct selection, Left click the Filter menu and move the mouse pointer to the Distort menu. From the sub-menu Left click on the Glass filter.
Here are the first few options of the Glass Filter. On the top right hand corner of the window, you will see the options for the Glass Filter. On the left hand side you will see your image. As you change the settings, the border of the image will change.
| A). After changing the settings, Left click the OK button to apply the changes or if you want to disregard the changes, Left click the Cancel button. | |
| B). For this tutorial, we will be using the Glass Filter, but by Left clicking the drop down menu, you will find many different possibilities for borders. |
Here is the next set of options of the Glass Filter. For any slider bars, move the mouse pointer to the up arrow and HOLD down the Left mouse button and move the mouse left or right. When you are satisfied with the setting, release the Left mouse button.
| A). The Distortion option will shift the actual image to make it appear distorted. | |
| B). The Smoothness option will smooth out the glass texture. | |
| C). You can also enter a numeric value for each setting. For this tutorial, change the Distortion value to 5 and set the Smoothness value to 1. |
Here is the last settings for the Glass Filter.
| A). Left click the Texture drop down box and Left click the Tiny Lens option. | |
| B). To change the size of the Glass, you can change the Scaling option. For this tutorial, make sure the scaling is set to 100%. |
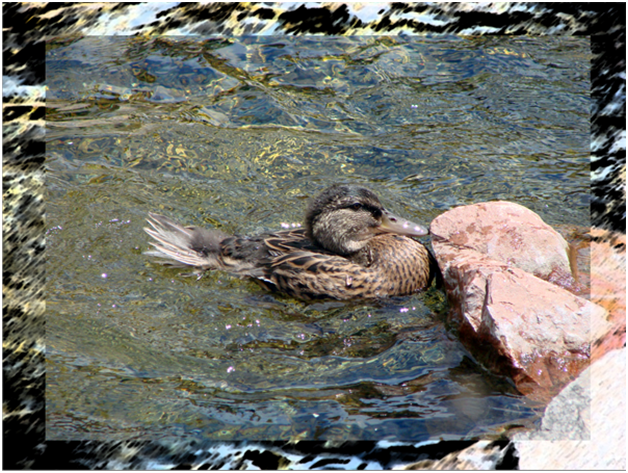
Left click the OK button and use CTRL-D to deselect the marching ants.
Here is our end result. As you can see we could have taken our time to make a more even selection around the image, but the frame looks good.
Remember you are not limited to using only the Glass Filter. Here are a few quick other examples.
Sumi-e:
Chalk & Charcoal:
Stained Glass:
Conclusion:
You have now learned how to do a basic blurred border and we showed you how to create a customizable border. The Feather option was explained and you should now begin to use that feature within your own projects. We went through all the settings for the Glass Filter and showed you that the border is not limited to only to Glass Filter and gave you a few different examples.
For any customizable border, play with all the settings and try different filters. Some filters will not work well with certain images. Example, if you used the Ocean Ripple filter for this image, it would not look great because there is already water in the image and it would be tough to determine the image versus the border.
1). What is the keyboard shortcut to Inverse a selection?
| A). CTRL-I. | |
| B). ALT-I. | |
| C). Shift-I. | |
| D). Shift+CTRL+I. |
2). What menu is Inverse command in?
| A). Select. | |
| B). Edit. | |
| C). Filter. | |
| D). Selection. |
3). What sub-menu is the Feather command located in?
| A). Select. | |
| B). Modify. | |
| C). Feather. | |
| D). Filter. |
4). The Glass Filter is located in what sub-menu?
| A). Blur. | |
| B). Other. | |
| C). Modify. | |
| D). Distort. |
5). What keyboard shortcut would you use to deselect the marching ants?
| A). CTRL-E. | |
| B). ALT-E. | |
| C). CTRL-D. | |
| D). ALT-E. |
6). What does the Distortion option do in the Glass Filter?
| A). It changes only the light values of the pixels to distort the image. | |
| B). It curves each pixel. | |
| C). It shifts each pixels away from the original pixel. | |
| D). It creates a mask effect. |
7). What is the best customizable border to use?
| A). You will need to play with the filters and settings and there is no best border. | |
| B). Sumi-e is the best for all photos. | |
| C). Chalk is the best for all images. | |
| D). Ocean Ripple is the best for all photos. |
8). After you Inverse the selection, what do you do next to create a blurred border?
| A). Pick your filter and apply your filter. | |
| B). Inverse the selection. | |
| C). Make a selection around the area that you do not want to blur. | |
| D). Press the Delete or Del key on the keyboard. |
9). How do you adjust the slider bars in the Glass Filter?
| A). Hold down the Left mouse button over the up arrow and drag the mouse left or right. | |
| B). Right click the line of the slider bar and select Expand or Contract. | |
| C). Hold down the Spacebar over the up arrow and move the mouse left or right. | |
| D). First unlock the slider bar by Right clicking the line and then hold down the Left mouse button and drag the up arrow either left or right. |
10). What is the measurement type of the Feather Radius?
| A). Percentage. | |
| B). Centimeters. | |
| C). Inches. | |
| D). Pixels. |
Answers: 1). D, 2). A, 3). B, 4). D, 5). C, 6). C, 7). A, 8). D, 9). A, 10). D
Scoring:
0 - 5 = Please review the video tutorial and re-read this document either offline (PDF) or online.
6 8 = We would recommend that you print this document off and read it at a later time.
9 10 = Congratulations you have passed the quiz. Go ahead and view another tutorial on our site.
We hope you enjoyed this detailed tutorial. Please visit us at: http://www.Photoshopeducation.blogspot.com to expand your knowledge within Adobe Photoshop.

Click Picture To Download Video File To View Offline
Download Total Video Player, iTinySoft

Click Picture To Download PDF Tutorial
Download Adobe Reader, Adobe Corporation

Click Picture To Download Supporting Files
(Brushes, Textures, Fonts, Images, Actions, .PSD, Etc.)
Download ZipGenius Standard Edition 6.0.3.1150, Dicono di ZipGenius


ConversionConversion EmoticonEmoticon