So here is the easyway to make those shiny, glossy, snazzy, glassy, sleek, web2.0 style, clean, bubbly, starburst, badges things. like so.

To begin: open up shop. 1) Press CTRL + N (open new document) make the size whatever you like I did mine 500x 500px. background white >OK
when doc is open Choose a foreground color you want to work with I chose dark blue.
2)Select the shape tool choose the custom shape tool than from the shapes library up in the properties panel on top of screen
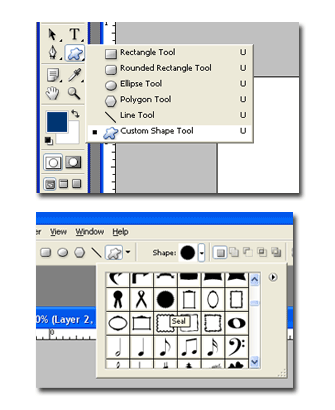
select the starburst shape if you cant find one than click on that small arrow to the right of the shapes menu and click on ALL this should bring up all the custom shapes which includes a starburst shape. Now with the starburst shape tool selected go to the middle of your work stage and drag out a nice shape (holding down on shift to keep perportions.) name that layer base.
With the base layer selected hold down on ctrl and click the square thumbnail on that layer. This will make a marquee selection of the starburst shape.
Create New layer .(SHIFT+CTRL+N) -place it above the base layer. name this layer brightness. and now select that layer.
Now with the brightness layer selected go to select >modify>contract and enter the number 1 pixels> ok.
While selection still active go to your color pallete and choose a nice bright color as foreground color of the same family as your starburst shape for example: if your starburst is dark blue than now you should be choosing a bright/light blue.
Make sure that in your in your properties on top of the page show that your gradient tool is set to FILL TO TRANSPARENT
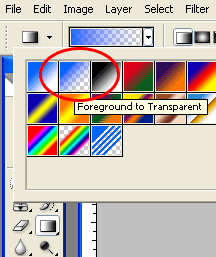
> Now grab the gradient tool and place the cursor just below your current marquee selection preferably at the bottom right corner and drag from bottom right corner up towards the top left corner and just about half way through that selection release the dragging. (Joke no connection to tutorial: how do you take a dog with no legs for a walk? take it for a drag)
Your starburst contracted selection should still be active do not deselect. now go create a new layer and place it above the others and select it. NOw name that layer gloss ( if your marquee selection for some reason has been deselected than just go to SELECT>RESELECT .) get the eliptical marquee tool (circular one) and with your one hand holding down on alt and shift go drag a circle/oval selection partially over the top left area of your star. This should cut out a peice of your selection. Like so
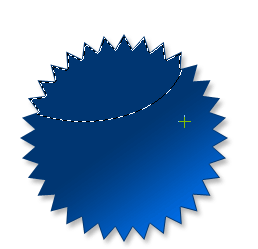
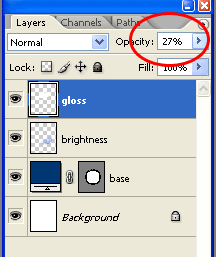
Go change your foreground color to white and than press alt+backspace to fill that selection. Now press ctrl+D to deselect. you should now be on the gloss layer GREAT! now go and lower the opacity of that layer from to about 27%.
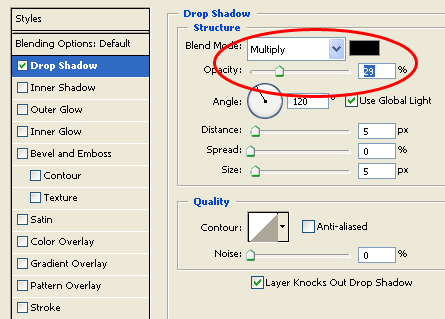
Now to top it off. Go select to the base layer and double click on it (or right click and select blending options) select the drop shadow effect and lower the opacity to 29-32% the rest leave as default.
YOUR DONE CONGRATS now go get your self a coke (or diet) and you can add any text you want on top of that usually chunky texts go well with this. ENJOY. Any questions? leave a comment and I will try to answer asap.
Have a good tutorial? Send me an email
ANOTHER TUTORIAL

CLICK HERE TO VIEW GLOSSY TEXT EFFECT
ConversionConversion EmoticonEmoticon