Free Sample FanExtra Tutorial:
PSD.FanExtra is actually part of our wider network of tutorial websites, FanExtra, which includes a popular members area. Membership costs just $9 per month and gives you access to all tutorial source files for PSD.FanExtra (around 200 now!), as well as hundreds of quality design resources. Weve been adding new textures, vectors, icons and brush sets every week now, and you may have noticed that the number of resources being added is ever increasing! We also pride ourselves on hosting some great members-only tutorials, which are really the key to boosting your learning.
Weve had a few emails recently asking about the level of detail in our members-only tutorials, so we figured why not show you!
We hope that you enjoy the following tutorial, and if you like this kind of detailed members-only content why not sign up for a FanExtra membership today!
Create A Human/Robot Hybrid In Photoshop
Today we are going to create a detailed composition of a human/robot hybrid. To make this happen we will use a combination of tools and effects in Photoshop that when used properly can yield some great results. If youre ready to start building the machine then lets get down to business!
Resources Used In This Tutorial
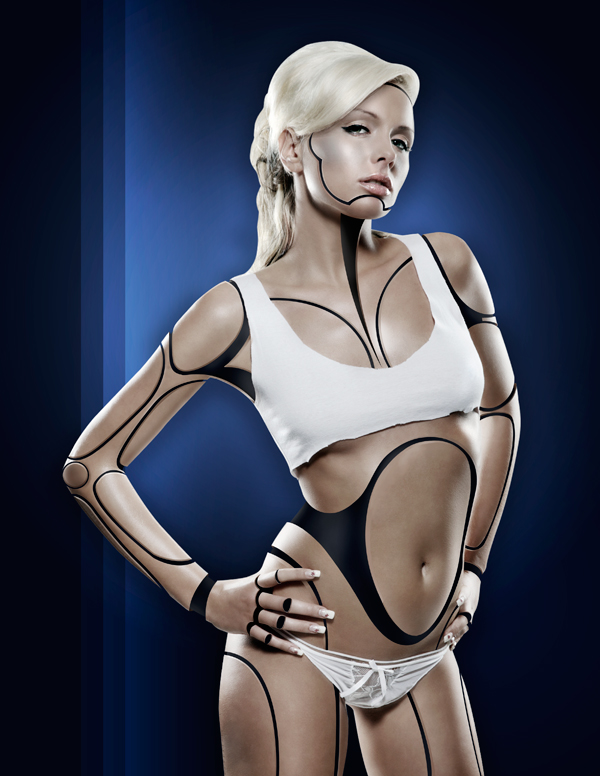
Final Image
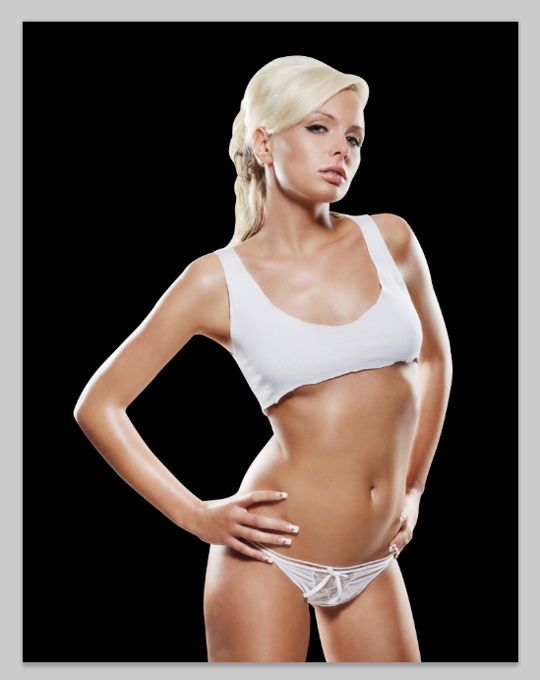
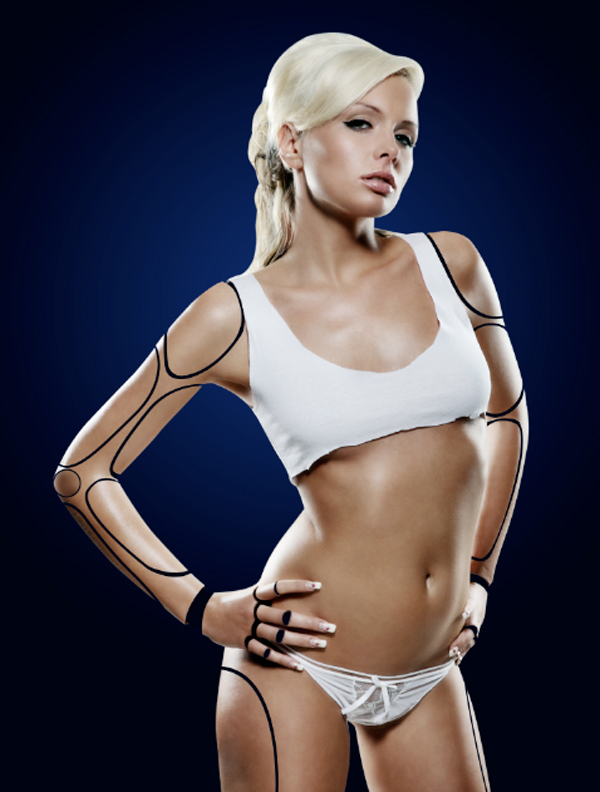
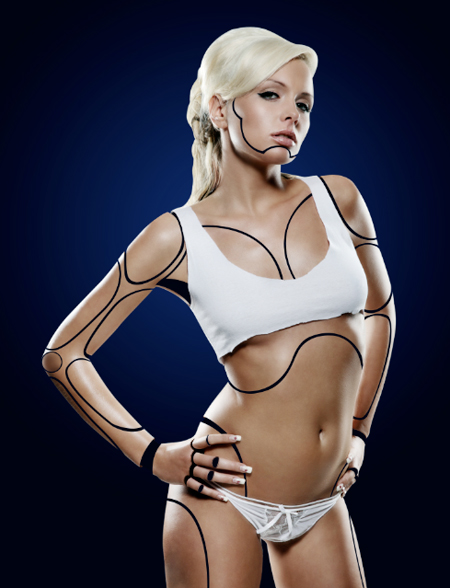
Here is a preview of the image that we are going to be creating:
Step 1
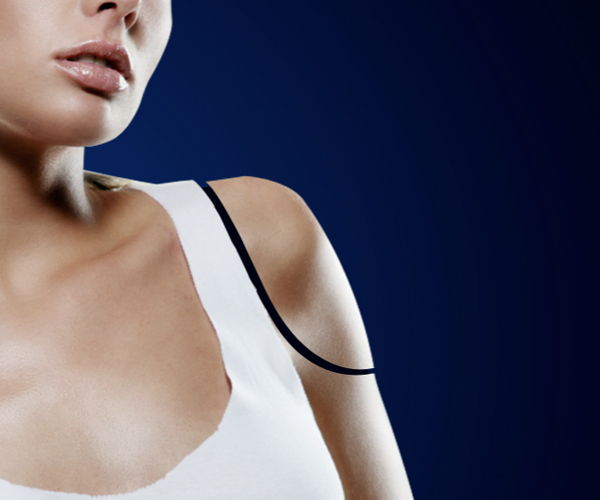
Start by finding an image of a model that you can use as the subject for your design, you can get this one from iStock, or a similar image of a model will do. The one I will be using is of an attractive woman who will soon become half machine. Before we get to that, however, we will need to isolate our model from her background.
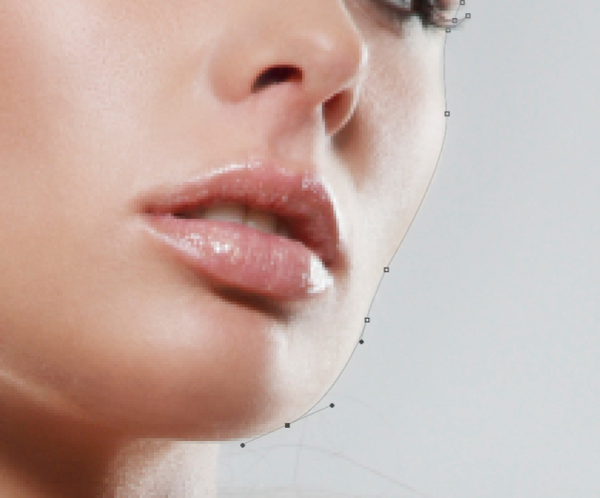
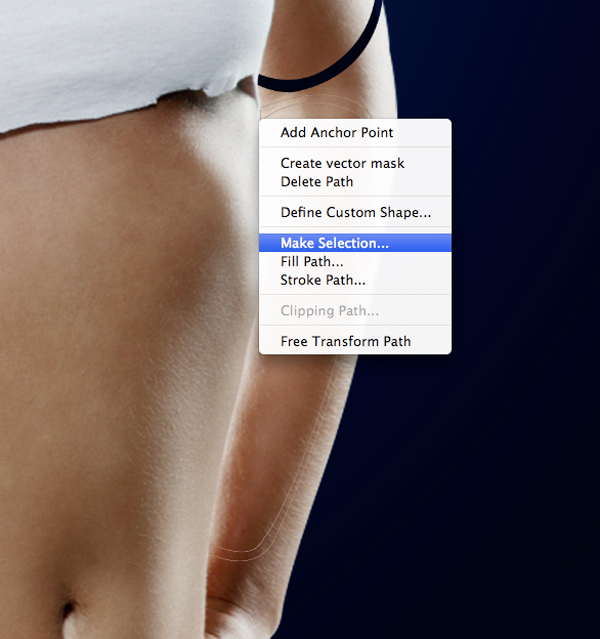
Zoom into your image about 200% or more if you need too and switch over to your Pen Tool. Begin to trace around the image, which should be fairly straight- forward for a pose like this. The only part that may be a bit tricky here is the hair of our model, but we can just make a sort of guess as to where the line would be without the light blending it with the background. You will want to make a kind of flowing, curved selection here to make it seem more natural.
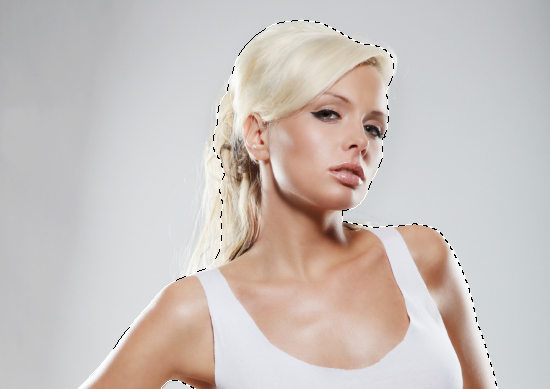
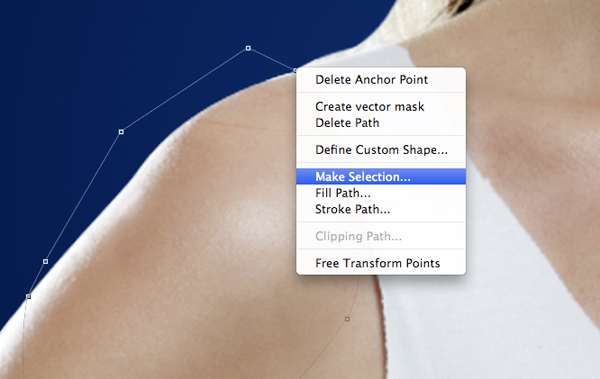
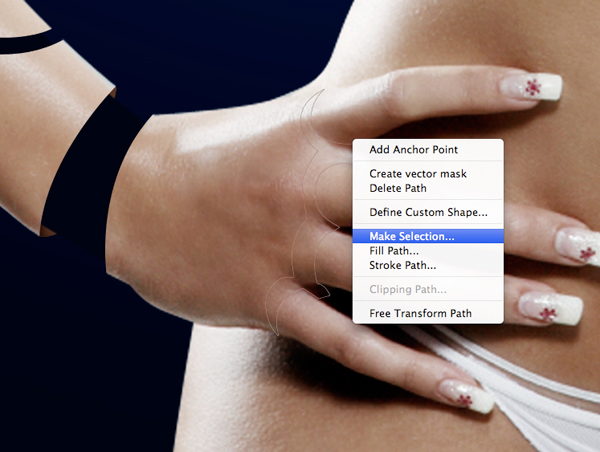
Once you have made your selection and traced around your model, hold the Control Key and click anywhere along the path and choose Make Selection from the dropdown menu. Hit OK and you will see a selection going around the figure indicating the active area.
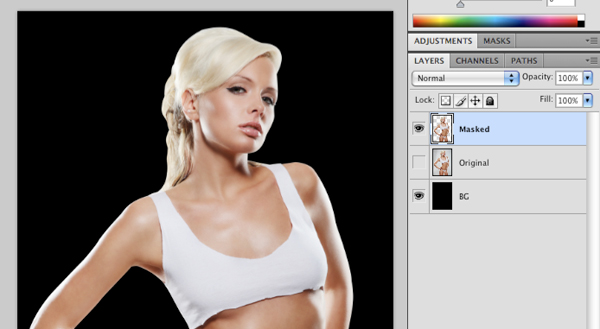
Next, simply press Command+J to duplicate this selection onto a new layer. Now you should have two copies of the image one with and one without a background.
Step 2
We should now save our work, just to do this early so we dont get too far ahead and lose something! That can always be frustrating especially after you have just taken some time to make a nice selection.
Once you have saved and are ready to move on, we are going to expand the size of our canvas. Normally I would just make a new Photoshop file at a certain size and drag my isolated image over, but this is another way of doing it:
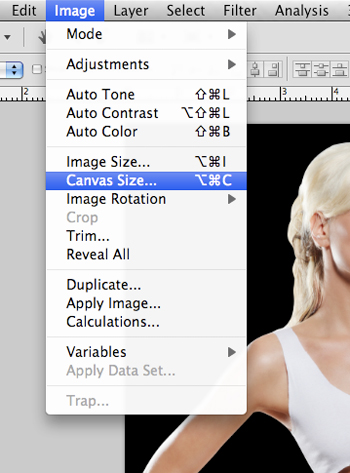
Go to Image>Canvas Size as shown here:
You will see the dialog box pop-up and I am going to make this 8.5 x 11 just to keep things simple.
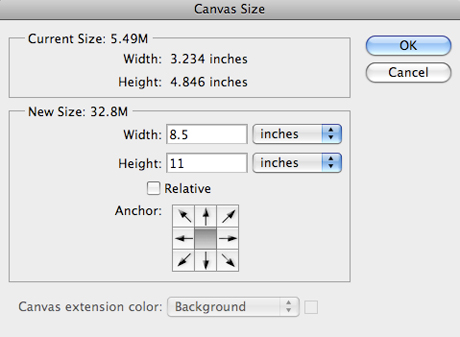
After you apply the changes the canvas will expand accordingly. You will have to fill in the remainder of the background on the Background Layer with whatever color you are using, or press Command+T and resize it. You will also need to scale up the size of the model you are using in order to fill most of the space. To do that, use the Free Transform command and drag one of the four corners outwards while holding down the Shift Key.
Step 3
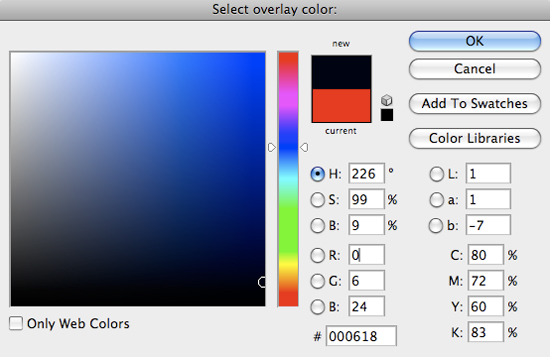
Double click on your Background Layer to bring up the Layer Styles before checking off Color Overlay.
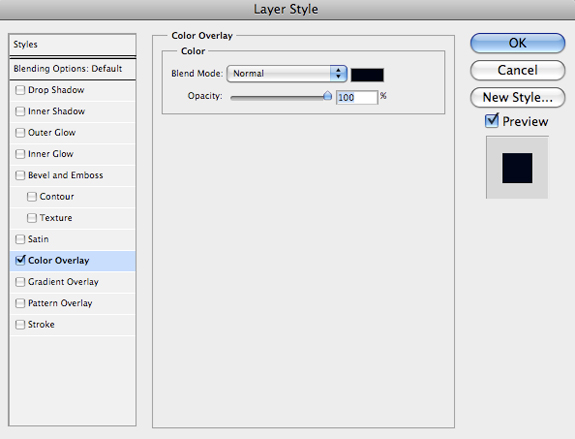
We are going to apply a dark blue color to the background and then add a gradient on top of it. The color I am using here is #000618.
Step 4
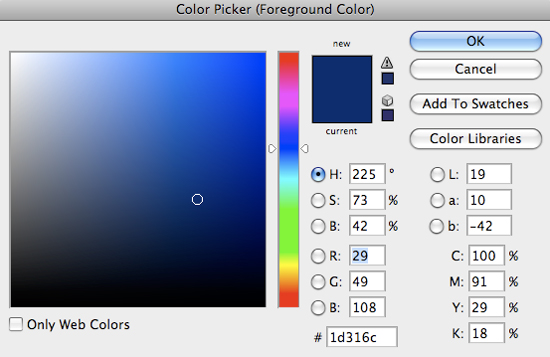
Next, create a new layer just above your background and switch over to the Gradient Tool (G). We are going to want to use a Radial Gradient that fades from solid to transparent as shown here:

For the color we will use a slightly more vibrant shade of the navy color we are using for the background. Here I am using #1D316C.
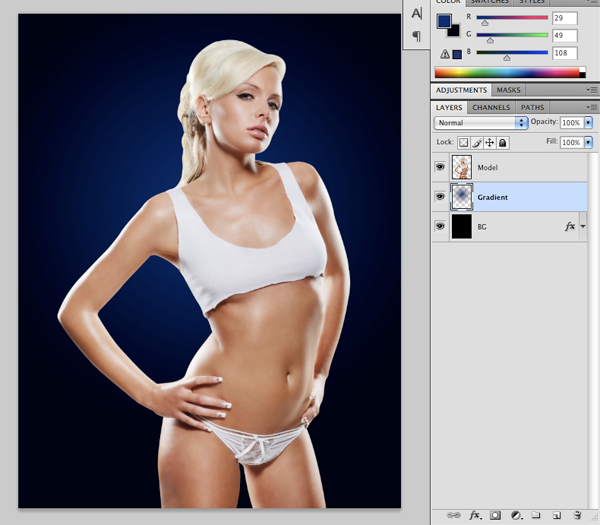
Once you have set that up, on your new layer, click in the middle of the canvas and drag outwards towards one of the four corners of the image.
Step 5
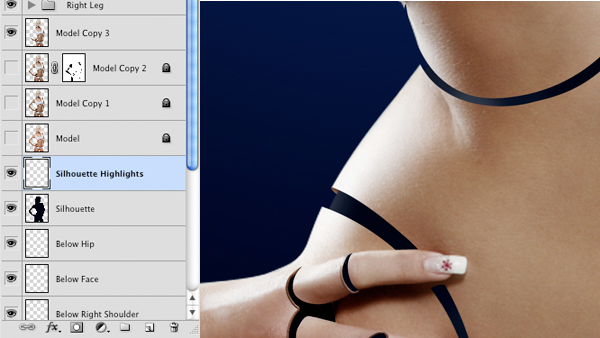
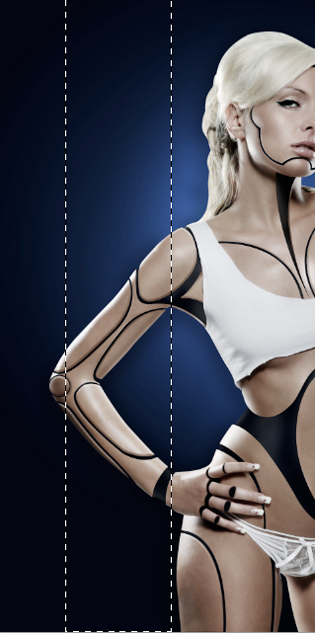
Next, hold the Command Key and select your isolated model layer to activate a selection around him/her. Create a new layer and then go to the Select Menu followed by Modify>Contract.
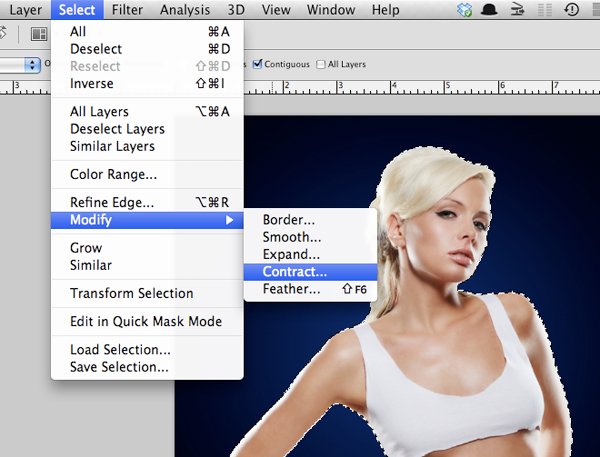
Input a value of about 12 pixels and press OK to contract the selection. On your new layer that you created, use your Paint Bucket Tool (G) to fill this area with black:
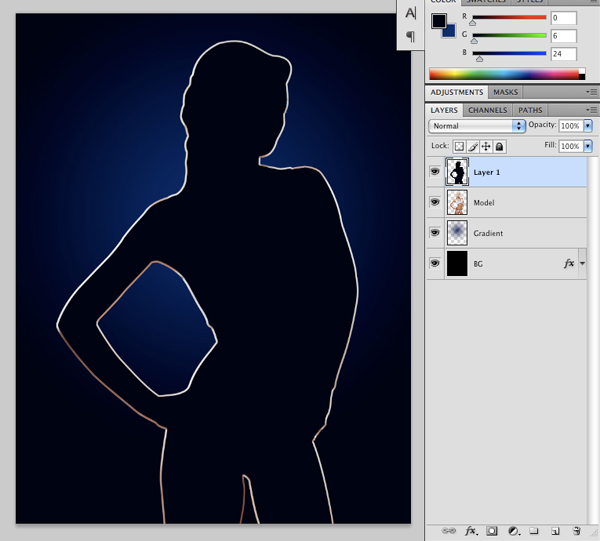
You can now name this layer and move it below the model layer. It will make more sense as to why we are doing this, but it will basically serve as the skeleton that will be revealed when we removed pieces of the original model.
Step 6
We want to now make it so that our model looks a bit more pale and plastic-like and in order to do that we need to tone down some of the brightness in her skin. Select your model layer and press Command+J to duplicate the layer before selecting the copy. Next, go to Image>Adjustments>Hue/Saturation as shown here:
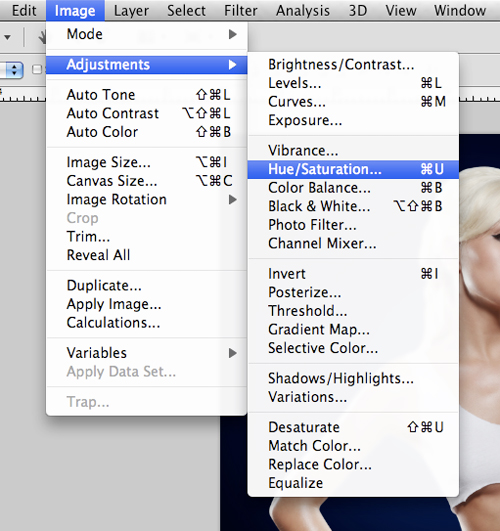
Move the Saturation slider down to about -22 and press the Enter Key to slightly desaturate the layer. Once you have done that, press Command+J to duplicate this layer and turn off the visibility of the original so that we can again work from a copy of this layer.
Step 7
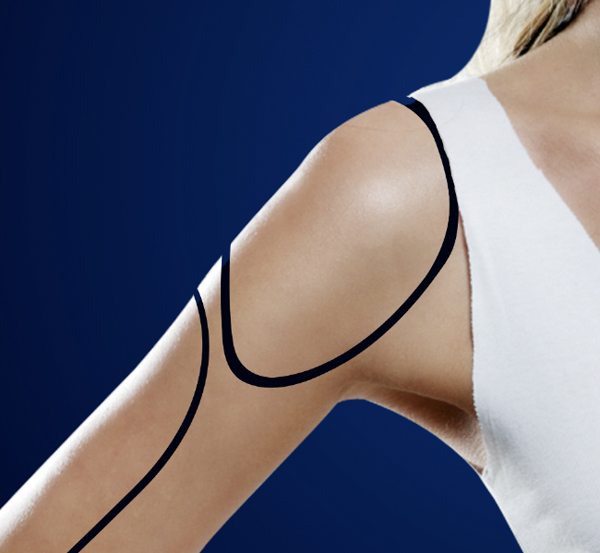
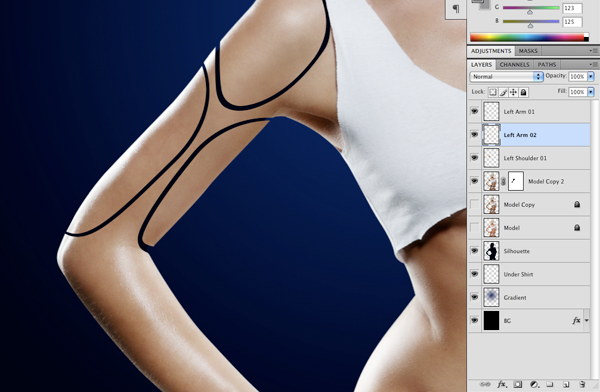
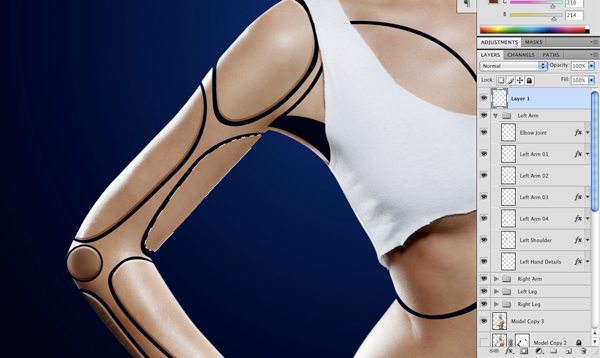
Zoom in a bit to view the arm of the model and using your Pen Tool, create a selection that you want to be your first piece. Hold the Control Key and click on part of the path and choose Make Selection as we had done earlier. You should now have an active selection showing you the area of the arm that is selected.
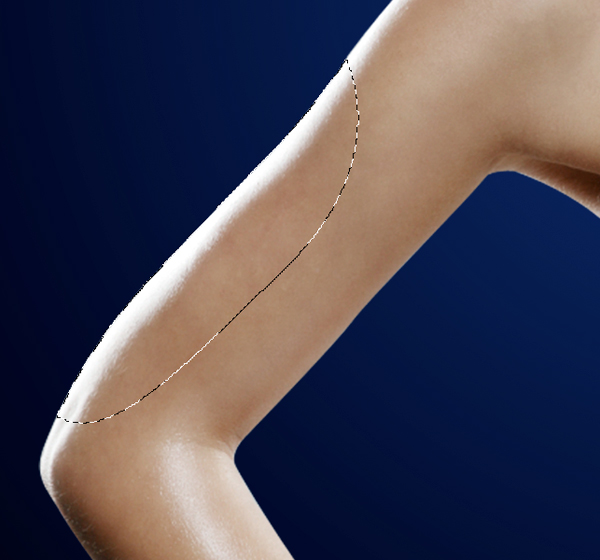
With the selection still active, click on your model layer and press Command+J to duplicate this selection onto a new layer just above the model layer.
Once you have done that, hold the Command Key and select the piece of the arm that is on a new layer to activate the selection. With this selection still active, switch back to your model layer and press the Delete Key to erase this portion of the models arm. We now have a copy of it just above this layer so we no longer want to see what is underneath.
Again switching back to the piece of the arm, with your selection still active, go to Select>Modify>Contract and contract the selection by about 6-8 pixels and press the Enter Key to apply the change. Right after doing this, go to the Select Menu and choose Inverse before hitting the Delete Key once again, to remove a selection from the piece of the arm.
As the last part of this step, nudge the arm piece over to the left slightly so that you can see a visible gap along the edges of the selection.

Once we begin to build up more of these pieces the layers can get to be a bit confusing. For this reason, you may want to name all of the subsequent layers as you go along just to remind yourself of what is on each one.
Step 8
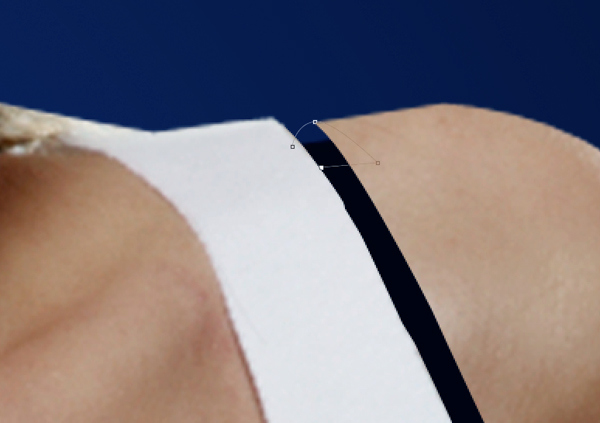
Next, zoom into the image around the left shoulder area. With the Pen Tool selected, begin to trace a curved form that will soon become our second piece.
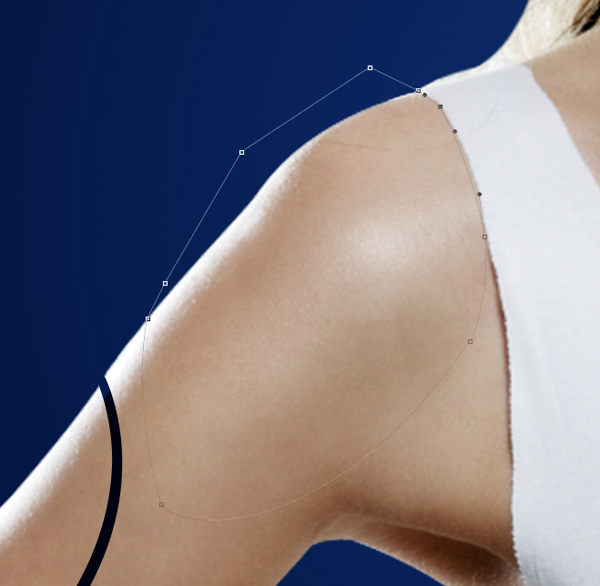
Once you have traced a path around the area, hold the Control Key and click anywhere along the path and you will again see the following menu:
Simply press OK to accept the changes and then Command+J to duplicate this selction onto a new layer. Delete this area from the model layer. You may also choose to use a mask on this layer so as not to permanently erase it if you arent sure, but we also have the original, desaturated model layer below it so we can also copy a selection from here and paste it into our working copy if we need to.
Next, switch back to your shoulder selection and go to Select>Modify>Contract and contract the selection by 6 pixels before pressing OK to apply. Before deleting this area, remember to first go to Select>Inverse.
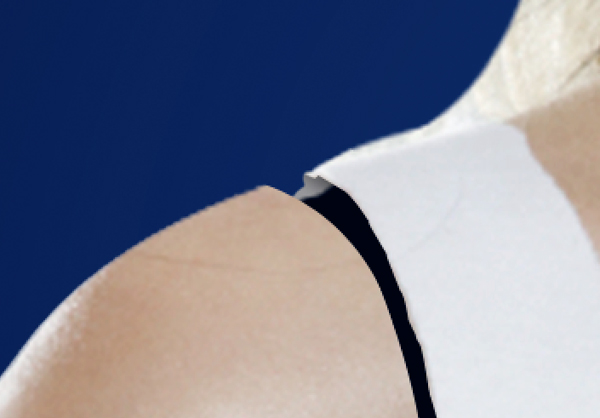
If you have some rough edges and need to smooth out the arm or the body where the separation has occurred, use the Pen Tool to create a new selection that will help to smooth it out. After doing this a bit I now have the following result:
I have left the edge along the shirt a little bit rough and jagged as well to help give it a more shirt-like appearance. I have also named this layer Left Shoulder 01 so I know what it is, but that is up to you if you choose to name the layer.
Step 9
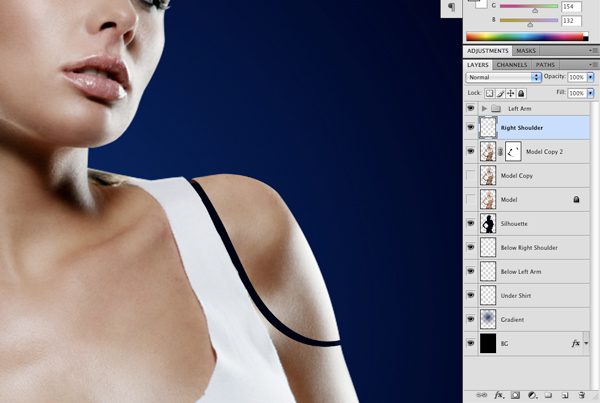
When we look at our image, near the shoulder where we have made a selection on a different layer, you will see that the shirt looks a bit awkward just being cut off like that, so we want to create a new layer underneath the black silhouetted layer that we created earlier. Once we are on that new layer, sample a color from the shirt and make it slightly darker, but a subtle difference will prove to be more convincing. Rough in an area where the back of the shirt continues using the Brush Tool. Create another new layer and make another pass with an even darker shade, but lighten the opacity of your brush to about 40% just by pressing the number 4 on your keyboard while your Brush Tool is active.
Now that we have patched that up and have made a few selections we can begin to see where this is going. We will continue to make these selections, and in some instances we may need to paint underneath as we have done with the shirt in order to create a more convincing image.
Step 10
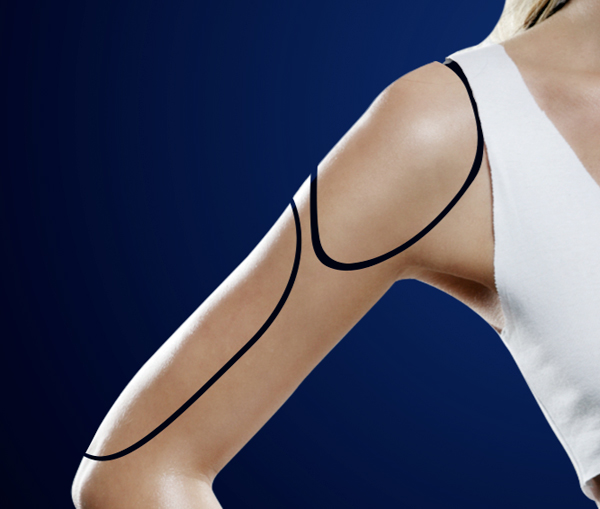
We are going to begin to repeat the last few steps in order to complete the rest of the left arm. Here I am making a selection for the other half of her upper arm, which I am then smoothing out along the edges. Continue to keep track of your layers as good practice.
Step 11
Create a new layer at the top of your Layers Palette and using the Ellipse Tool (M) create a circle on the elbow joint and fill it with a solid color (#573B2B) and fill it using the Paint Bucket Tool (G).
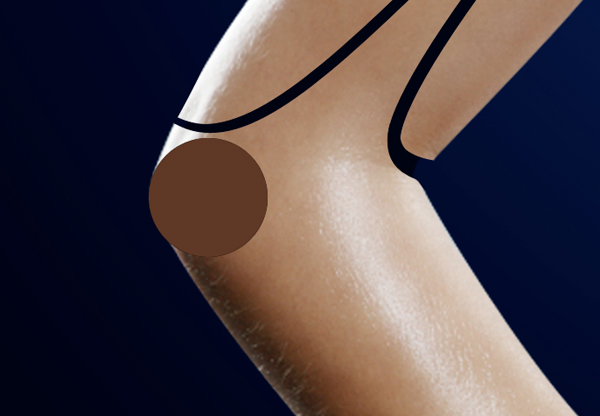
Next, either mask or delete this area from the model layer and then with the selection still active, switch to the circle shape layer and contract the selection by 6-8 pixels before inversing and deleting.

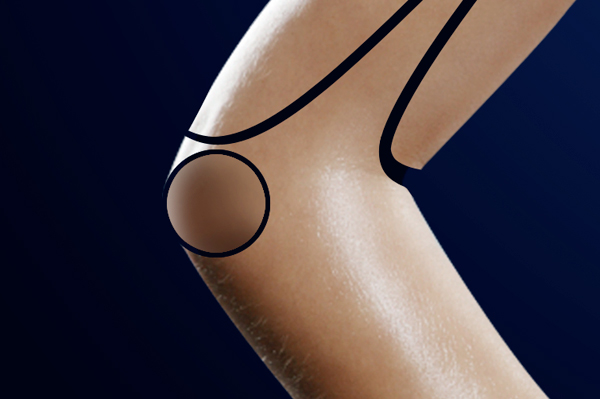
Now create another new layer just above the circle shape and switch over to your Brush Tool (B) where you will want to have your settings looking something like the image below:

Using this brush, begin to sample colors from the arm by hitting the Alt Key while using your brush. The light opacity will help blend the colors, but make sure that you try to emulate the direction of the light as best as you can. You will want to add a bit of a highlight around the edges and blend them all together by using low opacities.
Step 12
Continue to use the Pen Tool to make selections and remove pieces of the image so that you can see the space in between the plates and the body.
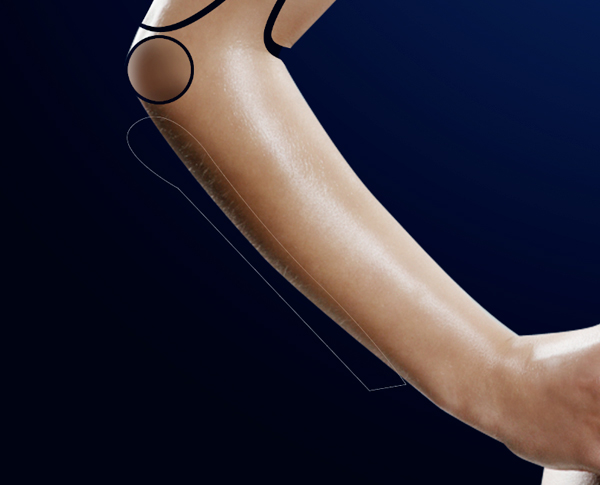
Once you begin to get used to the repetition of the steps it becomes easier and you can gradually build up the rest of the arm.
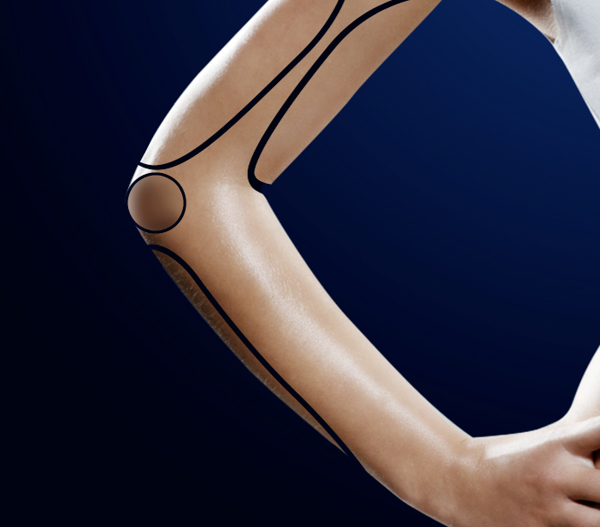
Im going to repeat this process again to make one more plate on the inside of the left forearm before moving on to the hand.
Step 13
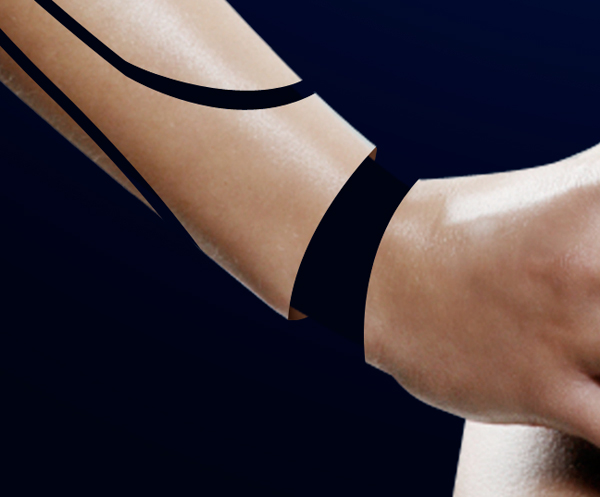
Using your Pen Tool, make a curved path that follows the arm right above the wrist of the model and delete or mask this area out.
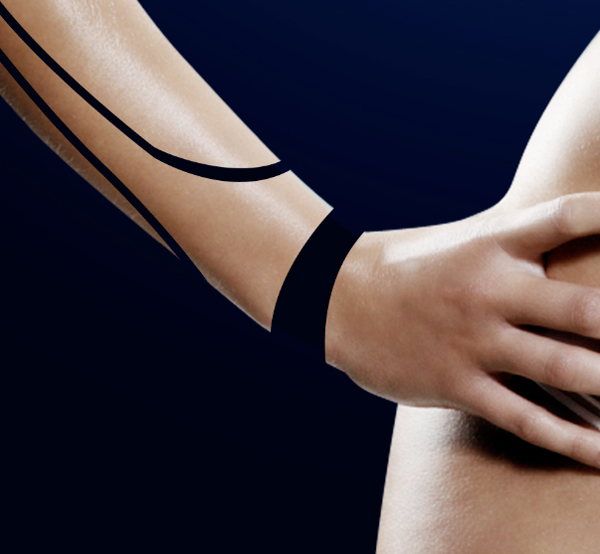
Create a new layer and drag it down below the silhouette layer and create an oval type of shape near the wrist, where you can imagine the shape kind of wrapping around.
Once you make this selection active by selecting the path while holding the Control Key, you can again use the Brush Tool (B) at a low opacity to paint in this layer using colors sampled from the skin.
This technique will be used throughout the remainder of the tutorial as well, so you will be getting plenty of practice. As long as you continue to try and think of the plates and the body as a 3D form it will help you visualize where you need to paint. Perspective like this will help add to the realism of the product we are trying to create.
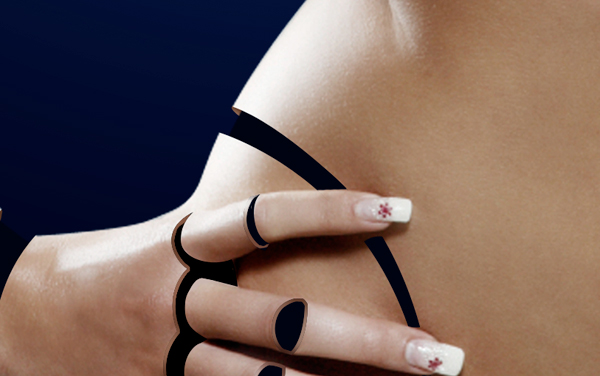
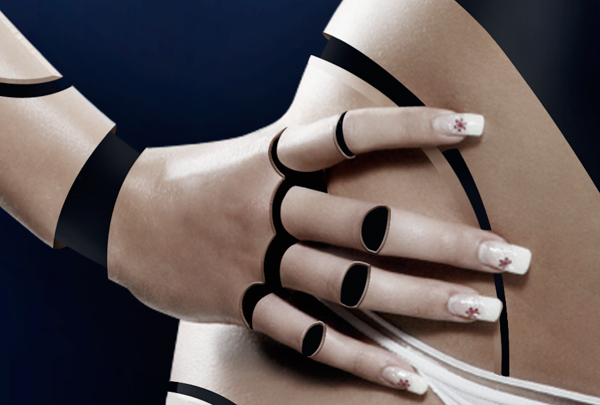
Step 14
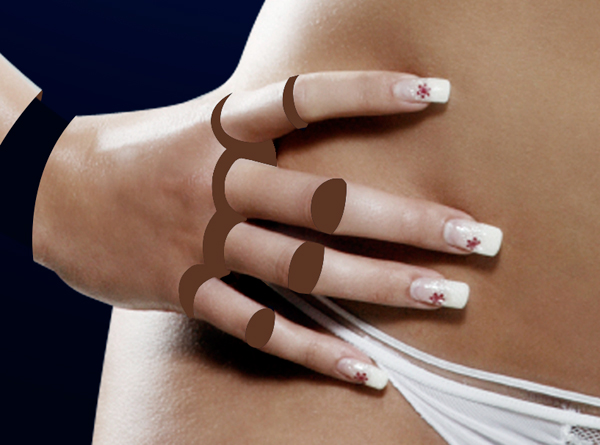
Next, we will focus on creating a selection around the knuckles and finger joints on the hand. To do this you will only need the Pen Tool (P). Trace on top of the image trying to follow the contours of the body:
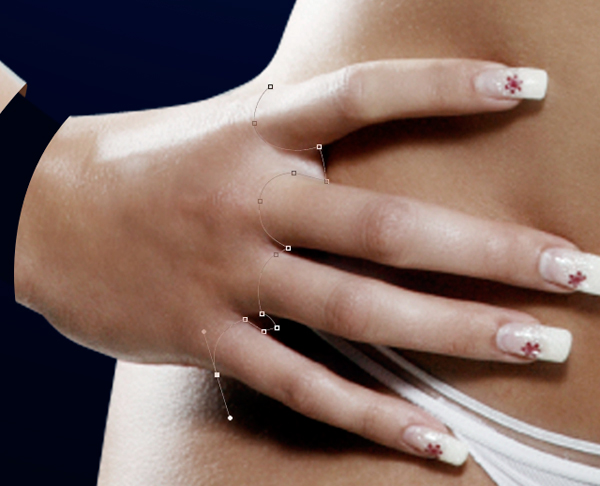
You will need to continue to do this for the rest of the knuckles, and then also make selections on each of the fingers.
Once you have made all of your selections you can mask them out from the model layer and you should now have something like this:
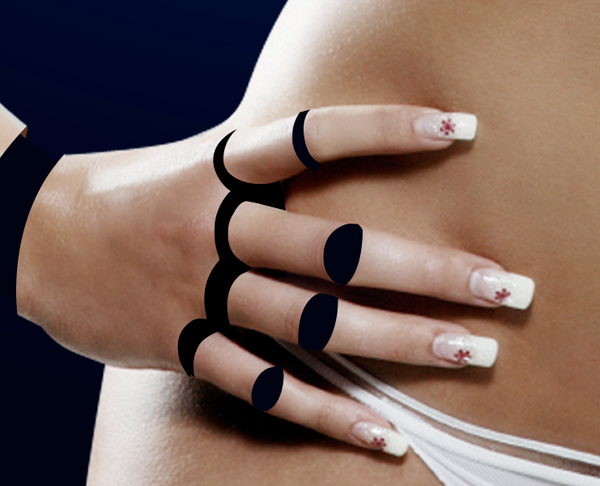
Step 15
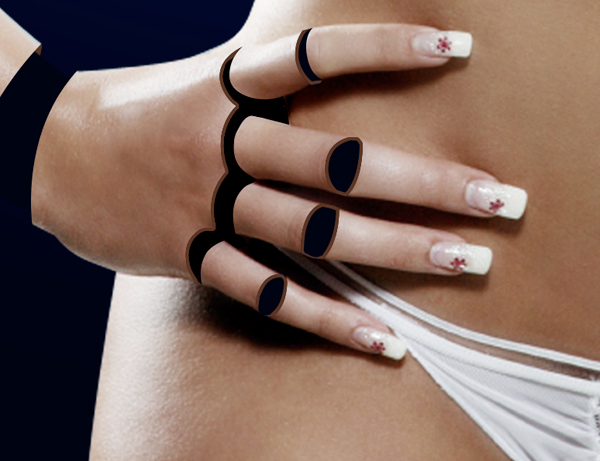
Using your Wand Tool (W) select the black areas of the knuckles and finger jointes from the previous step. Fill this area with a dark brown (#573B2B from earlier) on a new layer.
Next, with the selection still active, go to Select>Modify>Contract and contract the selection by about 4 pixels. Erase everything inside of this selection and then deselect everything by pressing Command+D.
After doing this you will need to zoom in and erase certain areas of the dark brown to keep things in correct perspective. Notice along the right side of the knuckles I have gotten rid of the brown:
On another new layer above the brown fill layer we are going to paint inside of this selection to make it blend more with the areas around it. To do this, hold the Command Key and then on your new layer, use a small, soft round brush at a low opacity (20-30%) and begin to sample colors from surrounding parts of the hand and brush them into the selection so they appear smooth and gradual.

After you are satisfied with the result you can save your work and prepare to move onto the next section of the body. Taking another look at it, this is what we have so far for the arm:
I think this is looking pretty nice so far so we are going to next focus on the other arm. Before we get there, however, I am just going to select all of my layers that are associated with the left arm by selecting them while holding down the Command Key and then pressing Command+G to place them all into a Grouped Folder and naming it Left Arm or another name of your choosing.
Step 16
Now we can begin to repeat this same process on the other arm. Starting with the shoulder piece, zoom in and follow the natural shape of the form with the Pen Tool (P) to create a path.
Press Command+J to duplicate your selection onto a new layer and mask this selection out of the model layer below. With the selection still active, make sure you are on the new shoulder piece layer and go to Select>Modify>Contract and contract the selection by 6 pixels before applying the change. Next, go to Select>Inverse and delete the area to create the gap. You will have to nudge the piece over and up a bit so that it falls in line with the rest of the outline of the body.
Next, on a new layer below the black silhouette layer, use your Pen Tool to create a curved path to make it look as though the shoulder piece is wrapping around the back of the model.
Hold the Control Key and click along the path to activate your selection before painting it with a soft round brush with the dark brown color (#573B2B). Create another new layer above this layer and set the Blending Mode to Multiply and use the same color to brush in some shadow. Once you have done that, press Command+E to merge the two layers together.
Step 17
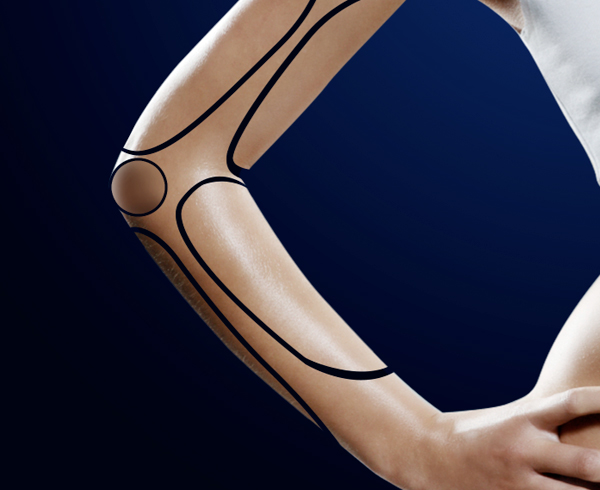
With the Pen Tool (P) selected, zoom in and make two paths that kind of arc around the bicep of the right arm (technically its HER left, but for us its the right arm) as shown here:
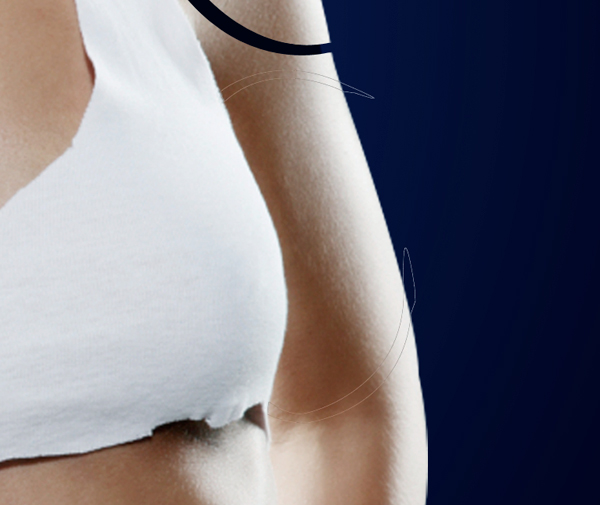
Hold the Control Key and click along the Path before choosing Make Selection and hitting OK. Next, mask out this area on the model layer.

Do the same thing for the forearm, tracing an area that we are going to cut out from the model layer.
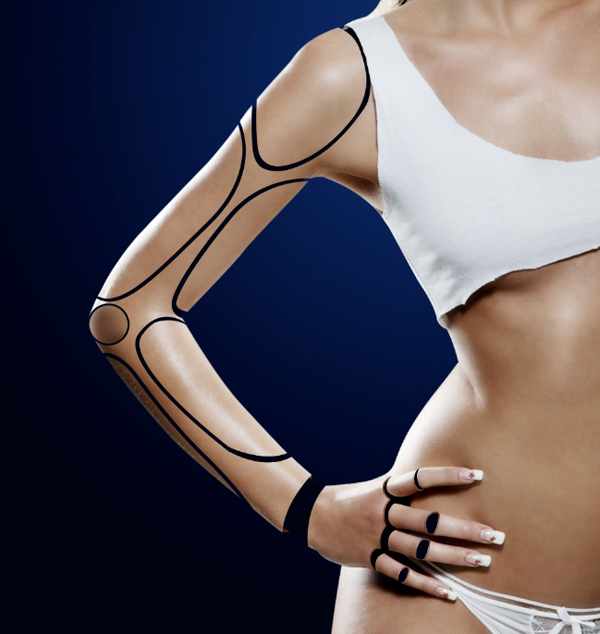
Once you have done that, mask the area out and now we have almost completed both of the arms!
Step 18
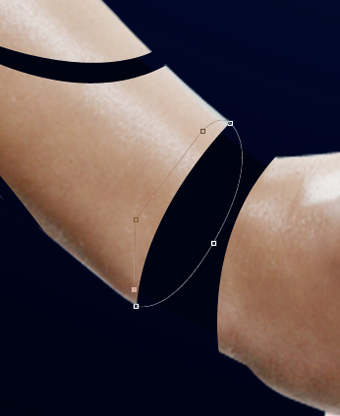
Make another selection using the Pen Tool to remove parts of the model (or mask it out) by following the curvature of the wrist and knuckles of the hand as we did earlier on the opposite side.
Once you have done that, make another path just along the inside of this selection as shown below:
We are going to hold the Control Key and select along the path to make the selection before filling it with our dark brown color (#573B2B) and filling the inner selection with the Paint Bucket Tool (G).
Create a new layer just above this with the selection still active, and using a soft round brush, sample colors from the surrounding areas of the hand and wrist to paint into the selection. Once you have a nice blended color going you can press Command+E to merge the two layers together.
Step 19
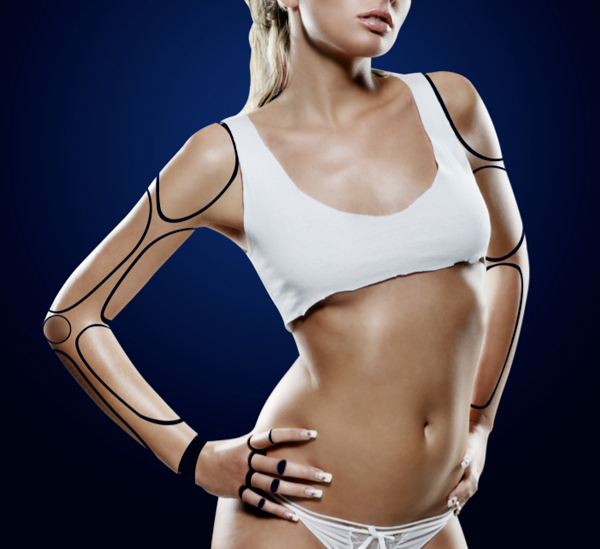
Just as we made our selections and isolated pieces of the arms, we are going to use the Pen Tool (P) to make additional selections on both of the legs.
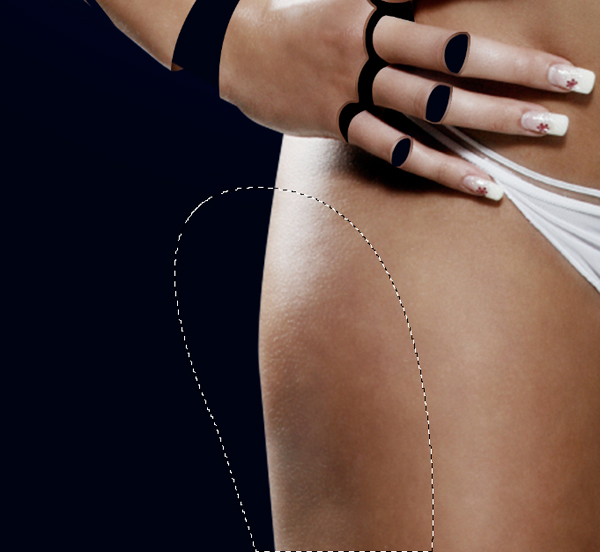
Duplicate the selection onto a new layer of its own (Command+J) and mask this out of the model layer. Then contract the selection by 6 pixels and inverse the selection before deleting the area.
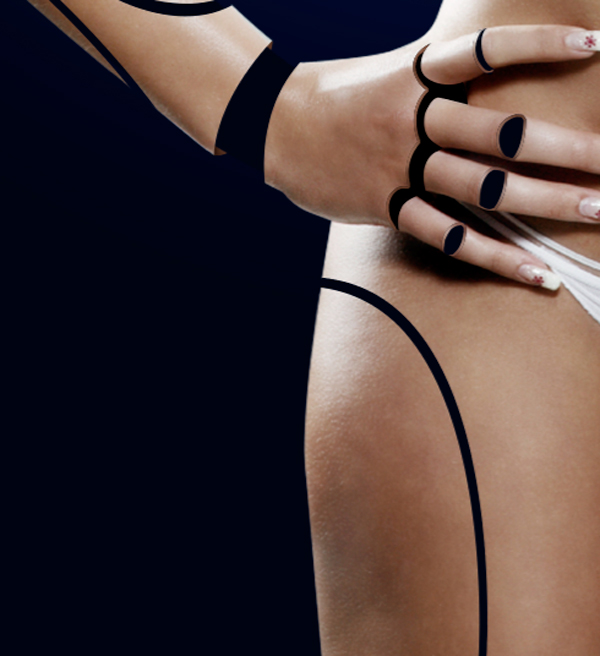
After doing the same thing on the opposite leg you should now have something like this:
Step 20
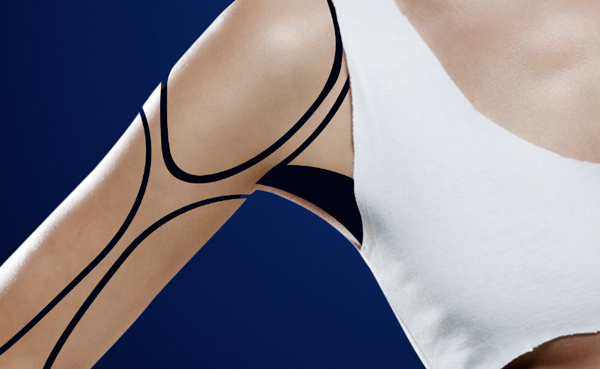
So far we have focused mainly on the extremities of our model so as we continue to make our way in we want to take care of one more order of business. Zoom in and mask out a selection in the underarm area so that it looks like there is an opening between the arm and chest as shown below:
Step 21
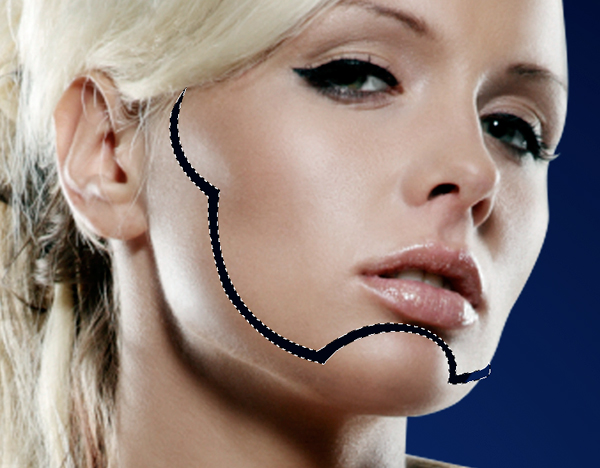
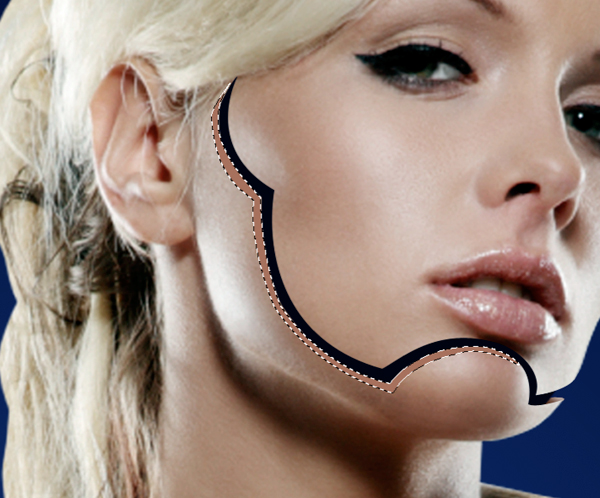
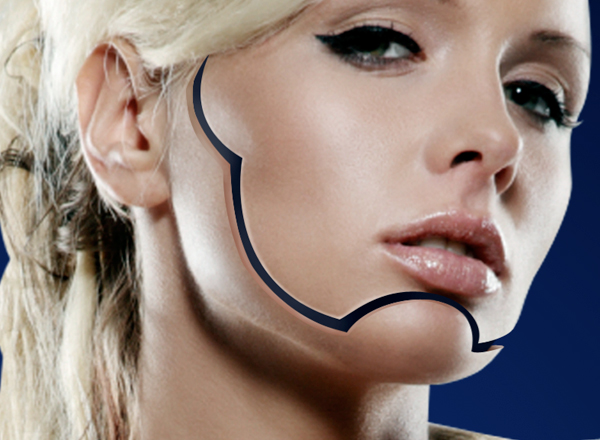
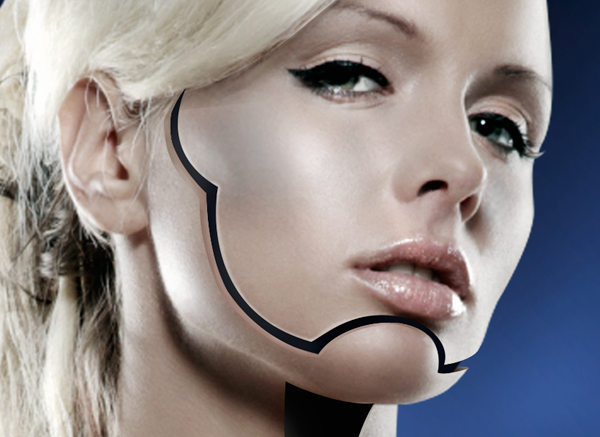
Next, we are going to make a selection on the face of our model by following the cheek bone down and curving around the chin where it will curve up slightly and then wrap around the rest of the face.
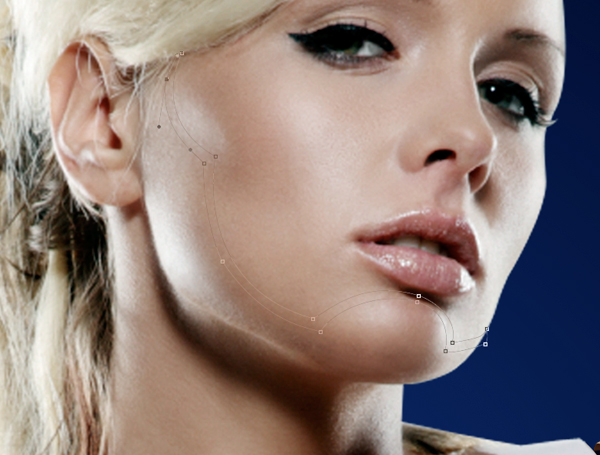
Mask this layer out on the model layer by brushing into the mask with a solid black brush.
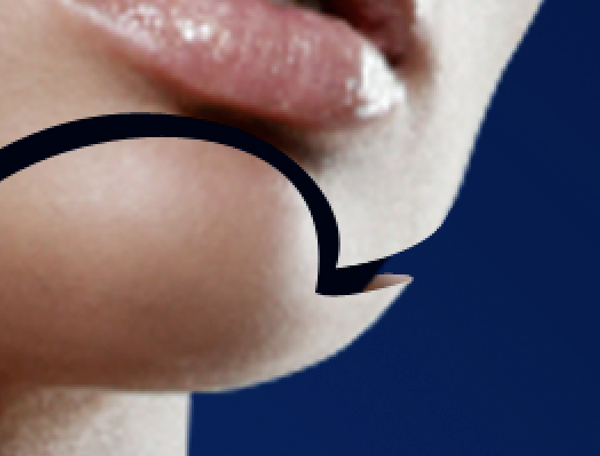
On a new layer below the black silhouette layer, create another path with the Pen Tool to continue the area of the face, below the chin where the faceplate would wrap around.
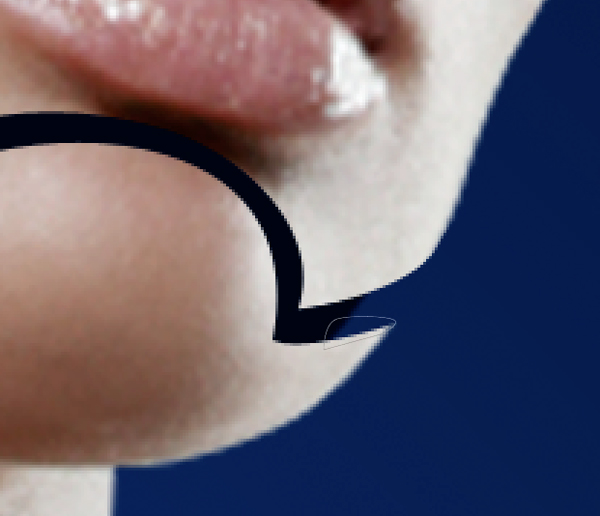
After activating the selection, fill the area with a dark skin tone and then use a soft round brush at a low opacity to brush some additional colors into the area.
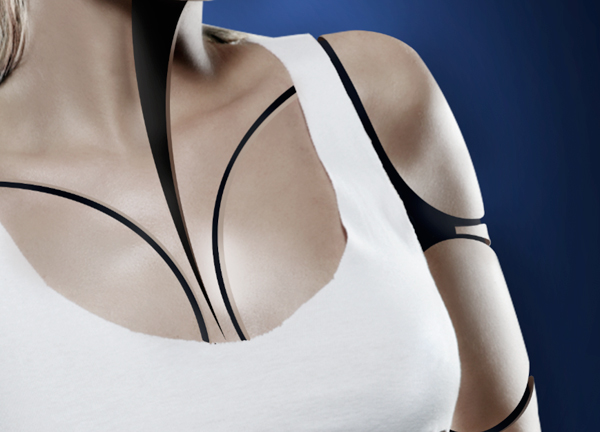
Step 22
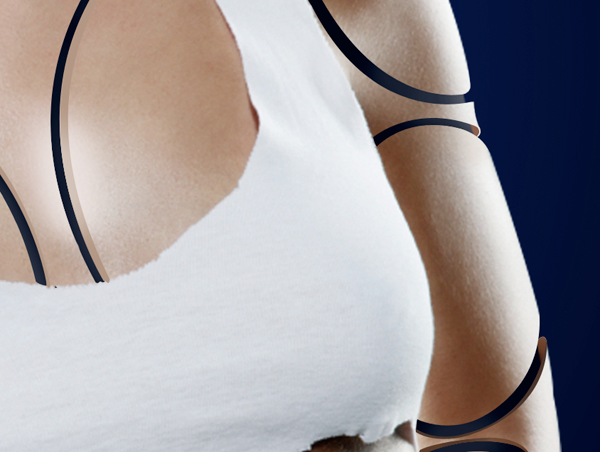
From here, we will work our way down to work on the chest and torso. Create two separate paths that swoop around the chest, curving outwards to meet the collarbones on both sides of the chest.
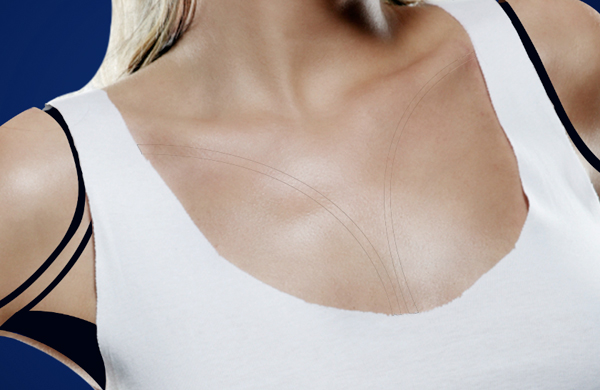
Hold the Control Key once again and click along the path and select Make Selection to activate the selectable area. Once you have done that you will need to brush into the mask layer of the model in order to remove this portion of the model.
Step 23
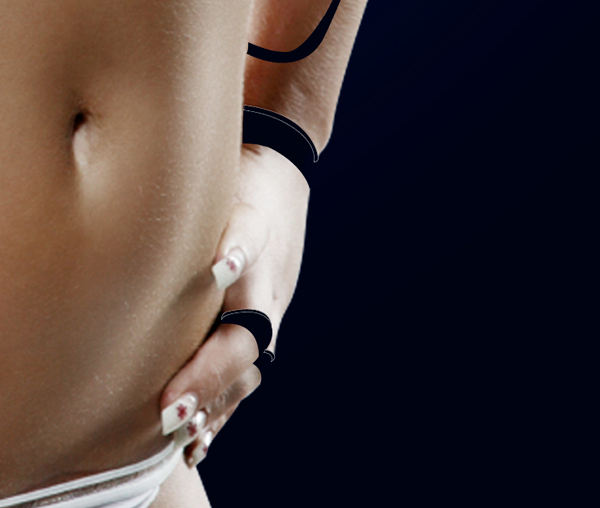
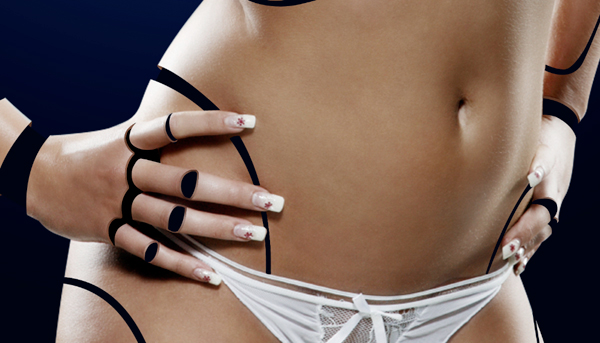
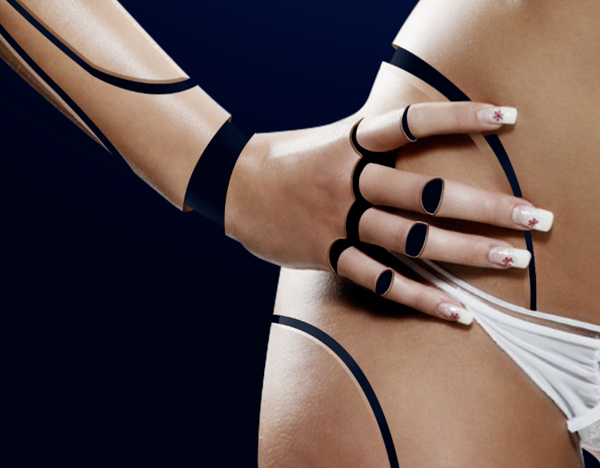
We will continue this process to create paths that follow the contours of the rib cage as well as the hip area.

Create another layer underneath the silhouette layer and create a curved path to show a portion of the hip wrapping around. Fill this in with a dark skin tone color and brush in some lighter tones with a soft round brush at a low opacity.
Work your way over to the other side to mask out a selection on the other side of the hip, just hinting at some symmetry.
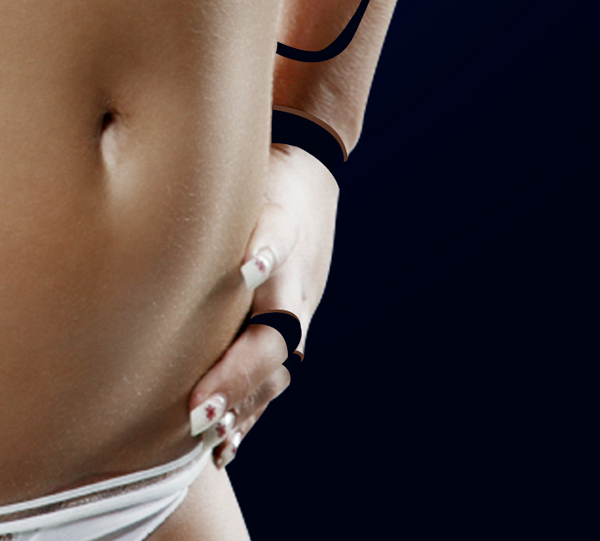
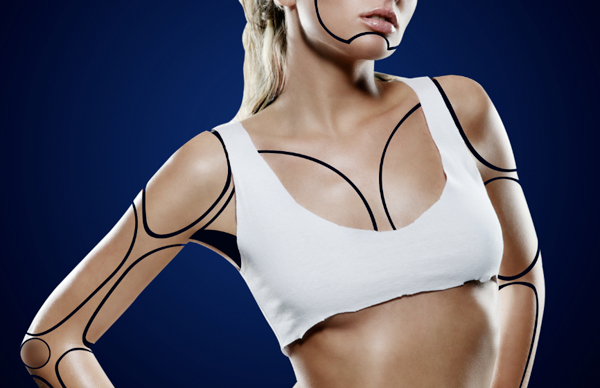
Step 24
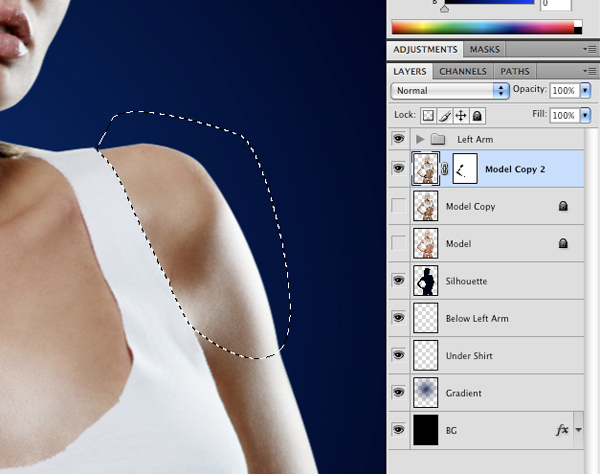
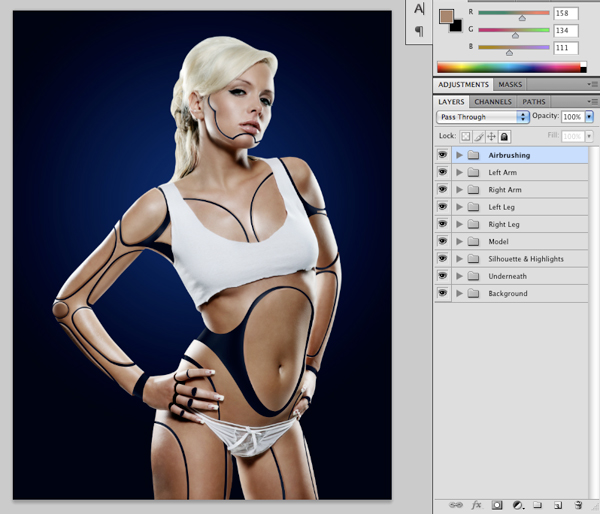
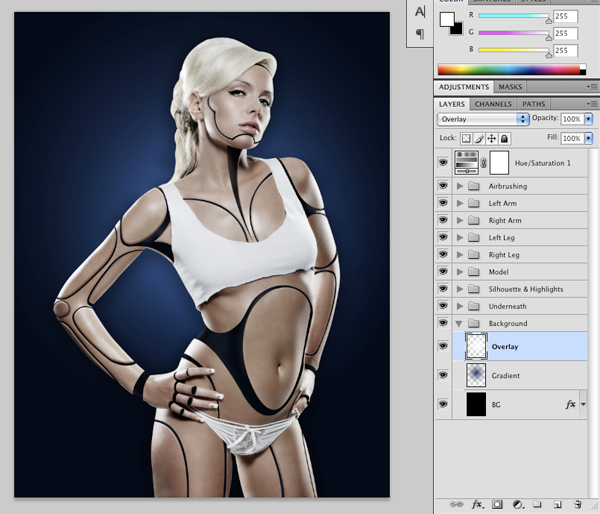
At this point we have finished separating the remaining areas of the body the legs, the face, and the torso of our model. Before moving on to the next step take a moment to save your work. This is what I have so far, hopefully you have something similar if you have been working along with the tutorial:
Duplicate your model layer by pressing Command+J and apply the Layer Mask if you have been using a mask to remove certain sections as weve been working along. Turn off the visibility of the layer just below this newly duplicated layer. We just want to preserve the mask on the layer beneath and will now be working from the copy of this layer.
Step 25
Going back to the left arm, open the folder containing all of the layers for this part of the image and double click on one of them to open up the Layer Styles Palette. Check off Bevel & Emboss and apply the following settings:
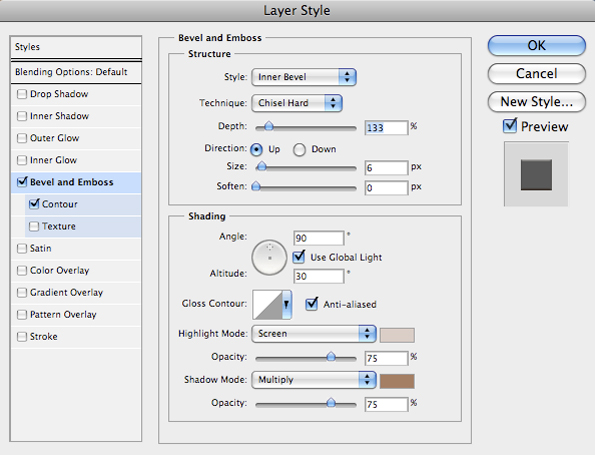
For the Screen color I am using #D6CDC6 and for the Multiply color select #9A7E65. Both of these colors are shades I have selected from the image. Before closing, also make sure that the Contour box is checked in the Layer Styles Palette and apply the changes. You should now have something like the image below:

Adding this emboss effect will help to give some of these pieces additional depth and show that they are overlapping. Details like this go a long way so it is important to try and keep that in mind as we move forward.
Step 26
Hold the Control Key and click on the layer we have just applied our style to and you should see a dropdown menu where you will have the option to Copy Layer Style which is exactly what we want.
Once you have copied the style, hold the Command Key and select the following layers:
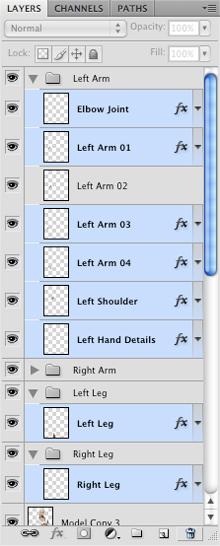
After these layers have been selected and are highlighted, hold the Control Key once again and click on one of the layers before choosing Paste Layer Style from the menu. You should now see the same Bevel & Emboss Layer Style applied to each of the layers.
This really helps some of these segments pop out from the image, but the reason I havent done it to all of them is because we are going to use a different method to achieve this effect on the other areas of our design.
Step 27
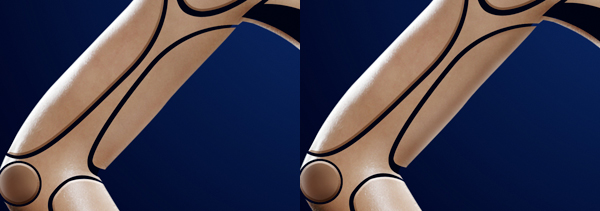
Next, hold the Command Key and click on the thumbnail icon of the layer containing the inner left arm plate as shown here:
Create a new layer and then swicth over to your Brush Tool (B) and use a soft round brush set to around 20% opacity. Hold the Alt Key and sample a lighter skin tone from the outside of the arm and begin to brush just outside of the selection on the inner part of the arm plate. The image below shows the before and after where you can see how this technique helps add some depth and realism.
Step 28
Using your Pen Tool (P) create a selection that encompasses part of the edge of the arm plate that we worked on in the previous step:

Once the path has been closed, activate the selection and brush inside of the area with a slightly darker color than the rest of the arm plate. Here I am using #71553F.
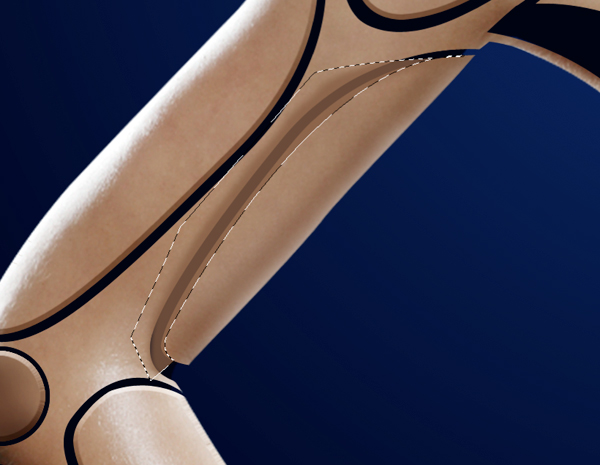
After you brush inside of this area, you will again need to hold the Command Key and select the thumbnail on the layer containing this arm plate in order to activate the selection. Once you have done that, make sure that you have the new painted color layer selected, and click on the mask icon at the bottom of the Layers Palette as indicated in the image here:
Step 29
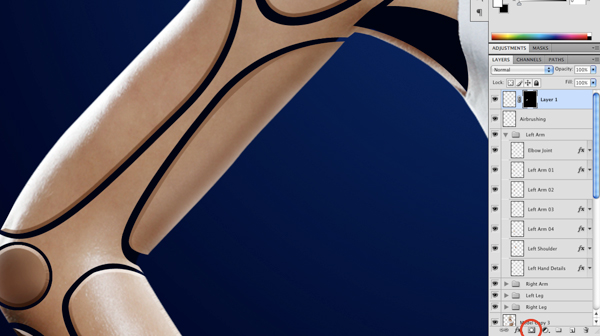
Next, create a new layer just above the black silhouette layer that we created early on in the tutorial. Make sure that you have your new layer highlighted in your Layers Palette and while holding the Command Key, click on the small thumbnail icon on the layer beneath it, which is the silhouette layer. This will activate the selection around the layer and you can now paint around the edges with a soft white brush at a low opacity in order to create highlights underneath the plates of the body.
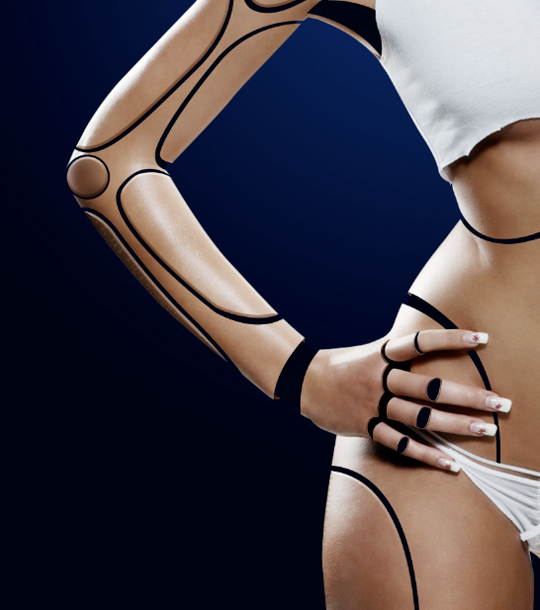
I do this, while also repeating the previous step where we make selections with the Pen Tool (P) while following the shapes of the body plates and after closing the shape, continue to use a soft brush with various colors to paint the edges. This is also the same technique you use to apply highlights as shown in the close-ups below:

You can see how doing this begins to add some real depth to the image and all of these details start to build. You can spend as much or as little time on this part as you want to the idea is to have fun! So think of this sort of like one of those action figures from back in the day where you could literally see all of the joints and parts that come together to create this being. Trying to visualize this will give you a good sense of where the highlights will go.
Step 30
Now its time to finish working on the details of the face so zoom into the image and using your Pen Tool, make a selection around the bottom part of the separation along the face. Close the shape and activate the selection by clicking the path while holding the Control Key. Once the selection is active, fill it with a sold color, preferably one sampled from the image.
While the selection is still active, create a new layer above this one and use a light opacity, soft round brush and begin to apply some additional colors into the area sampled from the face.
Step 31
After taking some time to mask out a few additional areas around the rib cage and underarms, we can then paint in some highlights just above the silhouette layer.
You can continue to place some extra separations coming down the legs by again using the Pen Tool (P) and shading it in with color as we have done throughout the tutorial.
Just for good measure, I have also placed all of the layers into folders. This will help in case we need to go back and find something without scrolling and scrolling up and down the Layers Palette.
Step 32
With the top layer selected, choose the Adjustment Layer icon from the bottom of the Layers Palette and choose Hue/Saturation.
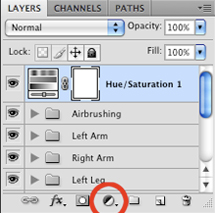
Once the dialog box appears, set the sliders to the settings shown below:
Hue: 0
Saturation: -36
Lightness: +4
By doing this we are taking some of the vibrancy out of the image and it will help to make the model look less human.
Step 33
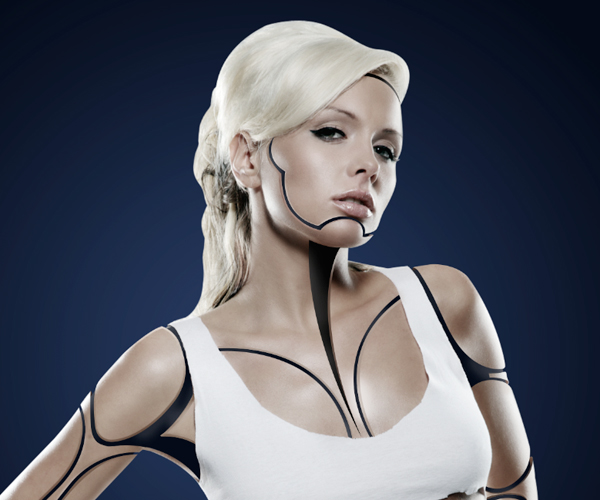
At this point it is good to just add a bit more detail using the Pen Tool (P) to make selections and add some depth to the face and neck area. I have added a tapering selection just below the hairline of the face as well as on the neck area as shown below:
Step 34
Next, double click on the model layer to bring up the Layer Styles and apply a Drop Shadow effect with the following settings applied:
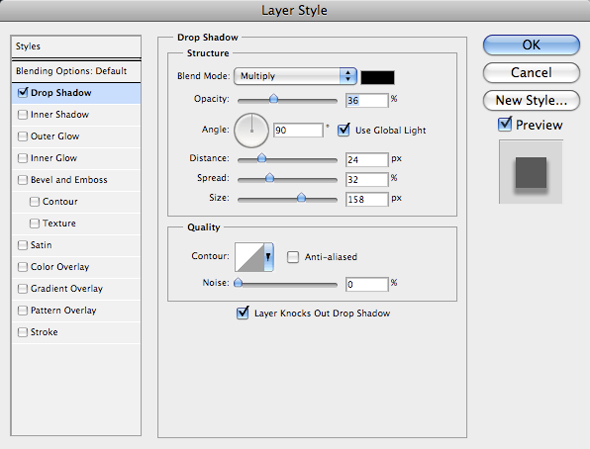
Step 35
After desaturating the image we need to add a bit more contrast to the background. To do this, create a new layer above the blue gradient that we made early on in the tutorial. Using your Gradient Tool (G) select a Radial Gradient that fades from solid white to transparent and click and drag outwards to make the gradient. Once you have done that, position it behind the model and change the Blending Mode to Overlay.
Step 36
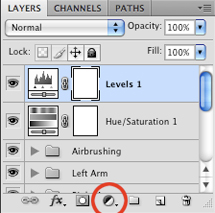
To boost the overall contrast of the whole image and as one last detail we will add a Levels Adjustment Layer by clicking on the icon at the bottom of the Layers Palette and choosing Levels from the menu that appears.
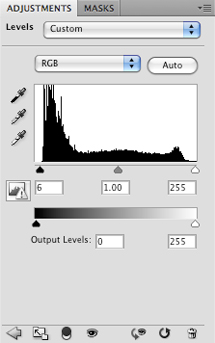
Bring the left slider in slightly so its set to about 6 as shown here:
Step 37
Once you have applied the Levels Adjustment at or close to the setting shown in the image, create one additional new layer, just above the background layers (both the blue gradient and the Overlay we created earlier). On this new layer, select your Marquee Tool (M) and make a tall, fairly narrow rectangular selection as shown here:
Use your Gradient Tool (G) set to a Linear Gradient that fades from solid white to transparent and click and drag a straight line from left to right inside of your selection:

This is what the image looks like after applying the Linear Gradient in the background:
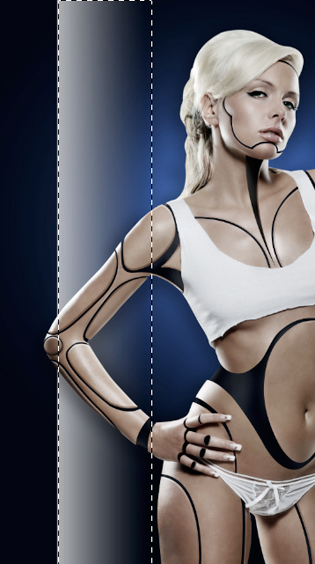
Once you have done that, change the Blending Mode of this layer to Overlay.
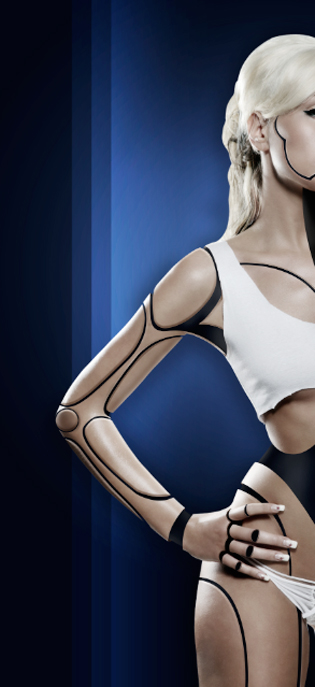
Step 38
After changing the Blending Mode to Overlay, duplicate this layer by pressing Command+J and nudge the duplicated layer over to the left of the previous one. Do this one more time so that you have two copies plus the original, all side by side as shown in the image below:
Step 39
Lastly, just go over the image and check to see that everything is looking good. To enhance the highlights and shadows you can use the Dodge and Burn Tool (O) at a low opacity setting or paint in some highlights on a new layer with a low opacity brush until everything looks smooth. The idea here is to just brush inside of the selections and smooth over most of the texture of the skin to make it appear less human and more like plastic.
Step 40
Once you have applied these last changes, you can now sit back and enjoy the final result (after saving your work of course.) If you have made it this far than not only have you finished making an awesome cyborg, but you will have plenty of practice with the Pen Tool along with various other techniques that can be used in your own projects. Happy Photoshopping!
And Were Done!
You can view the final outcome below. I hope that you enjoyed this tutorial and would love to hear your feedback on the techniques and outcome.
VIP Download
Download the original .psd file for this tutorial here:
DOWNLOAD .PSD FILE

Get more of our great design content direct to your inbox
Join our newsletter and receive our best weekly content by email. Also get access to hundreds of free design resources via your Designer Toolkit area.
About the Author:
Eric is a Graphic Designer, specializing in Print and Web Design. He's a graduate of the New England Institute of Art in Boston and has over 4 years of professional and freelance work experience. He lives in Brooklyn, New York working as a Graphic Designer and he has been featured in Advanced Photoshop Magazine, The Art of Fashion Art Exhibit and Artists In The Station Art Exhibit. Visit Eric's portfolio at ericvasquez.net.
Related Posts
Free FanExtra Tutorial: Create A Human/Robot Hybrid In ...
Free Sample FanExtra Tutorial: Create A Human/Robot Hybrid In Photoshop. Today we are going to create a detailed composition of a human/robot hybrid.
Free FanExtra Tutorial: Create A Human/Robot Hybrid In ...
Free Sample FanExtra Tutorial: Create A Human/Robot Hybrid In Photoshop. Today we are going to create a detailed composition of a human/robot hybrid. To make this
Free FanExtra Tutorial: Create A Human/Robot Hybrid In ...
Free Sample FanExtra Tutorial: PSD.FanExtra is actually part of our wider network of tutorial websites, FanExtra, which includes a popular members area.
Members Area Tutorial: Create A Human/Robot Hybrid In ...
Members Area Tutorial: Create A Human/Robot Hybrid In Photoshop Final Image. The result of this tutorial is shown below: What You Will Learn. This tutorial is very in
Robot Body Photoshop - Mobile Resources
Free FanExtra Tutorial: Create A Human/Robot Hybrid In Learn how to create a fantastically detailed cyborg being. You will not only create the cyborg body
Photo Manipulation Tutorials: 50+ Wickedly Creative Tips ...
Free FanExtra Tutorial: Create A Human/Robot Hybrid In Photoshop. Free FanExtra Tutorial: Create A Human/Robot Hybrid In Create a Water Girl Photo Manipulation
Adobe Photoshop Tutorials: Collection of Amazing Tips And ...
Tutorials For Photoshop: 50+ Free Online Tips . Free FanExtra Tutorial: Create A Human/Robot Hybrid In Photoshop. Free FanExtra Tutorial: Create A Human/Robot
Tutorial Robot Line Tracer - Best HP Laptop 2014
Free fanextra tutorial: create a human/robot hybrid in, Free sample fanextra tutorial: psd.fanextra is actually part of our wider network 2014 Free Laptops For
Free FanExtra Tutorial: Create A Human/Robot Hybrid In ...
Join for free Log in
Human Psd | PSD File
Free fanextra tutorial: create human/robot hybrid , Free sample fanextra tutorial: psd.fanextra is actually part of our wider network of tutorial websites,
Travelling is my life
ConversionConversion EmoticonEmoticon