This technique is written for Photoshop CS6, but can easily be accomplished in prior versions.
Zooming the lens during a long exposure produces an effect with beams of light and color rushing dramatically toward the subject. In todays tutorial, Ill show you how to produce this effect in Photoshop using an image captured without long-exposure trickery.
In case youre also interested in the in-camera approach, heres a brief description. To capture a long-exposure slap zoom, first mount a zoom lens, such as a 70 200 mm. Place the camera on a tripod and frame the scene. Set the camera to Aperture Priority mode and reduce the size of the aperture until the shutter speed slows to between 1 and 8 seconds. If there is too much light, you may need to mount a polarizer or a neutral density filter to reduce the intensity. Now practice zooming the lens to ensure that both ends of the zoom produce a good composition. When youre ready, begin the zoom and then open the shutter. Zoom throughout the entire exposure duration. To produce a slightly different effect, try opening the shutter before beginning the zoom.
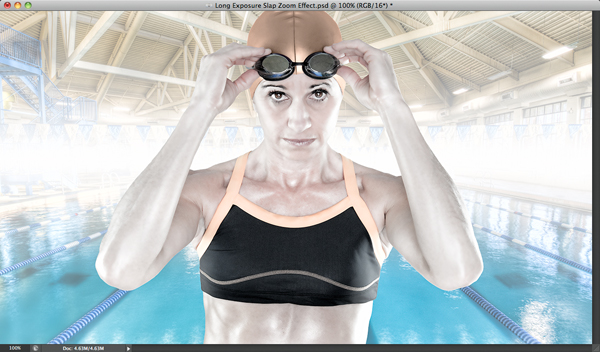
Step 1: Open an Image with a Dominant Central Subject
Open a flattened image with a dominant central subject surrounded by areas of detail and color.
Step 2: Convert the Background to a Smart Object
Choose Filter>Convert for Smart Filters to transform the Background layer into a smart object.
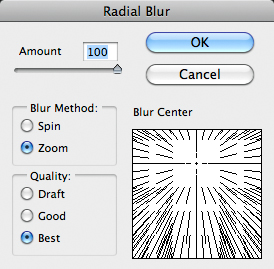
Step 3: Add a Radial Blur
Choose Filter>Blur>Radial Blur. Set the Blur Method to Zoom, crank the Amount to 100, and choose Draft as the Quality. Drag the bulls-eye in the Blur Center box until it is positioned where you imagine the most important part of the subject to exist (in this example, Im attempting to target the spot directly between the models eyes).
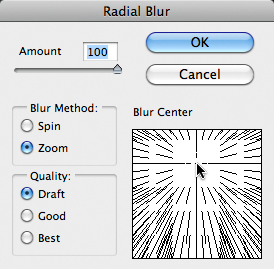
Press OK.
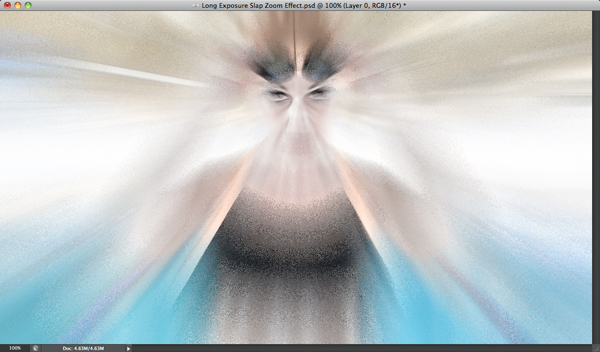
View this draft-quality version to determine if the blur amount and/or the zoom center require modification. Chances are they will, but even if they dont, pop over to the Layers panel and double-click the Radial Blur filter effect name to re-open the Radial Blur dialog.
If necessary, make changes to the blur amount and zoom center and then set the Quality to Best to render a high-quality rendition of the filter.
Press OK.

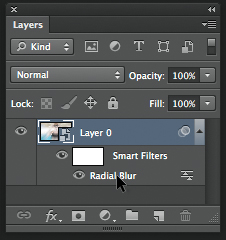
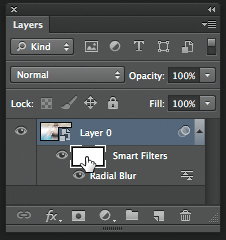
Step 4: Mask Away Parts of the Blur
The blur looks dramatic, but the most important part of the subject is too blurry. To reveal the eyes and surrounding regions, active the mask associated with Radial Blur Smart Filter.
Using a large, soft-edged black brush at 100% opacity and flow, click once in the center of the subjects face.

Now make the brush even larger and reduce the opacity to 50%. Dab once on the entire face to expand the region of focus.

Repeat the same process one more time using an even bigger brush and further reduced opacity. Paint over any remaining areas that may benefit from less blur. This is your opportunity to be creative with the process.

Step 5: If Desired, Reduce Blur Opacity Globally
Although this image looks fantastic as is, you may wish to reduce the opacity of the blur image wide. To accomplish this, choose Image>Adjustments>Levels. Drag the Output Levels Highlight slider inward.
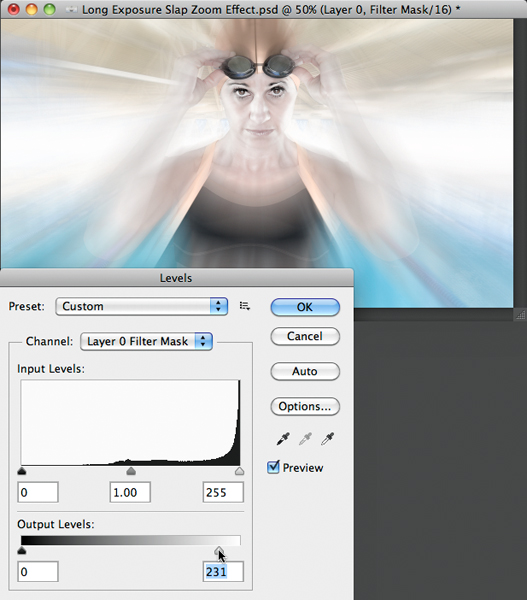
Press OK to commit the change.
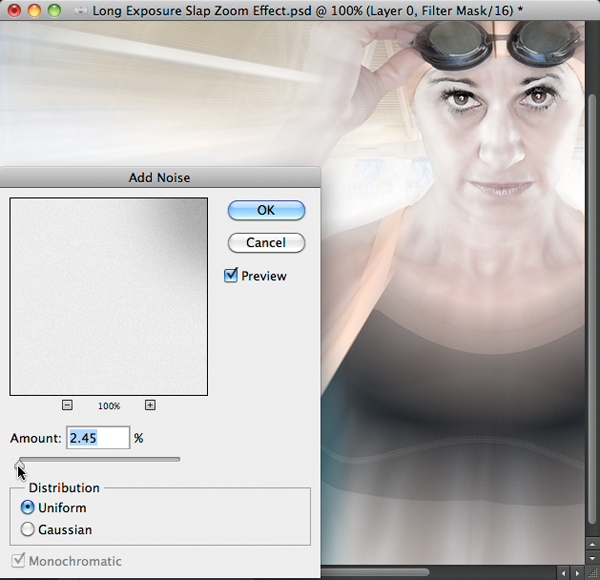
Step 6: Add a Little Noise
Since the Radial Blur filter wiped out all noise in the blurred areas, well restore just enough to complete the effect. Choose Filter>Noise>Add Noise. Set the Distribution to Uniform and check the Monochromatic box. Adjust the Amount until the noise in the blurry areas matches the noise in the sharp regions. In this example, it doesnt take much to bring the two into balance.
Press OK. Heres a look at the completed effect.

Mark S. Johnson Photography
msjphotography.com
Long Exposure Slap Zoom Effect | Planet Photoshop
This technique is written for Photoshop CS6, but can easily be accomplished in prior versions. Zooming the lens during a long exposure produces an effect with beams
Photoshop Workbench 304: Long Exposure Slap Zoom Effect ...
which opened the door for us to explore a method for reproducing the slap-zoom effect with Photoshop. To capture a long-exposure slap zoom, , slap
(PREVIEW) Photoshop Workbench 304: Long Exposure Slap Zoom Effect
Join MSJPhotography (http://www.msjphotography.com) for less than $30/year to access two of the most inspiring Photoshop and Lightroom edu
Long Exposure Slap Zoom Effect - RNELdotNET
Long Exposure Slap Zoom Effect in Photoshop Using Photoshop CS6, learn how to produces an effect with beams of light and color rushing dramatically toward the
(PREVIEW) Photoshop Workbench 304: Long Exposure Slap Zoom ...
(PREVIEW) Photoshop Workbench 304: Long Exposure Slap Zoom Effect Kyle's Ultimate Brush Set 2 Photoshop Workbench 304: Long Exposure Slap Zoom Effect
Zoom Effect - RNELdotNET
Zoom Effect in Photoshop. Simple but nice zoom effect. Read full article here . Similar tutorials . Long Exposure Slap Zoom Effect.
| Photoshop Tutorial
Create a Raw Horror Movie Poster Design in Photoshop; Aging a Young Woman; Sites We Love! Photoshop Roadmap; Photoshop Star; PSD Vault;
How To Fake The Long Exposure Effect In Photoshop
How To Fake The Long Exposure Effect In Photoshop. VIDEO of Minecraft Server Tips DETAILS. Video Title : Long exposure slap zoom effect | planet photoshop,
10 Sites to Find Free Graphic Design Courses Online
Planet Photoshop. Long Exposure Slap Zoom of subjects related to Photoshop. Long Exposure Slap Zoom Effect is focused graphic design in the Long
Camera Aperture Effects | best laptop deal
Long exposure slap zoom effect | planet photoshop, This technique is written for photoshop cs6, Long exposure slap zoom effect | planet photoshop.
Travelling is my life
ConversionConversion EmoticonEmoticon