to be honest i dont consider myself any expert at gifing (accept now that this is a word because i will be using it a fair bit) but i have gotten a couple people asking me how i make my gifs. so i thought id give it a shot to answer the best i can. if you have any questions or encounter any problems let me know and we can figure something out - the entire process of how i gif was learned through not being able to do things others could. anywho, allonsy!
EDIT: as of late ive gotten some questions about this tutorial, please look under my gifhelp tag to see if your question has already been answered before asking me for help!
EDIT EDIT: IF YOU ARE USING CS6/A MAC PLEASE GO TO MY NEW GIF TUTORIAL HERE. both tutorials are split into two parts capping & creating, so if youre capping on a windows, and then creating in CS6, follow the capping part of this tutorial and the creating part of the other. make sense?
CAPPING - WINDOWS
1) before we get started go download photoshop cs5 and kmplayer, also go find some fairly basic psds you can use to color your shtuff :3
2) open a video file in kmplayer and find the part you want to gif. i would recommend using 720p videos if you want higher quality but its not necessary! im going to use a clip from amy in victory of the daleks so i find the spot where i want my gif to start and pause it.
3) now to capture some frames, hit ctrl+g on your keyboard to open the frame capture window. i have my settings set like so, but you can change where your frames are saved to by clicking the icon next to the extract to area.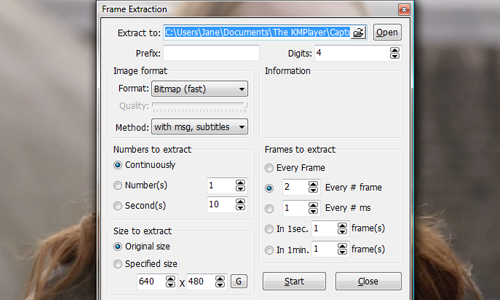
4) hit start and then go play your video, stop it when the part you want to gif is done. one thing i should mention is taking the screencaps might slow down your computer a bit, resulting in the video lagging as the shots are taken, once you stop taking the captures the video will go faster to make up for lost time. just keep calm and carry on.
CREATING - CS5
5) okay, so now go to photoshop and locate where your frames were saved, for me they go under documents -> kmplayer -> capture, so open up that folder and select the frames you want to gif. i try to keep it from a 10-20 frame maximum depending on what size my gifs are going to be. if youve taken more than that then just select the 15 or so frames with the most content in them. go file -> open, select your frames by holding down the tab key and then open them.
6) your frames should all open as different images, but we want them all to be stacked as different layers in one image. if youre lucky youll be able to skip step 5 and 6 and just go to file -> scripts -> load files into stack, but this button doesnt work for me so now i must do the tedious job of dragging all my frames onto one layer. if you need help doing this look over here! phew, 20 seconds later and im done. heres what you should have:
7) now since im making a square gif to go in a gifset im going to go image -> image size -> height: 245 (your width will be 436) and hit okay. then im going to go image -> canvas size -> width: 245 to make a nice little square. now its time to sharpen your gif. so go filter -> sharpen -> smart sharpen -> these settings, after you do this once just press ctrl+f to repeat the action. go through the layers and sharpen each one.

8) make sure you have your animation window open (window -> check off animation) and click the drop down menu. hit make frames from layers, in some cases, your frames will be in the wrong order so you might need to press reverse frames too. select all your frames (hold down tab people!) and click the little down arrow by 0 sec. this is the delay between frames. i always put mine at 0.13 so hit the other button and type in .13.

9) add a psd on and press the play button to see how it looks!

10) final step, go file -> save for web and devices and put your settings to something like this, if the gif is over 1M you can reduce the size by lowering the colors or reducing the number of frames.

and there we go! hope that helped and if you have any questions please message me! good luck ^.^


watsonly's photoshop CS5/windows gif tutorial - courage ...
to be honest i dont consider myself any expert at gifing (accept now that this is a word because i will be using it a fair bit) but i have gotten a couple people
My Photoshop Cs5 Doesn`t Have Animation Window - Prijom
watsonlys photoshop CS5/windows gif tutorial : To create animation with Photoshop, you will need to have at least In the Import Video to Layers window,
How to make a gif in photoshop cs5 from video-Mr How
ways and tutorials links to help you to make a gif in photoshop cs5 from watsonly's photoshop CS5/windows gif tutorial to be honest i don't consider
A Quick Photoshop CS5 Tutorial To Create Animated GIFs
3. In Photoshop CS5, create a new image that is a fit for the raw images you have in the folder. Here we are using an image size of 397px x 400px.
How to make gif from pictures photoshop cs5-Mr How
so that you can make gif from pictures photoshop cs5 very easily and save much more watsonly's photoshop CS5/windows gif tutorial to be honest i don't
How to Create an Animated GIF in Photoshop CS5
How to Create an Animated GIF in Photoshop CS5. WELCOME !! 1. Now let's see how they look. In Photoshop CS5, if you go to Wind 4. Android and Windows 8!
Creating an animated Gif in Photoshop CS5
animated gif for the web. For this tutorial I will show you one quick and easy way to create an animated gif using Photoshop CS5. I (Windows Skills RSS
Create an animated GIF in Flash and Photoshop CS5
Create an animated GIF in Flash and Photoshop CS5. in Flash and Photoshop CS5. Create a GIF in Photoshop. Theres a lot of things you to Windows > Animation
Adobe Photoshop CS5 Animation Tutorial - How to create Animation using the Timeline
Adobe Photoshop CS5 Animation Tutorial. In this video I demonstrate how to create animation in Photoshop CS5 using the Animation Timeline. View more
How to Create an Animated GIF in Photoshop CS5 : Step Four ...
Now let's see how they look. In Photoshop CS5, if you go to Wind 4. (which stands for Graphics Interchange Format, Android and Windows 8!
Travelling is my life
ConversionConversion EmoticonEmoticon