Step 1
© Photography and tutorial by Colin Smith
 For the old, simpler cast shadow tutorial, click here
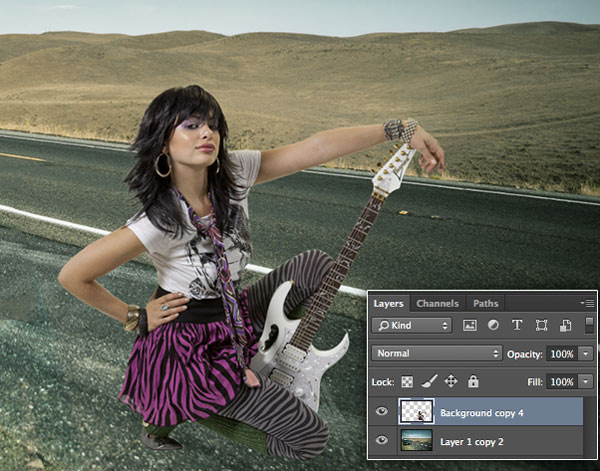
Open your image and remove it from the background.
Here we have the background plate and the extracted subject that we need to apply a shadow to. Without the shodow, there is no visual clue as to the scale and position of the object. The shadow also serves to anchor the object to its surface.
Step 2
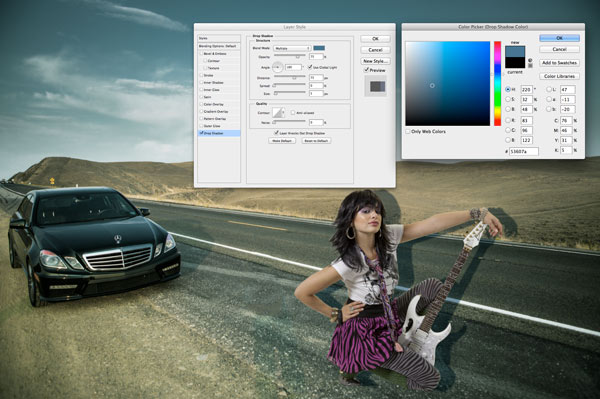
The first thing that we are going to do, is to create a standard drop shadow.
Choose The Later style buttom at the bottom of the Layers panel (looks like a little F) Select Drop Shadow.
At the moment, it looks more like a persona standing in front of a billboard, rather than being intergrated into the scene. Thats the difference between a drop shadow and a cast shadow.
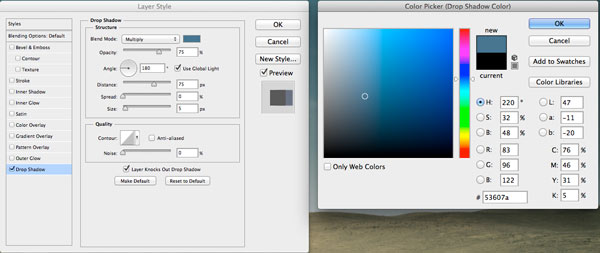
For some realism, lets first choose the correct color for the shadow. Click the black rectange to the right of the blend mode in the Drop Shadow dialog box. You will see a color picker. I changed it to a blue color to match the color of the shadow on the car.
Also change the size to match the softness of the other shadows in the scene.
Click Ok to apply.
Step 3
We now have a pretty good drop shadow, but we want a cast shadow.
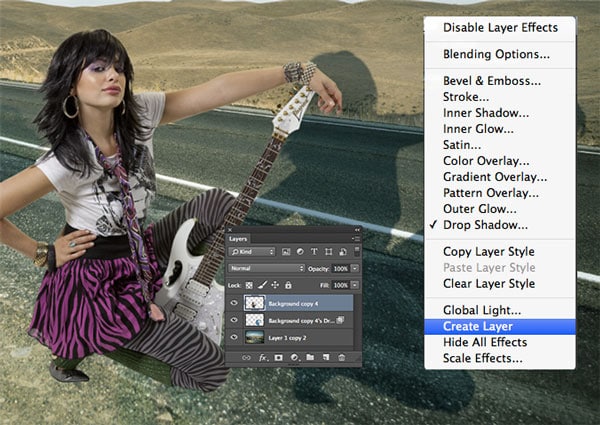
We are going to seperate the layer style from the layer, so that we have the shdow by itself on its own layer.
In the layers panel, right click on the little f on the right of the layer name. You will see a drop down menu.
Choose the option called Create Layer
The layer will now be spilt into 2 layers. The shadow will be moved to its own layer directly underneath the original as shown in the screen grab. (I moved our guital girl to the left of her shadow, just do you can see the seperation in the image here).
Step 4
Now to distort the shape. (If you are going to do this to text, you must render the type first)
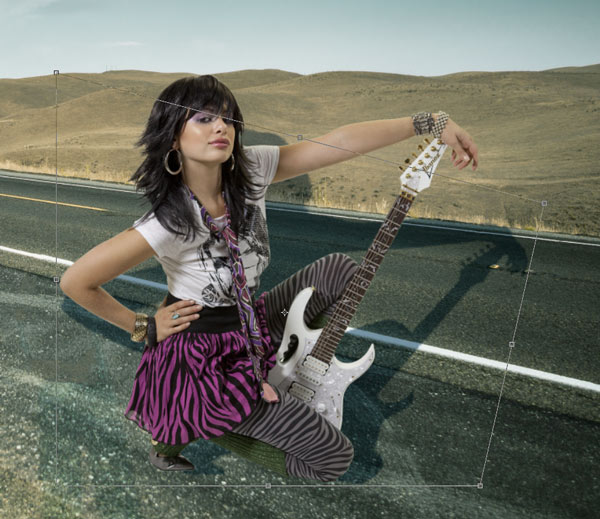
Press Ctrl/Cmd+T, this will bring up the free transform tool. Right click on the selected object Mac:Cmd click. Select Distort from the pop-up menu.
You will see a bounding box with 8 little squares. Drag in the middle of the box to reposition it. Click and drag the top right square (called handles) until it looks similar to the picture.
Step 5
Click and drag on the left top handle to match the angle on the road behind our model.
Reposition any of the handles if you need to.
Press Enter/Return to apply the transformation.
You now have a basic cast shadow. However its missing some realism that we are going to add now.

Step 6
If you look at a shadow in the real world, you will notice, as the subject thats casting the shadow gets further away from the surface that receives the shadow, 2 things happen. The shadow will soften with distance and lose intensity (or darkness).
We now want to make the shadow softer as it gets further away.
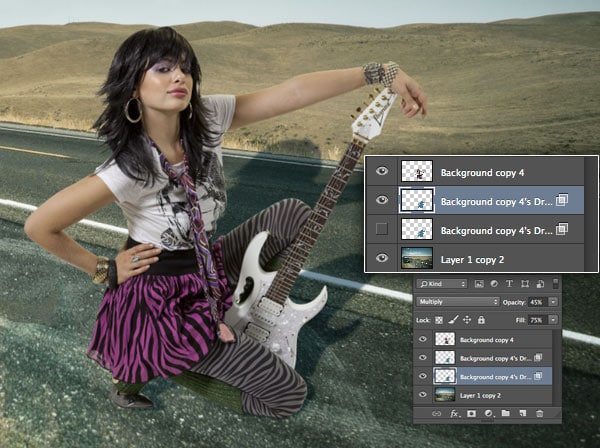
Duplicate the shadow layer by dragging the layer into the new layer icon in the layers panel, of press Cmd/Ctrl+J.
Turn off the visability of the bottom shadow layer and select the top shadow layer, This is the one we are going to soften.
Step 7
Lets set this second shadow to the softer end of things. (We are going to blend 2 shadows together)
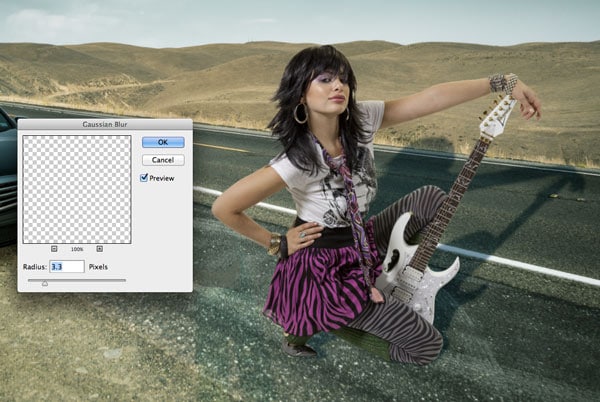
Choose Filter>Blur>Gaussian Blur. Add enough blur to make the shadow softer, the setting will vary according to the size of the image that yourre working on. Press ok when done.
Step 8
Time to blend the 2 shadows together. ![]()
Add a layer mask to the top shadow layer by clicking the Layer mask button in the Layers panel.
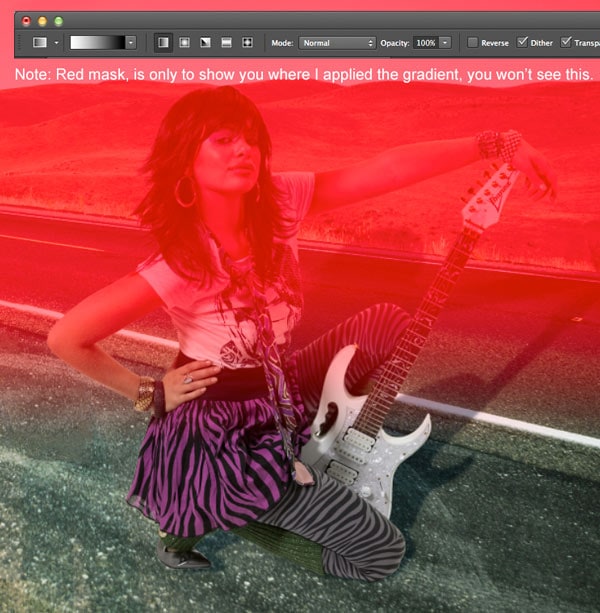
Grab the gradient tool and set the colors to black and white (D key). Choose linear, forwground to background.
Make sure the mask is selected and using the gradient tool drag it from about 1/4 way to the the bottom of the shadow to about 3/4 of the way up to blend the 2 shadow layers. (The red in this image shows where I dragged the mask)
For more details on this technique see here
Step 9
Finally Set the shadow to multiply mode and the opacity of the top shadow layer to about 50%-75% and the bottom shadow to about 30%
Experiment and see what looks best for your image.
You now have a basic, realistic cast shadow, but read on.

xtra credit
One of the things Im often accused of, is being a perfectionist. I believe its the extra little things that really make a difference between a good effect, and one that is believably realistic.
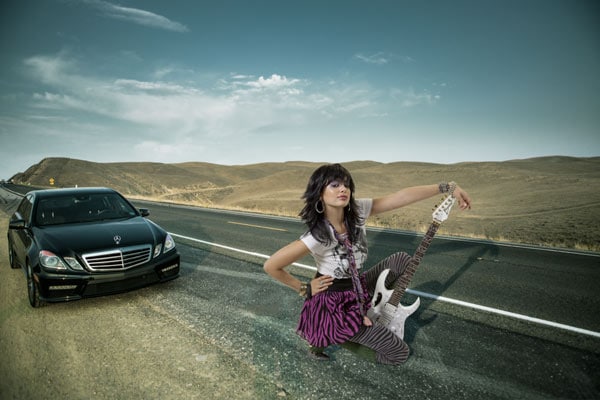
There are two little issues in this particular image. #1. The shadow at the tip of her head wouldnt stay the same over the lip of the road, as there is distance there in the background plate. #2 The color of our girl doesnt quite match the colorizing of the plate. (The background plate was adjusted with a slight color cast for effect.)
Lets deal with these 2 using some quick-fix techniques that I have developed.
fix #1
Lets fix the shadow where its going over the edge of the road (This is very important for skies, as a subject doesnt usually cast a shadow into the sky (unless its foggy or cloudy).
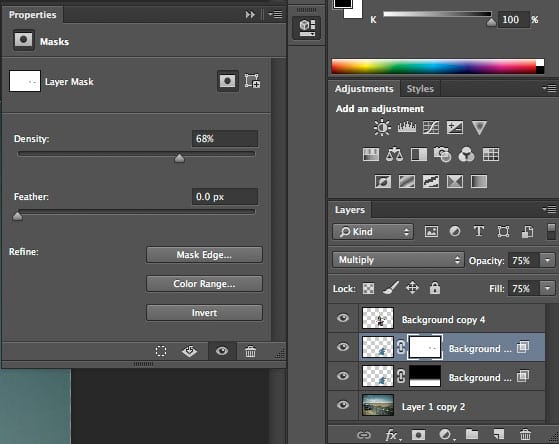
On the top shadow layer, create a layer mask. Paint away the portion of the shadow that you want to hide with a black brush on the mask. If you want to still have some shadow showing, but reduced; double click on the layer mask to open the properties panel (Mask panel in Photoshop CS6 or earlier).
Slide the density slider to adjust the opacity of the masked area. (Apply a levels adjustment to earlier versions of Photoshop that donr have a mask panel).
Fix #2
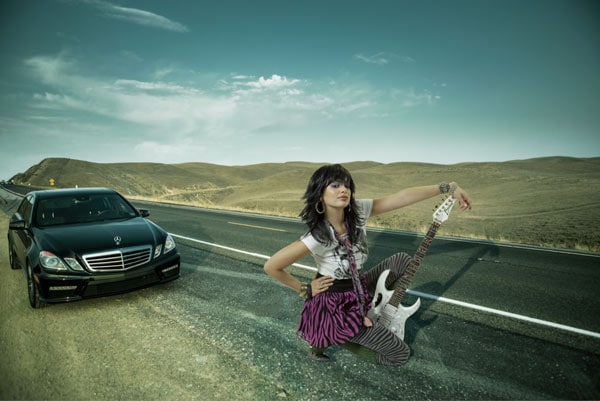
Here is a little trick that I often do to composites.To pull all the layers together visually, I apply a color cast to the entire image.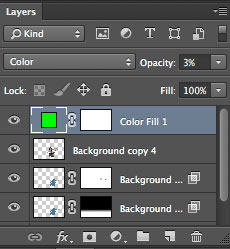
Create a new Solid Layer by clicking on the Adjustment layer button at the bottom of the Layers panel and choose Color Fill.
Set the color for the mood that you want.
Change the Layer blend mode to Color and drop the opacity to a low amount.
End
So, there you have it. The steps to creating a realistic Cast Shadow in Photoshop. If this kind of training interests you, check out my Route CS6 training video that includes a section on Layers and Channels, Deep Dive where you will learn a ton more.
CS6 Superguide
All the CS6 information and more is available as a PDF magazine called the CS6 Superguide. If youre on our list, you will receive it free by email as soon as its available. If not, sign up now and get the CS6 Superguide for free.
Cast Shadow in Photoshop Tutorial - PhotoshopCAFE
Learn how to create a cast shadow in Photoshop. What do you do when a drop shadow isn't realistic enough? Create a cast shadow. When you see an object in a spotlight
free Photo tutorials from photoshopCAFE - Learn Photoshop ...
Cast Shadow in Photoshop Tutorial. PhotoshopCAFE LIST. Adobe Photoshop Tips, tricks, discounts and announcement from photoshop CAFE. Its fast and free!
Realistic Cast Shadow Effect In Photoshop
In this Photoshop Effects tutorial, learn an easy way to create a realistic cast shadow effect. Home; Contact Us; Sitemap; Photoshop Background Eraser Tutorial;
Cast Shadow in Photoshop Tutorial
Cast Shadow in Photoshop Tutorial - http://photoshopcafe.com/tutorials/cast_shadow/cast_shadow.htm. For the old, simpler cast shadow tutorial, click here.
Cast Shadow Photoshop Tutorials | PSDDude
Cast Shadow Photoshop Tutorial. Cast Shadow Photoshop Tutorial by photoshopessentials. Shadow Effect in Photoshop. Shadow Effect in Photoshop by photoshopcafe.
Cast Shadow in Photoshop Tutorial
http://photoshopcafe.com/tutorials/cast_shadow/cast_shadow.htm. How to Lighten and darken digital photos in Adobe Photoshop How to Cast a shadow within a photo in
Photoshop: How to Cast Realistic Shadows
Photoshop CS6 Extended tutorial showing how to cast realistic shadows from any Photoshop CS6 Extended tutorial showing how to cast realistic
Making Cast Shadows | Photoshop for Video | Adobe TV
Instructor Richard Harrington shows you how to make reflected or cast shadows in Photoshop. Shadow Highlights Command 00:08:15 : Making
Photoshop cast shadow effect. | Design | Pinterest
Photoshop tutorial - Cast Shadows by PhotoshopCafe at www.photoshopcafe Rebecca Hanson. PHOTOSHOP BASICS Pin it. Like.
Cast Shadow | Drawing Techniques - Web Design - Website ...
In this tutorial you will learn how to cast shadow in Photoshop. Photoshop Drawing Techniques Cast Shadow. popular Photoshop resource site, PhotoshopCAFE
ConversionConversion EmoticonEmoticon