Introduction.
In this lesson you will learn how to use the AlphaPlugins Engraver filter to give photos the appearance of hand-made engravings. This filter works with Adobe Photoshop, Adobe Photoshop Elements, Picture Publisher, Image Ready, Painter, Photo Impact, PaintShopPro, Corel PhotoPaint and other applications. The latest free trial version of this filter can be downloaded here.
Also you can download actions
for Adobe Photoshop that reproduce all steps of this tutorial.
1. Begin
1.2 In the Layers Menu select duplicate layer. Photoshop makes a copy of the original image.
1.3 Click on the Create New Layer icon. Drag the new layer to put it below the copy layer.
1.4 Make the new layer black using the fill tool.
The layers window should now look like this:
2. Image engraving.
Now you need to have the special plug-in filter, Engraver. You can download the trial version of Engraver from www.alphaplugins.com. After installing this module, Photoshop will list Engraver in the Filter menu. When you click on the Engraver filter in the list, this dialog window is displayed:
|
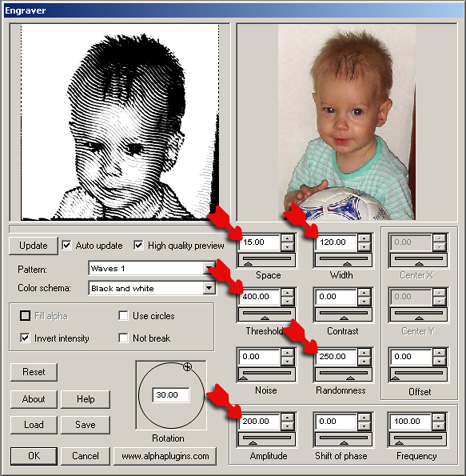
Set the parameters as follows:
Space:
15 - Decreasing this value makes lines closer together.
Width:
120 - Increasing this value makes lines thicker.
Threshold:
400 - See the help article for an explanation of threshold.
Randomness:
250 - Introduces random distortions to simulate lines cut by hand.
Amplitude:
200 - Increases the height of waves.
After applying the filter, the original
picture will be transformed into this.
3. Improving of your picture.
To make your engraving look more realistic you can use additional layers.3.1 In the Layer Menu select the Background and duplicate this layer, creating "Background copy2"
3.2 Drag this copy to the top of the layer window. The Layer Window should look as shown below.
3.3 Select the Engraver filter again and change just one value...Rotation: 330.
Apply the Engraver filter and now your picture should look as shown below right.
Flattening all layers combines them into the final image. But there is still more you can do.
4. Additional touches
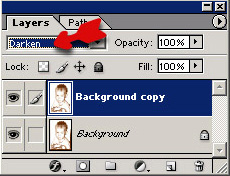
Enhance an engraving's realism by duplicating the final layer and applying blur to the copy.In the layer blending option at the top left, change the mode to DARKEN by clicking on the arrow.
Combine these two layers by selecting Flatten Image under Layer at the top Menu Bar.
5. Create colored engraving
As well as Black & White, this Alpha filter also allows you to make colored engravings by choosing between the two options of Color Schema.
Conclusion
You have seen that with the Alpha Engraver you can make beautiful images, but the creative potential is much wider than we can present in a brief tutorial. Explore this special add-on filter yourself and discover the wonderful possibilities waiting to free your artistic imagination.
You can download the freshest trial version of Engraver filter from this site Product page |
Also you can download
action for Adobe Photoshop with all steps of this lesson. |
Travelling is my life
ConversionConversion EmoticonEmoticon