The use of colourful vector art is a great way to create an accessible and friendly webpage. When done well it is possible to create a rich and vibrant art style which will capture the imagination. We walk you through the basics to get you going on Photoshop CS and newer.
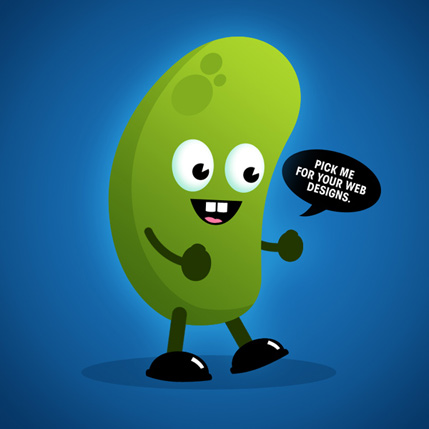
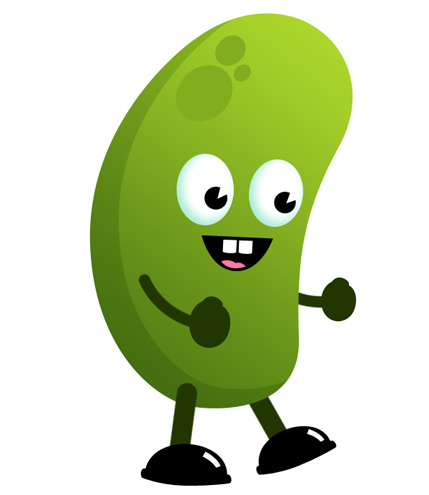
Heres the end result of this tutorial.
Step 1
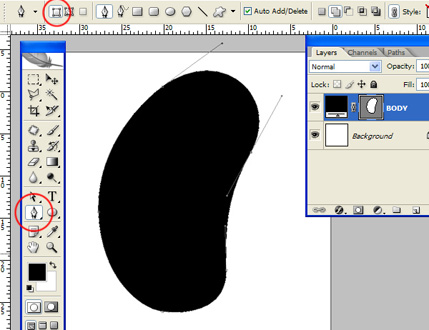
Well create this at 300dpi so set up a canvas thats 750×750 pixels at 300dpi. Its also better to work in RGB as you get more control over the colour output and more options within Photoshop itself. With your canvas open, select the Pen Tool and set it to Shape Layers in the Options bar (Window > Options if its not visible). Use this tool to draw in your basic character shape, at this stage dont worry about colour.
Step 2
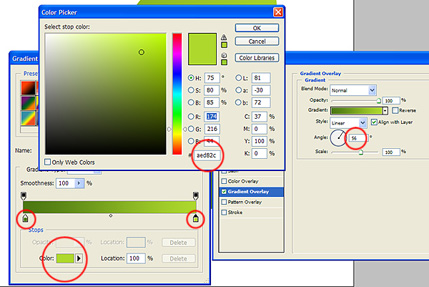
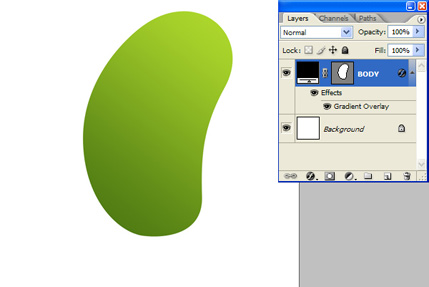
Once youve drawn a basic shape its time to add colour so select your Body Shape Layer and go to Layer > Layer Styles > Gradient Overlay. Set up a 2-colour gradient inputting 4c7812 and aed82c in the field marked # in the Color Picker window. Your gradient should look similar to the screen grabs.
Step 3
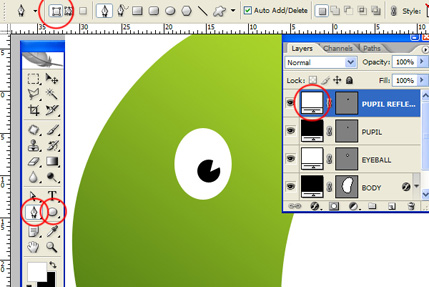
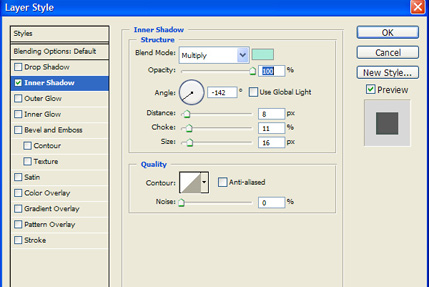
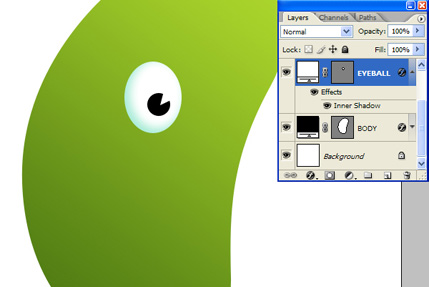
Select the Ellipse Tool and make sure its set to Shape Layers (Use the Options bar to do this). Select White as your foreground colour and draw an ellipse as your eyeball. Draw a smaller black circle for a pupil (hold the SHIFT key whilst you draw this will constrain a perfect aspect ratio). Then use the Pen Tool to draw a small white triangle over the pupil. If you need to change the colour of any of your shape layers then simply double-click the corresponding colour icon on the Layers palette. Finally, select the EYEBALL layer and go to Layer > Layer Styles > Inner Shadow and set up as in the screen grab.
Step 4
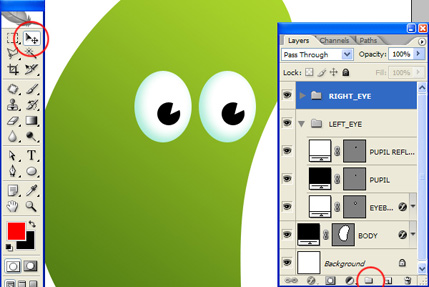
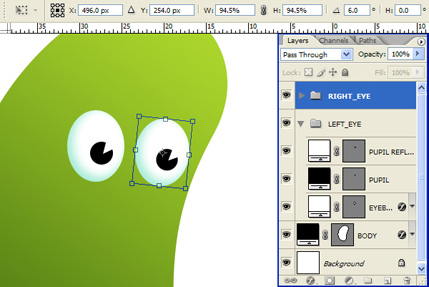
Select all of your eye layers in the Layers Palette and click the Folder icon at the bottom of the palette to group them. Name the Group LEFT_EYE. Then select the Move Tool from the Tools palette, hold down the ALT key and drag the group across the canvas to create a duplicate. Name the duplicate group RIGHT_EYE. The eyes dont quite fit the perspective of the body so with the RIGHT_EYE group selected go to Edit > Free Transform and resize and rotate to 94.5% size and 6.0 degrees.
Step 5
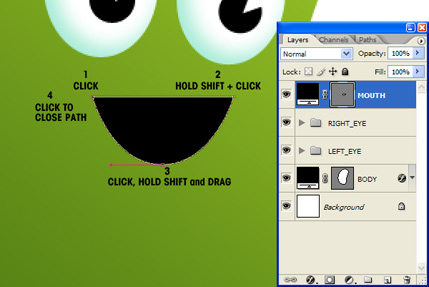
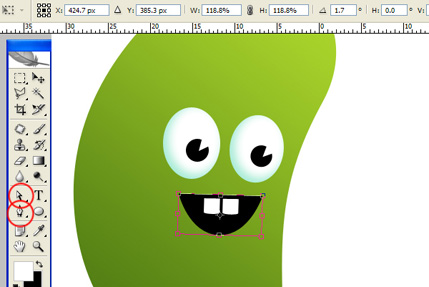
The mouth is easy enough. Select the Pen Tool and set it to Shape Layers. Click one point and then hold the SHIFT key and draw a point to the right of the first one. Holding SHIFT will force the point to be drawn within increments of 45degrees from the last point drawn. In this case we want a horizontal line. Then pick somewhere between the two points but lower down and click and drag to create a curve. Then click the original point (the open end) to close the path. You can edit any of these points by using the Direct Selection Tool (the white arrow not the black) and dragging the points or their handles. You can also resize by using the Free Transform Tool. Draw in two teeth over the mouth.
Step 6
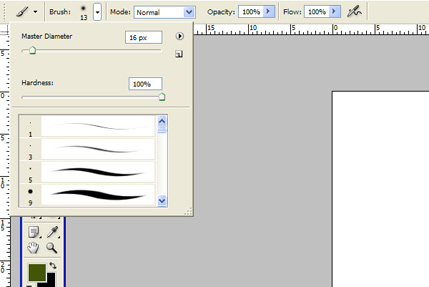
Select the Paintbrush Tool and edit the options to create a 16 Pixel brush with 100% Hardness. Set the foreground colour to 213600. Select the Pen Tool and set it to Paths. Create two new layers (Layer > New Layer) and call one LEFT_ARM and one RIGHT_ARM. Make sure that LEFT_ARM is positioned above BODY in the Layers palette. RIGHT_ARM should be below BODY. Draw a left arm with the Pen Tool, select LEFT_ARM layer and open the Paths palette. Click the little arrow at the top right of the palette to bring down the drop down menu. Select Stroke Path. Repeat the process for the RIGHT_ARM layer.
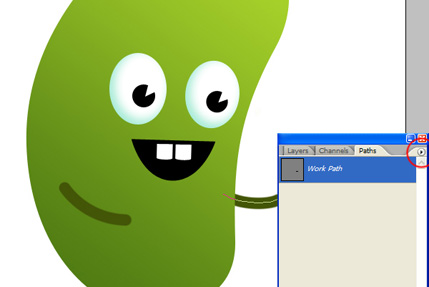
Step 7
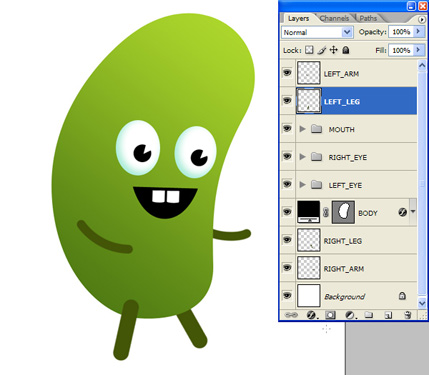
Repeat the process to draw in some legs. Bear in mind that the legs should be thicker so I opted for a 26 pixel brush to Stroke Path with. Booger Man should be taking shape by now.
Step 8
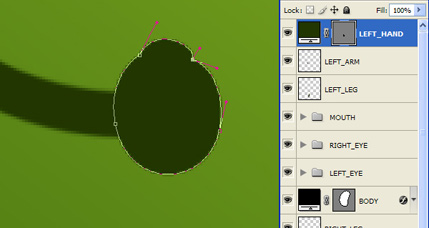
The hands are a little trickier. Select the Pen Tool and set it to Shape Layers. Draw a curve point (click and drag downwards until the handles appear) at the base of the wrist. Then draw another curve point opposite, dragging the handles roughly the same distance. Draw a curve point where the thumb would meet the fingers of a clenched fist. Then press and hold the ALT key, click the point again and drag a new handle as shown in the screen grab. Holding ALT and clicking a point splits its handles so you can move them independently of each other. Youll need to use this technique again at the base of the thumb. Use the Direct selection Tool to manipulate the points, their handles and generally clean it up. Duplicate the hand and call the duplicate RIGHT_HAND. Use Free Transform to rotate and resize until they are in perspective.
Step 9
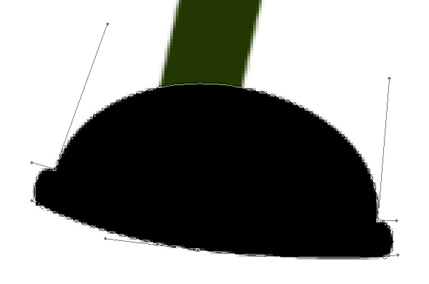
Use the Pen Tool to draw in a shoe. Set Black as your foreground colour and draw as in the screen grab. Use the Direct Selection Tool to clean up and perfect your shoe. Once done, duplicate, rename, rotate and resize so it fits your perspective.
Step 10
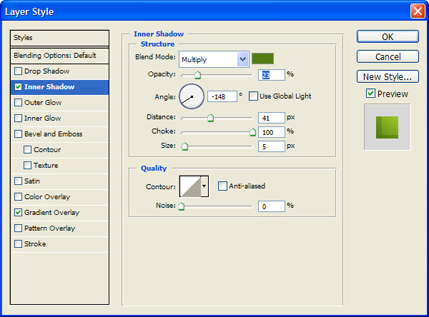
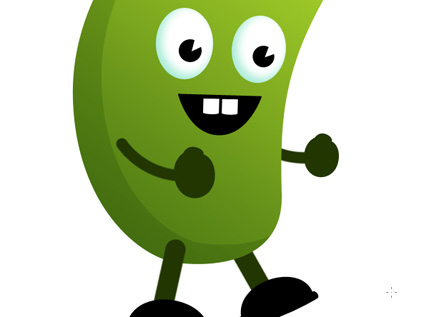
Lets add another layer of depth by adding more shading to the body. Select BODY layer and go to Layer > Layer Styles > Inner Shadow. Firstly, deselect Use Global Light and then set up as in the screen grab. I used colour #527e14 for the shadow. I had to move the left arm a bit to accommodate the new shadow.
Step 11
Add as much depth as you like. Ive drawn in some shine on the shoes and a Tongue using the Pen Tool. Ive also drawn in some spots using the Ellipse tool before resizing and rotating them with the Free Transform tool. Once your character is complete you can move all the elements around to fine tune your character. You can also resize and rotate things until you are happy.
Download the Photoshop Source File
[private_premium]
[/private_premium]
About the Author
James Davies writes tutorials for various magazines and websites when hes not designing gig posters, t-shirts, catalogs, magazines, etc.
Create Simple Cartoon Characters in Photoshop | Tutorials
The use of colourful vector art is a great way to create an accessible and friendly webpage. When done well it is possible to create a rich and vibrant art
Draw a Cartoon Monster Character in Photoshop - Tuts+ ...
In this tutorial, we will explain how to draw a cartoon monster character in Photoshop. Let's get started! Easy Character Design;
Create Simple Cartoon Characters in Photoshop Tutorials ...
The use of colourful vector art is a great way to create an accessible and friendly webpage. When done well it is possible to create a rich and vibrant art style
50 Useful Cartoon Character Design Tutorials
In the following easy tutorial, Learn how to create cartoon character in Photoshop. A great tutorial by Abduzeedos reader. Tags: cartoon, character,
40+ Cartoon Character Illustration Tutorials - Smashing ...
50 Excellent Digital Photography Photoshop Tutorials create cool cartoon characters character. This tutorial makes use of simple
80+ Creative Photoshop and Illustrator Cartoon Tutorials ...
monster or a chubby ninja is actually durable with the right Photoshop and Illustrator cartoon tutorials at Create Simple Cartoon Characters in Photoshop
How To Make A Cartoon Character : 90 Tutorials | Bashooka ...
How to make cartoon character in photoshop & illustrator. Cartoon character How To Make A Cartoon Character : 90 Tutorials. Create a Simple Mechanic Character
45 Cartoon Character Illustration Photoshop Tutorials
Create Simple Cartoon Characters in Photoshop. Follow this tutorial to create your own vector character, Freddy the Fish. Build your characters back story.
50+ Great Photoshop Cartoon Tutorials | InstantShift
Following are some great links to Photoshop cartoon tutorials, which make this, Create Simple Cartoon Characters Photoshop Tutorial.
30 Photoshop Cartoon Character Tutorials | takedesigns
Today I have shared top tutorials on cartoon characters. Create Simple Cartoon Characters In Photoshop. Cute Funny Character can be made by this.

ConversionConversion EmoticonEmoticon