Written by Steve Patterson. In this Photoshop Effects tutorial, were going to learn how to take an ordinary photo and give it more focus and impact by creating a light source and shining it on the main subject through a window. Youll need the photo you want to add the lighting effect to, as well as a photo of the window you want to use. If you dont have a photo of a window, just do a quick search on the internet for one, since its really just the shape of the window well be using, not the window itself.
To create the lighting effect, well be using a Levels adjustment layer, along with its layer mask, and well see how we can use a layer blend mode at the end to enhance the light even further. It may sound complicated, but its really very easy. The great thing about this effect is that theres lots of room for creativity, since theres no need to limit yourself to using only windows as the object the light is shining through. With a little imagination, you can shine light through any shape you can think of for some truly interesting and unique results!
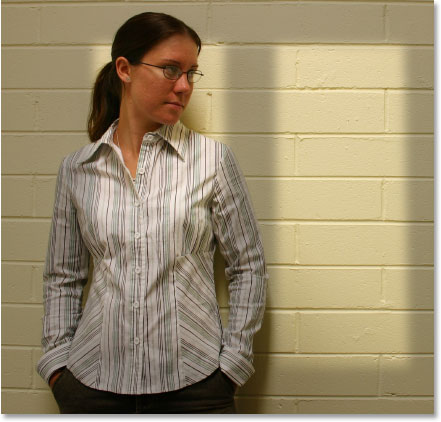
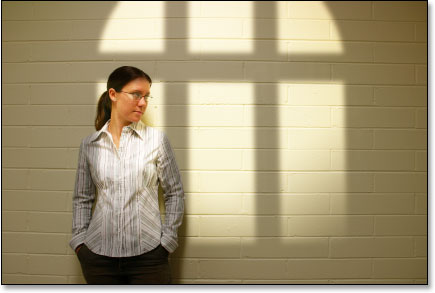
Heres the image Ill be starting with, a very simple photo of a woman standing in front of a wall. The wall itself is so bright that its a bit difficult to see the womans face:
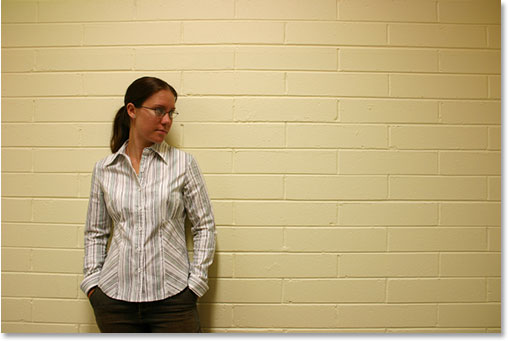
The original image.
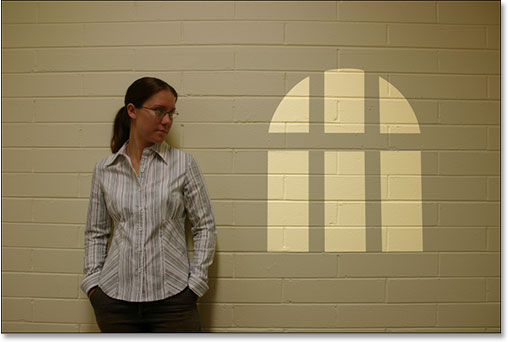
Heres how the photo will look after altering the lighting, giving it the appearance of a single light source shining from a window onto the woman and the wall behind her, which gives the photo itself a more focused and dramatic result. The womans face is also now clearly visible:
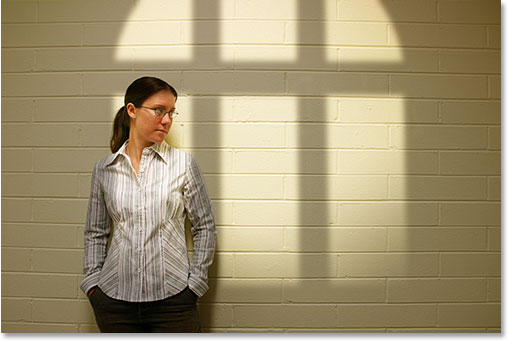
Photoshop Lighting Effects: The final result.
Lets get started!
Step 1: Drag The Photo Of The Window Into The Main Image
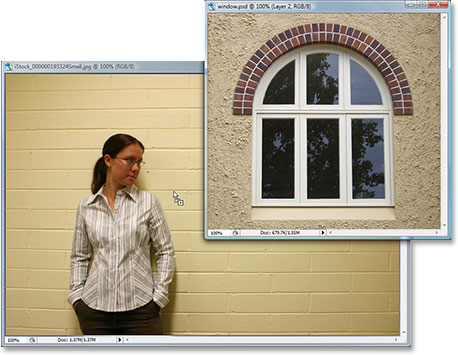
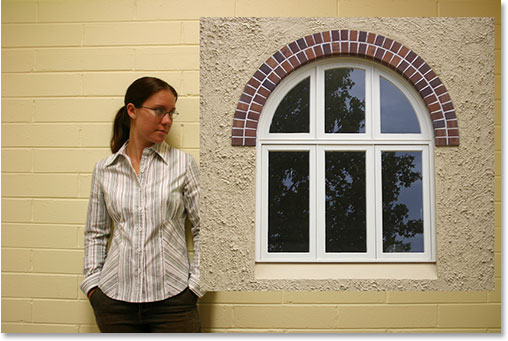
To start things off, youll need both your main image and the photo of your window open in Photoshop. Weve already seen my main image, and heres the photo of the window Ill be using:

Open both of your photos in Photoshop.
With both photos open in their own separate document windows, select your Move Tool from the Tools palette:
Select the Move Tool.
You can also select the Move Tool by pressing V on your keyboard. Then, with the Move Tool selected, click anywhere inside the photo of the window and drag it into the main images document window:
Drag the window photo into the main photos document window with the Move Tool.
When you release your mouse button, the photo of the window will appear inside the main image:
The window now appears inside the main image.
If you look in your Layers palette, youll see your main image on the Background layer, and the window photo above it on its own layer, which Photoshop has named Layer 1:
Photoshops Layers palette showing our two layers.
Step 2: Select Around The Inside Of The Window
Now that our window photo is inside our main image, we need to make a selection around the inside of the window.
Depending on the window youre using, the Rectangular Marquee Tool or the Elliptical Marquee Tool may be all you need to select it. Be sure to check out our tutorial on the Full Power Of Basic Selections if you need help with adding to, subtracting from, or intersecting with selections.
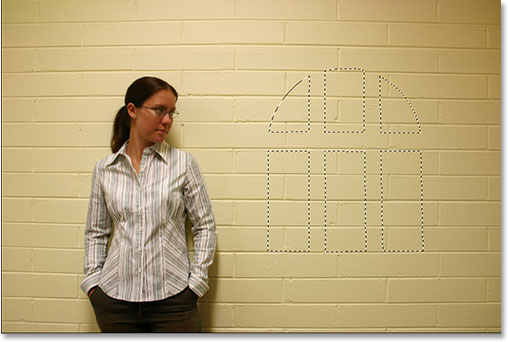
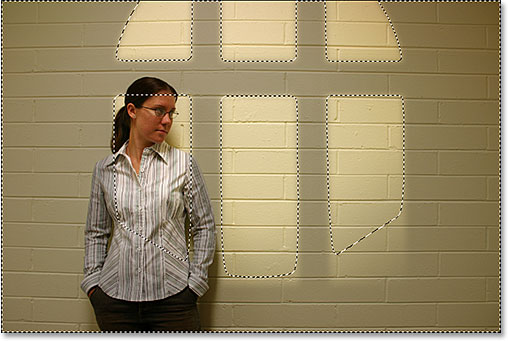
For more complex window shapes, the Pen Tool may be your tool of choice, which is what I used here to select around the insides of all six window sections (check out our full tutorial on Making Selections With The Pen Tool) if you need help:

Use the selection tool of your choice to select around the inside(s) of the window.
Step 3: Delete The Window Layer
With the window shape now selected, we no longer need the window photo inside our main image, so click on the window layer (Layer 1) in the Layers palette and drag the layer down onto the Trash Bin icon in the bottom right corner of the Layers palette to delete it:
Delete Layer 1 by clicking on its layer and dragging it down onto the Trash Bin icon at the bottom of the Layers palette.
This will delete the window layer, but the selection we just made remains:
The selection we made around the window remains inside the image.
Step 4: Invert The Selection
Were going to use a Levels adjustment layer in a moment to darken the image everywhere except in the area that was inside the window, which is going to give us our "light shining from a window" effect. To do that though, we need to have everything except the area that was inside the window selected, but at the moment, we have the exact opposite. We have the area that was inside the window selected, while the rest of the image is not selected. To fix that, we need to invert our selection, which basically means we need to swap the selection around so that whats currently selected becomes deselected, and what is currently not selected becomes selected. To do that, all we need to do is go up to the Select menu at the top of the screen and choose Inverse, or we can use the keyboard shortcut Shift+Ctrl+I (Win) / Shift+Command+I (Mac).
Whichever way you choose, youll see a selection box appear around the outside edges of your image, which tells us that everything in the image except for the area that was inside the window is now selected, while the area that was inside the window has now been deselected:

Invert the selection so that everything except the area inside the window shape becomes selected.
Step 5: Add A Levels Adjustment Layer
Click on the New Adjustment Layer icon at the bottom of the Layers palette:
Clicking the New Adjustment Layer icon at the bottom of the Layers palette.
Then choose Levels from the list of adjustment layers that appears:
Choose a Levels adjustment layer from the list.
This will bring up the Levels dialog box, and were going to use it to darken our image and create our lighting effect next.
Step 6: Darken The Area Around The Window With The Levels Adjustment Layer
With everything except the area that was inside the window selected, we can now darken the image and create our lighting effect quite easily using the Levels adjustment layer.
If you look at the bottom of the Levels dialog box, youll see a horizontal bar with a gradient going from black on the left to white on the right, with a small black slider below it on the far left and a small white slider below it on the far right. These sliders are the Output Levels sliders. The name is a bit confusing, but what these sliders do is determine how bright or dark the image can be. If you dont touch the sliders at all (normally you just leave these sliders alone), the image can be displayed with a full tonal range. In other words, it can display everything from pure black to pure white and everything in between. Normally, this is what you want.
Sometimes though, like when youre creating an effect as were doing here, you want to limit how bright or dark the image can be. In our case, we want to darken the image, and the easiest way to do that is to simply limit how bright it can be by clicking on the white output levels slider on the far right and dragging it towards the left. As you drag, youll see the image becoming darker and darker, and thats because were limiting how bright it can be. The only part of the image that will not be affected by the slider, and therefore not become darker, is the area that was inside the window which is the only part of the image that is not currently selected. It will remain at its original brightness level, giving our us lighting effect.
Go ahead and begin dragging the white output levels slider towards the left while keeping an eye on your image to see whats happening:
Drag the white output levels slider towards the left to darken the image everywhere except for the area that was inside the window.
As you continue dragging the slider towards the left, darkening the image more and more, the light shining from a window appears:
The light shining from a window appears as you drag the white point slider to darken the image.
Its completely up to you how dark you want to make the image, so drag the slider until youre happy with the results, then click OK to exit out of the Levels dialog box.
Step 7: Load The Selection Again
Hold down your Ctrl (Win) / Command (Mac) key and click directly on the layer mask thumbnail for the Levels adjustment layer in the Layers palette. This will load the selection once again inside the image:
Hold down Ctrl (Win) / Command (Mac) and click directly on the layer mask thumbnail for the Levels adjustment layer to reload the selection.
Step 8: Invert The Selection
We need to invert the selection once again so that we have only the area that was inside the window selected. To do that, use the keyboard shortcut Shift+Ctrl+I (Win) / Shift+Command+I (Mac) to quickly invert it, leaving only the area inside the window shape selected:

Invert the selection once again so that only the area around the window light is selected.
Step 9: Move And Resize The Window Light With Free Transform
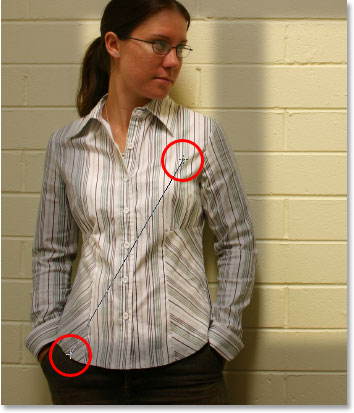
Press Ctrl+T (Win) / Command+T (Mac) to bring up Photoshops Free Transform box and handles around the window light effect, then move and resize it as needed. To move the window light, simply click anywhere inside the Free Transform box (anywhere except on the small target icon in the center) and drag it into position with your mouse. To resize the window light, drag any of the handles. If you want to constrain the proportions of the window light as you drag, hold down your Shift key and drag any of the four corner handles. Here, Im making the window light quite a bit larger and moving it so that the light from the bottom left section of the window is shining on the woman:
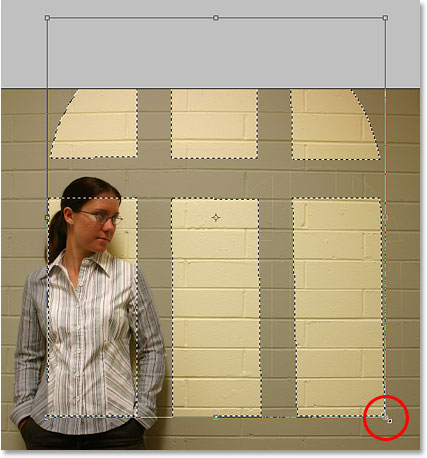
Move the window lighting into position and resize it as needed with Free Transform.
Press Enter (Win) / Return (Mac) when youre done to accept the transformation, then press Ctrl+D (Win) / Command+D (Mac) to deselect the selection.
Step 10: Apply The Gaussian Blur Filter
The only problem with our window lighting effect at the moment is that the edges are too sharp, which looks unrealistic. Lets soften them by applying the Gaussian Blur filter.
To do that, go up to the Filter menu at the top of the screen, choose Blur, and then choose Gaussian Blur. Im going to set my Radius value to about 5 pixels to soften my edges. If youre using a high resolution image, youll probably want to set yours a bit higher.
Keep an eye on your image as you drag the Radius slider at the bottom of the dialog box so you can see how much blurring is being applied (its always better to make a decision with your own eyes than to simply enter in a value that worked well for someone elses image):

Soften the edges of the window light with the Gaussian Blur filter.
Click OK to apply the filter and exit out of the dialog box. Heres my image after softening the window light edges:

The image after softening the window light edges with the Gaussian Blur filter.
Step 11: Select The Gradient Tool
These next few steps are optional, and if you wanted, you could stop here, but Im going to add a bit more realism to my effect by reducing the intensity of the window light in the bottom corners. To do that, if youre still following along, select your Gradient Tool from the Tools palette, or press G to select it with the keyboard shortcut:

Select the Gradient Tool.
Step 12: Set White As Your Foreground Color And Black As Your Background Color
Your Foreground and Background colors should already be set to white and black respectively, but if for some reason theyre not, press D on your keyboard to reset them. If you look at the Foreground and Background color swatches near the bottom of the Tools palette, you should see the top left swatch (the Foreground color) filled with white and the bottom right swatch (the Background color) filled with black:
Photoshops Foreground and Background color swatches in the Tools palette.
Step 13: Select The Foreground To Background (White To Black) Gradient
With the Gradient Tool selected, white as your Foreground color and black as your Background color, Right-click (Win) / Control-click (Mac) anywhere inside the image to bring up the Gradient Picker and select the first gradient in the top left corner, the Foreground to Background gradient:
Right-click (Win) / Control-click (Mac) anywhere inside the image and select the Foreground to Background gradient from the Gradient Picker.
Step 14: Drag A Short Gradient From The Bottom Corners In Towards The Center Of The Image
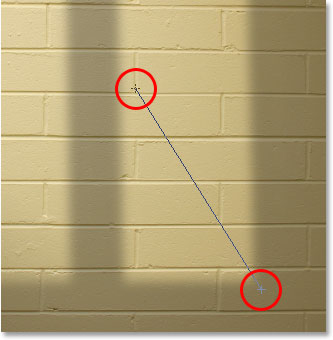
Click your mouse just below and to the left of the bottom corner of the window light and drag a short ways in towards the center of it to add a white-to-black gradient in the corner. Were not adding the gradient to the image itself here. Were adding it to the layer mask of the Levels adjustment layer:
Drag a short white-to-black gradient from the bottom left corner of the window light in towards its center.
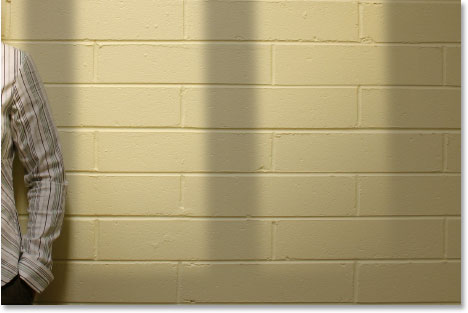
When you release your mouse button, Photoshop will add the short gradient to the layer mask, and youll see the light gradually fade away as it approaches the bottom left corner:
The window light now gradually fades away in the bottom left corner.
Then do the same thing in the bottom right corner. Click your mouse just below and to the right of the bottom right corner of the window light and drag a short ways in towards its center:
Drag a short white-to-black gradient from the bottom right corner of the window light in towards its center.
When you release your mouse button, Photoshop adds the second white-to-black gradient to the layer mask, and the light appears to fade away in the bottom right corner as well:
The light now appears to fade away in the bottom right corner just as it does in the bottom left corner.
To finish off the effect, Im going to make the window light a bit more intense, and Ill do that next.
Step 15: Load A Selection Once Again Around The Window Light
Were going to finish off the effect by making the light shining from the window a little more intense. Again, this is an optional step, but its very simple.
Hold down your Ctrl (Win) / Command (Mac) key and click once again on the layer mask thumbnail for the Levels adjustment layer in the Layers palette:
Hold down Ctrl (Win) / Command (Mac) and click on the layer mask thumbnail in the Layers palette.
This will again load a selection inside the image, with everything except for the window light selected:
The selection loaded in the image. Everything except the window light is currently selected.
Step 16: Invert The Selection
Press Shift+Ctrl+I (Win) / Shift+Command+I (Mac) to invert the selection so that only the window light is selected:

Invert the selection so only the window light is selected. The rest of the image becomes deselected.
Step 17: Add A Second Levels Adjustment Layer
Click once again on the New Adjustment Layer icon at the bottom of the Layers palette and choose Levels to add a second Levels adjustment layer:
Add a second Levels adjustment layer.
When the Levels dialog box appears, simply click OK in the top right corner to exit out of the dialog box. We dont need to make any changes to it. If we look now in the Layers palette, we can see our second Levels adjustment layer above the original one:
Photoshops Layers palette showing the second Levels adjustment layer at the top, above the original.
Step 18: Change The Blend Mode Of The Adjustment Layer To Screen
To increase the intensity of the light shining from the window, all we need to do is go up to the layer blend mode option in the top left corner of the Layers palette and change its blend mode. By default, layers are set to the Normal blend mode. Click on the down-pointing arrow to the right of the word Normal and select Screen from the list:
Change the blend mode of the second Levels adjustment layer from Normal to Screen.
As soon as you change the blend mode to Screen, youll see the intensity of the light increase dramatically in the image:
The light appears much more intense after changing the blend mode to Screen.
Step 19: Adjust The Light Intensity By Lowering The Opacity Of The Adjustment Layer
If you find, as I do, that the light now appears too intense, you can reduce the intensity simply by going up to the Opacity option in the top right corner of the Layers palette (directly across from the blend mode option) and lowering the opacity value until youre happy with the result. Im going to lower mine to about 70%:
Reduce and fine-tune the intensity of the light by lowering the opacity of the Levels adjustment layer.
And with that, youre done! Here once again is my original image for comparison:
The original image once again.
And here, after reducing the intensity of the light by lowering the opacity of the adjustment layer, is my final Cast Light From A Window effect:
The final result.
And there we have it! Thats how to create a window light effect with an image in Photoshop!
Download our tutorials as print-ready PDFs! Learning Photoshop has never been easier!
You May Also Like...
Cast Light From A Window - Photoshop Tutorial
In this Photoshop Effects tutorials, learn how to create the illusion of light shining from a window on to the subject of your photo.
Photoshop Lighting Effects: Cast Light From A Window ...
photoshop tutorial: In this Adobe Photoshop tutorial, we're going to learn how to take an ordinary photo and give it more focus and impact by creating a light
Cast Light From A Window - Photoshop tutorials, plugins ...
Give an ordinary photo a more focused and dramatic look to it by creating a light source that appears to be shining through a window onto your main subject.
Casting Light Through Window Blinds - Photoshop Tutorial
In this Photoshop effects tutorial, learn how to create the illusion that light is being cast onto your subject through window blinds.
25 Useful Digital Photography Photoshop Tutorials ...
Cast Light From A Window . focus and impact by creating a light source and shining it on the main subject through a window. Full Photoshop Tutorial Here
How to Add a window light cast in Photoshop « Photoshop
How to Add a window light cast in Photoshop. In this video we are going to light cast a window so we can add more focus to the photos. First take unremarkable photo
How to create a casting light from window in Photoshop ...
to create a cast light on objects. Follow this step by step guide to learn how to create a casting light from a window in Photoshop. tutorials @ iTunes
Add A Window Light Cast - Free Photoshop Video Tutorials
Learn how to simulate a light cast by a window, adding more focus to your photos.We cover the use of selection tools, levels adjustment layer, gaussia
Tutorial: Add a Window Light Cast - Free Photoshop Video ...
Learn how to simulate a light cast by a window, adding more focus to your photos.We cover the use of
Empower Photoshop Skills With 40 Cool Photo Effects Tutorials
Photoshop Lighting Effects: Cast Light From A Window. In this Adobe Photoshop tutorial, Light effect wallpaper in Photoshop.
Travelling is my life
ConversionConversion EmoticonEmoticon