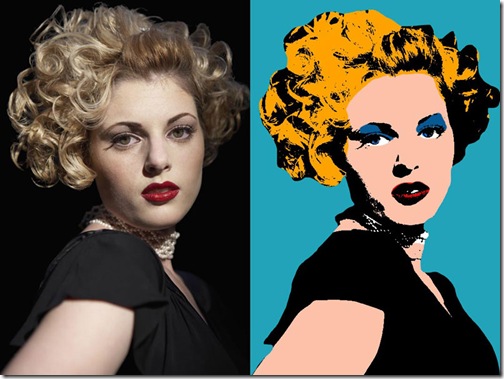
In this tutorial well use Photoshop Elements to create an effect similar to Andy Warhols iconic pictures of Marilyn Monroe, Elizabeth Taylor et al. Well use layers and blend modes to build up the effect, making it easy to correct mistakes or change the look at a later stage.
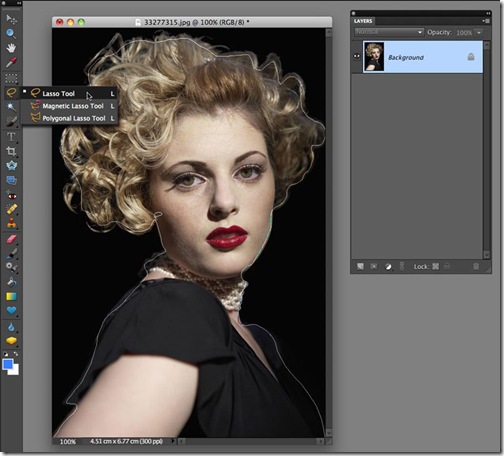
1. The first thing we need to do is cut our subject away from the background. Select the Lasso tool from the toolbox. Choose a starting point with the mouse and click to start the selection. Keeping the button held, draw around the subject. The outline doesnt need to be too precise, as long as it follows the face and hair; in the originals, Warhol used a scalpel to cut out the photo. Once you reach the starting point again, release the mouse to create the selection.

2. Now well create a copy of the selected area onto a new layer. To do this go to the Layer menu and select New > Layer via copy. Youll see a new thumbnail appear in the Layers panel containing the area you selected. Layers are like pieces of celluloid film, you can build up an image by stacking layers on top of one-another; they can be edited and moved around independently without permanently affecting the rest of the picture.
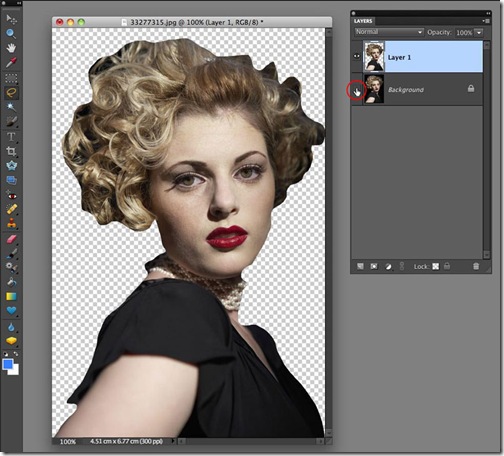
3. Before we start on the effect, well turn the original background layer off, as it can be distracting. Click the Eyeball icon next to its thumbnail; were now left with just the cutout layer showing. Make sure the cutout layer is still selected by clicking its thumbnail in the layers panel it will be highlighted.

4. We need to remove the detail of the face for the effect to work properly. Go to the Filter menu and Select Adjustments > Threshold. This filter looks at the tones of an image; anything lighter than mid-gray is made white, anything darker than mid-grey is made black. The initial effect is too strong and has too much black; we need to balance it out. Click the slider and start to drag it to the left. Youll see the black areas begin to disappear to be replaced by white. A value of around 80 works well here.

5. Now we can start to add some colour to the image. First well bring back the selection area of the cutout. Press and hold the Ctrl key on the keyboard, now click the mouse on the cutout layers thumbnail. The marching ants outline will appear around the edge of the image.

6. Go to Layer > New > Layer. A dialog box will appear. Its always useful to name the layers: this one will be for our skin colour so well call it Skin. We wont worry about the other settings for now. Click OK to create the layer. Its appeared in the Layers panel but we wont see any change as yet.
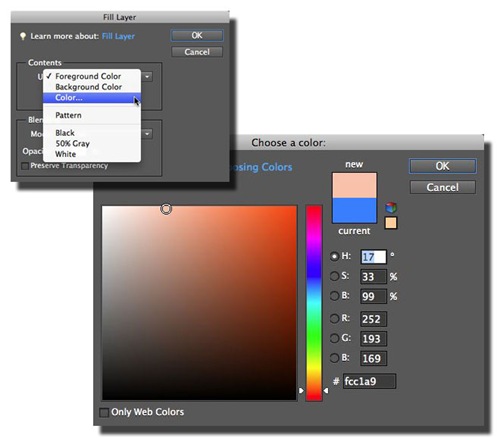
7. Go to The Edit menu and select Fill Selection. The default contents will be the foreground colour but we need a custom colour. Click on the Use menu and select Color. The colour palette will appear. Skin tones are found somewhere between red and orange so drag the arrows down on the Hue bar, then pick a suitable shade from the main window. Click OK to set the colour, and then click OK in the Fill dialog to fill the selection.

8. Weve filled the layer with our colour but theres a bit of a problem, we cant see anything else! This is because the colour layer is on top of the original. We can fix this by changing the layers Blend Mode. These change the way the contents of a layer interact with the layer below. To change the mode, click the Blend Mode menu at the top of the Layers panel (it will be Normal to begin with) In this case well use Multiply. This mode only affects areas that are lighter than the current layer and as the layer below is black and white, the black areas are ignored so the colour only applies to the white areas.

9. The next step is to add the detail colours. We could do this on the skin layer but it would be difficult to correct any mistakes so well do this on a new layer above. Create a new layer as before, this time name it Details. Again, we want the colours to show through to the original so we can set the blend mode in the dialog box before we create it. Set the Mode to Multiply and click OK.

10. Grab the Brush tool from the Toolbox. Right-click the mouse anywhere on the image to open the brush picker. We want the detail to have a hard edge so select the Hard Round 19 pixels preset.
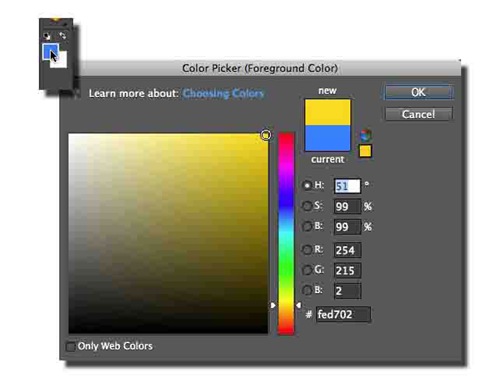
11. Well be starting with the hair, so we need to choose a suitable colour. Click the forground colour chip in the Toolbox. The colour palette will appear. Choose a vibrant yellow and click OK.
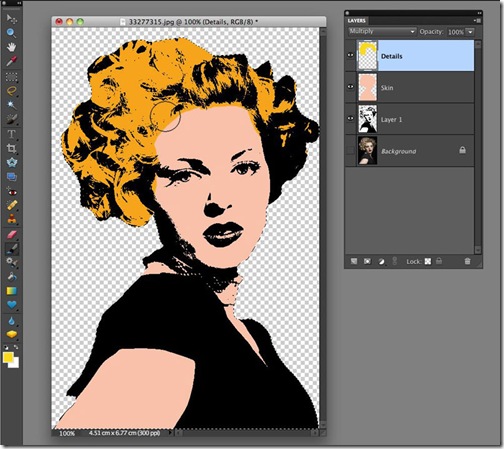
12. Start to paint over the area of the hair. Because we set the blend mode to Multiply, the new colour is only covering the skin tone, leaving the black detail intact. Youll notice the yellow appears slightly different to the actual colour you chose, this is because its mixing with the skin tone as well. Dont worry about going over the edges; the selection prevents anything spilling out. Continue painting; again, dont worry about being too accurate around the hairline, Warhols original is in block colour and has a very hard edge. If you need to make the brush tip larger you can press the right square bracket on the keyboard (next to the P key).

13. Once the hair is finished we can add the other details. Go back and click the foreground colour chip, this time select a deep red, this will be for the lips. Reduce the size of the brush using the left square bracket key. Now paint over the top of the lips. You can go over the outline slightly to define them more. Switch to a light blue and paint in the eye-shadow. You can also dab the blue on her eyes.
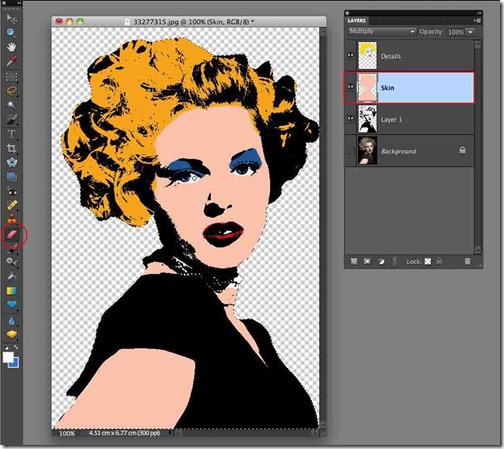
14. In the Warhol original, the white areas (teeth and eyeballs) were left in skin tone. If we want to add the white in on the image, well need to do it a little differently. Painting with white will have no effect on this layer, as its set to Multiply. Instead, click on the skin layers thumbnail to make it the active layer. Now select the Eraser tool. Using a small brush tip, erase the areas that you want to be white. Basically, what we are doing is letting the original black and white layer show through.
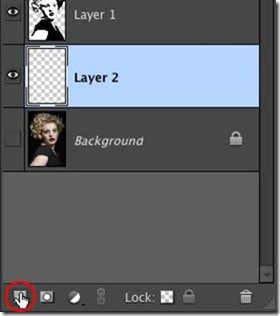
15. Were almost done. All that remains is to create a new backdrop for the image. Well need to remove the selection first, so go to the Select menu and choose Deselect. Click the mouse on the background layers thumbnail. Now create a new layer, either from the Layer menu as before, or by clicking the New Layer icon in the Layers panel. A new layer thumbnail will appear beneath the rest.
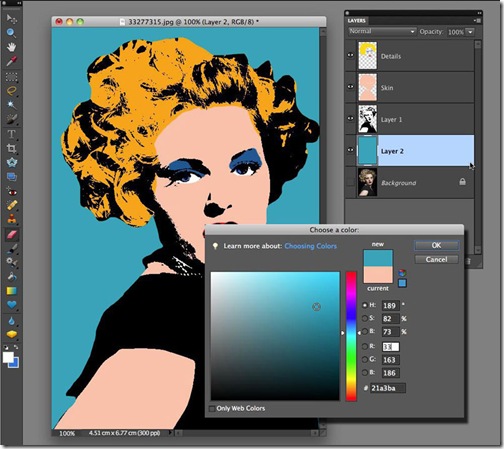
16. Go to Edit > Fill Layer. The Contents will still show Color but we have to click it again to open the colour palette. Well choose a colour for the background, a blue/green will work well. Click OK to set the colour and then click OK again to fill the layer. And thats the effect completed.
Create Andy Warhol Pop Art with Photoshop
Create Andy Warhol Pop Art with Photoshop PHOTO EFFECT IN PHOTOSHOP, PHOTO: POP ART TUTORIAL 0 COMMENTS: Next Page Learn Photoshop Elements
How to Create Deke's New Improved Andy Warhol Effect in ...
How to Create Deke's New Improved Andy Warhol Effect in Photoshop. Andy Warhol. In other words, I'm Read on see how to start your own Photoshop Pop Art
Andy Warhol Pop Art Silkscreen Effect - Photoshop ...
Photoshop Elements; Photography tutorials; Templates and GUIs; News and Promotions; Featured Tutorials; Andy Warhol Pop Art Silkscreen Effect. SHARE THIS ARTICLE.
New Tutorial Andy Warhol Pop Art Silkscreen Effect ...
New Tutorial Andy Warhol Pop Art Silkscreen Effect Creating your own Pop Art-inspired images with Photoshop is easy, and great fun, too.
Warhol-Style Pop-Art Effect with Photoshop Elements | LinkedIn
When you join a group, other members will be able to see your profile and message you. The group logo will be visible on your profile unless you change that setting.
Andy Warhol Pop Art Silkscreen Effect - Photoshop Pop Art ...
Andy Warhol Pop Art Silkscreen Effect FaceAge ® Photoshop. Plugin for Photoshop, Elements. Users Manual . www.pantomat.com; www.abalonellc.com,
Andy Warhols vivid use of color in his... - Adobe ...
Andy Warhols vivid use of color in his works is legendary. Transform your own work of art into a masterpiece with the use of the Pop Art effect in
Andy Warhol inspired pop art photo effect
Photoshop Elements; Andy Warhol inspired pop art photo effect. into an Andy Warhol inspired piece of pop art! This Photoshop tutorial is easy to follow
Photoshop Elements 9 has great new features. See what they ...
Photoshop Elements 9 has borrowed some powerful Pop Art. Reflection. Lomo Camera Effect - This simulates an effect Pop Art - This is that cool Andy Warhol
Andy Warhol effect - Elements Village
Andy Warhol effect Photoshop Elements Editor pop art /warhol: Cherisabrenta: Photoshop Elements Editor: 2: May 5th, 2008 05:20 PM: The Warhol Effect: susangreen:
ConversionConversion EmoticonEmoticon