Written by Steve Patterson. When it comes to making selections in Photoshop, theres really two types of people those who know how to use the Pen Tool, and those who struggle. Most people put off learning how to use the Pen Tool for as long as possible, while others never get around to learning it, believing its just too confusing, too complicated, and just plain unnatural. Ultimately, their work in Photoshop suffers for it, since theyre stuck relying on the Lasso Tool for just about everything they cant select with the Rectangular or Elliptical Marquee Tools. In this Adobe Photoshop tutorial, were going to put an end to the suffering. Were going to learn just how easy it really is to make selections with the Pen Tool.
Now, when I say "easy", I dont mean youre going to read this tutorial and be instantly transformed into a Pen Master. Learning how to use the Pen Tool is a lot like learning how to ride a bike. Once youve learned, it will seem completely natural and youll wonder how anyone could possibly not know how to use something so simple. But getting to that point requires a little practice and effort, and while reading every book there is on how to ride a bike may teach you the fundamentals of how the pedals, gears and brakes work, its not until youre on the bike struggling to keep your balance that the real learning begins.
One of the great things about the Pen Tool is that its not something thats exclusive to Photoshop. Far from it! Virtually every popular photo editing, graphics and page layout program uses the Pen Tool in one form or another , so once youve learned how to use it in Photoshop, youll already have a good understanding of how to use it in lots of other programs as well!
Where Do I Find The Pen Tool?
Before we start talking about what the Pen Tool is or how to use it, we should look at where to find it in Photoshop first. Youll find the Pen Tool in the Tools palette, grouped in with the Shape Tools, the Type Tool, and the Path Selection (the white arrow) and Direct Selection (the black arrow) Tools (see the image on the left).
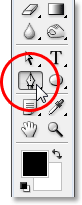
Photoshops Pen Tool
Of course, this may raise the question of why, if we can make selections with the Pen Tool, is it not grouped in with the other selection tools (the Rectangular Marquee Tool, the Elliptical Marquee Tool, the Lasso Tool, etc.) at the top of the Tools palette? Why is it down there with those other tools which are clearly not selection tools?
Thats an excellent question, and there just happens to be an equally excellent answer to go with it, which well get to in a moment.
Why Is It Called The Pen Tool?
One of the first stumbling blocks to learning how to use the Pen Tool, as with many other things in Photoshop, is its name, since after all, if theres one thing that everyone whos ever tried to use it knows, this thing is not a pen. At least, not the sort of pen youd normally think of when you hear the word "pen". Try writing your name with it in the same way you might sign your name on a piece of paper with a pen and youll probably end up with a twisted, tangled mess and things looping all over each other (of course, I suppose that could very well be how you sign your name).

Pierre Bezier
So if it doesnt act like a traditional ink pen, why is it called the Pen Tool? The Pen Tool has actually been called several things over the years, and by that, I dont mean the sort of things you may have called it in moments of frustration. You may have heard it referred to as the Bezier Pen or the Bezier Tool, and thats because it was created by a man named Pierre Bezier (thats him on the left), a French engineer and all-around smart guy who came up with the fancy math that powers the tool while working for the Renault car company (the Pen Tool was originally created to help design cars).
You may also have heard the Pen Tool referred to as the Paths Tool, and thats really the most appropriate name for it. The Pen Tool is all about drawing paths. To make selections with the Pen Tool, we simply convert the path or paths weve drawn into selections. It always begins, though, with a path.
What Is A Path?
A path is, quite honestly, something that may seem a little out of place inside a program like Photoshop. The reason is because Photoshop is primarily a pixel-based program. It takes the millions of tiny square pixels that make up a typical digital image and does things with them. Paths, on the other hand, have absolutely nothing to do with pixels, which is why I said they may seem out of place in a program thats used mainly for editing and drawing pixels.
A path is really nothing more than a line that goes from one point to another, a line that is completely independent of and cares nothing about the pixels underneath it. The line may be straight or it may be curved, but it always goes from one point to another point, and as I mentioned, it has nothing at all to do with the pixels in the image. A path is completely separate from the image itself. In fact, a path is so separate that if you tried to print your image with a path visible on your screen, the path would not appear on the paper. Also, if you saved your image as a JPEG file and uploaded it to a website, even if you saved the image with the path visible on your screen in Photoshop, you wont see it in the image on the website. Paths are for your eyes and Photoshop only. No one else will ever see them, unless they happen to walk past your computer while youre working.
We always need a minimum of two points to create a path, since we need to know where the path starts and where it ends. If we use enough points that we can bring our path back to the same point it started from, we can create different shapes out of paths, which is exactly how Photoshops various Shape Tools work. The Rectangle Tool uses paths, connected by points, to draw a rectangular shape. The Ellipse Tool uses paths, connected by points, to draw an elliptical shape, and so on. Its also how Photoshops Type Tool works, although Photoshop handles type a bit differently than it handles regular shapes, but all type in Photoshop is essentially made from paths. In fact, you can convert type into shapes, which then gives you all of the same path editing options with type that you get when working with shapes.
You may also have heard paths referred to as outlines, and thats a pretty good description of what a path is, or at least, what a path can be. We can draw a square path, and if we do nothing else with it, as in we dont fill it with a color or apply a stroke to it, then all we have is a basic outline of a square. Same with a circle or any other shape we draw. The path itself is just the outline of the shape. Its not until we do something with the path, like fill it, apply a stroke, or convert it into a selection, that the path actually becomes something more than a basic outline.
You can select an entire path using the Path Selection Tool (also known as the "black arrow" tool), or you can select individual points or path segments using the Direct Selection Tool (the "white arrow" tool). A path segment, or line segment as its sometimes called, is any path between two points. A rectangular path, for example, would be made up of four points (one in each corner), and the individual paths connecting the points together along the top, bottom, left, and right to create the shape of the rectangle are the path segments. The actual path itself is the combination of all of the individual path segments that make up the shape.
That can be a little confusing, so lets see what I mean. Open a new document inside Photoshop. It doesnt matter what size it is. Ill choose the 640×480 size from the list of presets, but as I said, it doesnt matter what size you choose. Select your Pen Tool from the Tools palette. You can also select the Pen Tool simply by pressing the letter P on your keyboard.
The Two Pen Tool Modes
Now, before we continue, we first need to make sure were working with paths, and thats because the Pen Tool actually has two different modes it can work in, and by default, it uses the other one. With the Pen Tool selected, if we look up in the Options Bar at the top of the screen, well see a group of three icons:

The Options Bar in Photoshop showing the group of three icons representing each of the three Pen Tool modes.
I know I said theres two modes the Pen Tool can work in and yet, as if to make things more confusing, theres three icons, but the icon on the right, which is the Fill pixels icon, is grayed out and not available when working with the Pen Tool. Its only available when working with the various Shape Tools, so theres really only two icons we need to look at.
The icon on the left is the Shape layers icon, also known as "not the one we want", and its the one thats selected by default. If we were to work with the Pen Tool with that icon selected, wed be drawing shapes, just as if we were using any of the various Shape Tools, except that instead of drawing a predefined shape like a rectangle or an ellipse, we could draw any shape we wanted. As I said though, thats not what we want. We want the icon beside it, the Paths icon, so go ahead and click on it to select it:
Photoshop Tutorials: Click on the Paths icon in the Options Bar to work with paths with the Pen Tool.
With the Pen Tool selected and the Paths icon selected in the Options Bar, click once anywhere inside your document. Dont click and drag, just click. When you do, youll add a small square point. Ive enlarged it here:

Click once inside the document with the Pen Tool to add a point.
This first point weve just added is the starting point of our path. Now at the moment, we dont actually have a path. All we have is a starting point. The point is technically called an anchor or anchor point, and its named that because it anchors the path into place. This first point will anchor the beginning of the path to this spot inside the document. As we add more points, each of them will anchor the path into place at that location.
Lets add another point. Click somewhere else inside the document. Anywhere will do. Im going to click somewhere to the right of my initial point:

Photoshop Tutorials: Add a second anchor point by clicking somewhere else inside the document.
Ive now added a second anchor point, and look whats happened. I now have a straight line joining the two points together! That straight line is my path. As I mentioned earlier, we need a minimum of two points to create a path, since we need to know where the path starts and where it ends, and now that we have both a starting and an end point, Photoshop was able to connect the two points together, creating our path.
Lets add a few more points just for fun. Click a few more times at different spots inside the document. Again, dont click and drag, just click:
Add additional points by clicking at different spots inside the document.
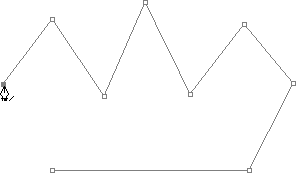
In the image above, Ive added seven more anchor points by clicking at different spots with the Pen Tool, and each time I added one, the length of my path increased because a new path segment was added between the previous point and the new point. My path now consists of nine anchor points and eight path segments. I could continue clicking around inside the document to add more anchor points and path segments, but what Id really like to do now is close my path so it forms a complete shape.
Closing A Path
To close a path, all we need to do is click once again on our initial starting point. When you hover your mouse cursor over the starting point, youll see a small circle appear in the bottom right corner of the pen icon:

A small circle appears in the bottom right corner of the pen icon when hovering the cursor over the initial starting point of the path.
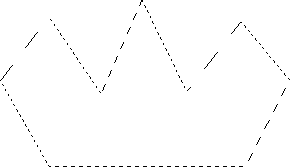
That circle tells us that were about to come full circle with our path, finishing it off where it began. To close it, simply click directly on the starting point. We can see below that my path has become a closed path and is now a basic outline of a shape:
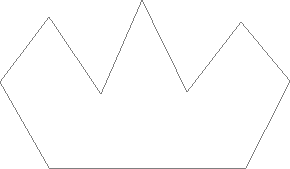
The path is now closed, finishing at the starting point, creating a closed path.
Even though this path was drawn just for fun as an example of how to draw a basic path with the Pen Tool , I can easily turn this path into a selection. For that, we need Photoshops Paths palette, and well look at that next.
Turning A Path Into A Selection
So far, weve looked at what a path is and how to draw a basic path with Photoshops Pen Tool. But how do you go about making a selection from the path?
Easy! Theres a couple of ways to turn a path into a selection, including a handy keyboard shortcut, but before we look at the quick way, lets look at the official way. The official way involves using Photoshops Paths palette, which youll find grouped in with the Layers palette and the Channels palette:
Photoshops Paths Palette.
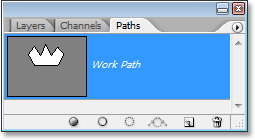
At first glance, the Paths palette looks very similar to Photoshops Layers palette, and Adobe purposely made it like that so youll feel more comfortable using it. We can see a thumbnail preview of the shape of the path we just created, and by default, Photoshop names the path "Work Path", which is basically a fancy way of saying "temporary", as in if you were to create a different path now without renaming this path to something else first, this one would be replaced by the new path. You can only have one "Work Path", so if you want to keep it, youll need to double-click on its name in the Paths palette and name it something else before creating a new path.
Since my path looks a bit like a crown, Im going to double-click on the name Work Path, which with bring up Photoshops Save Path dialog box, and Im going to rename my path Crown:
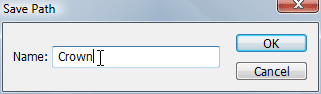
You can save a temporary Work Path simply by renaming it.
Ill click OK when Im done, and now if I look in my Paths palette again, I can see that sure enough, my Work Path has been renamed Crown:
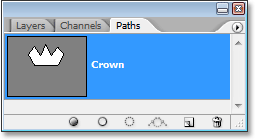
The Paths palette showing that the path has been renamed Crown.
By renaming it, the path is now saved and wont disappear on me if I go to create a new path. Also, any saved paths are saved with the Photoshop document, so now, if I save my document, the path will be saved with it and the next time I open the document, the path will still be there in the Paths palette.
Saving a path is not something you need to do in order to turn it into a selection. In most cases when using the Pen Tool to make selections, you wont have any need for the path once youve made a selection from it, so there wont be any need to save it. If you did want to save it though, just rename it to something other than "Work Path" and its saved.
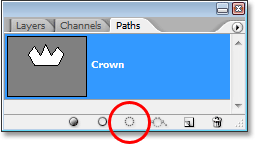
To turn the path into a selection, if we look at the bottom of the Paths palette, we can see several icons. These icons allow us to do different things with our path. The first icon on the left is the Fill path with Foreground color icon, and as its name implies, clicking on it will fill our path with our current Foreground color. Interesting, but thats not what we want. The second icon from the left is the Stroke path with brush icon, which will apply a stroke to our path using whatever brush we currently have selected.
This is a great way to create interesting effects in Photoshop, but for what were doing here, turning a path into a selection, its not what we want either. The one we want is the third icon from the left, the Load path as a selection icon:
The Load path as a selection icon at the bottom of the Paths palette.
As soon as I click on this icon, my path inside my document becomes a selection, as if I had created it using any of Photoshops more common selection tools:
The path has now been converted into a selection.
Its that easy! In fact, its even easier than that because theres a keyboard shortcut for turning a path into a selection without having to switch to the Paths palette at all. When youve drawn your path and youre ready to turn it into a selection, simply press Ctrl+Enter (Win) / Command+Return (Mac) to have Photoshop convert the path into a selection.
By now, it may be a little more obvious to you why, even though the Pen Tool is very much a selection tool, its not grouped in with the other selection tools at the top of the Tools palette. The reason is because the Pen Tool is primarily a path tool. It creates selections by first creating paths, and for that reason, it has more in common with the various Shape Tools and the Type Tool, all of which use paths , than it has with the basic selection tools like the Rectangular Marquee Tool or the Lasso Tool, which make selections based only on pixels.
Lets look at a practical example of what weve learned so far. Here we have a photo of a stop sign in front of some rocky cliffs:

A photo of a stop sign.
Lets say I wanted to select that stop sign so I can copy it onto its own layer. The stop sign is made up of nothing more than a series of straight lines, which is going to make this extremely easy. First, I need a starting point for my path, so Ill start in the top left corner of the sign by clicking once to place an initial anchor point. In this case, it doesnt really matter where I start the path, but Ill start in the top left corner:
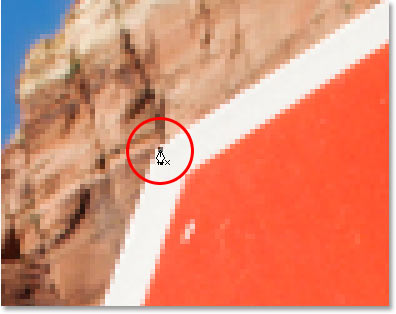
Clicking once in the top left corner of the stop sign to begin the path with an initial anchor point.
Notice how Im zoomed in here as I click. Youll find it easier when making selections with the Pen Tool to zoom in a little on your image. That way, you can be sure youre keeping your path just inside the area you want to select.
Right now, I dont have a path, I just have a starting point for my path. To create the path, all I need to do is go around the sign adding an anchor point in each corner where the path needs to change direction. As I add each anchor point, a new path segment will appear joining the previous anchor point with the new one, until Ive gone all the way around the sign. To close the path, Ill simply click back on the initial starting point. Its a little hard to see in the screenshot below, but I now have a path around the entire stop sign, including the post its attached to, simply by going around clicking in the corners where the path needs to change direction:

A path now appears all around the stop sign in the image.
If I look in my Paths palette now, I can see very clearly that I have a path in the shape of the stop sign:
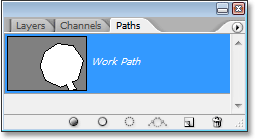
Photoshops Paths palette showing the path drawn around the stop sign.
Notice how Photoshop has named the path Work Path, which means that this path is temporary and Ill lose it if I create a different path without saving this one first by renaming it. Even if I dont create a new path, Ill still lose it when I close out of the document unless I save it first. I have no need to save this path though, so I wont worry about it. In most cases, you wont need to worry about it either.
To convert my path into a selection, Ill click on the Load path as a selection icon at the bottom of the Layers palette, or I could just as easily press Ctrl+Enter (Win) / Command+Return (Mac):
Click on the Load path as a selection icon in the Paths palette, or press Ctrl+Enter (Win) / Command+Delete (Mac) to convert the path into a selection.
As soon as I do, my path is converted into a selection, and the stop sign is now selected:

The stop sign is now selected after converting the path into a selection.
Ill switch back over to my Layers palette, and to copy the stop sign onto its own layer, Ill use the keyboard shortcut Ctrl+J (Win) / Command+J (Mac), which places the sign on its own layer above the Background layer:
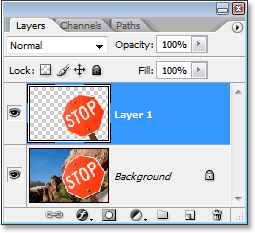
The stop sign has now been copied onto its own separate layer.
With the sign now on its own layer, I can do whatever I like with it, swapping the background with a different image, or making the background black and white while leaving the sign in color, whatever I can think of. The point is that I was able to easily select the sign by clicking in the corners with the Pen Tool, which created a path around the sign, and then I simply converted the path into a selection.
So far in our look at making selections with the Pen Tool in Photoshop, weve learned that the Pen is every bit a selection tool as Photoshops more common selection tools like the Rectangular Marquee and the Lasso Tools, but that instead of making selections based on pixels as those other tools do, the Pen Tool draws paths which can then be easily converted into selections, either from the Paths palette or by using the quick keyboard shortcut.
Thats why the Pen is found not at the top of the Tools palette with those other pixel-based selection tools but is instead grouped in with the path tools, like the various Shape Tools, the Type Tool, and the Path Selection and Direct Selection Tools. The Pen Tool is all about paths, not pixels.
Weve learned that we can add anchor points inside our document, which anchor the path in place, by simply clicking in different spots with the Pen Tool, and as we add more and more anchor points, we create a path as each new point is connected to the previous point by a new path segment. Weve also learned that a path is whats typically referred to as a non-printing-element, which means that no matter how many paths we add, none of them will be visible on the paper when we go to print the image. They also will not be visible if we display the image on a website. Paths are visible only to us when working inside Photoshop (although other programs like Adobe Illustrator also support paths). Its not until we do something with the path, like fill it with a color, apply a stroke to it, or convert it into a selection, that the path becomes something more than just a basic, non-printing outline of a shape.
We saw how easy it would be to use the Pen Tool to select something like a stop sign by outlining it with a path made up of a series of straight path segments and then turning the path into a selection. Thats great, but really, we havent done anything yet that we couldnt have done more easily with something like the Lasso Tool, or even better, the Polygonal Lasso Tool which was built specifically for selecting flat-sided shapes like our stop sign. Chances are, unless you have some strange fascination with road signs, sooner or later youre going to want to select something a little more interesting, and by "interesting" I mean more challenging. And by "challenging", I mean something that contains curves. Selecting a curved object in Photoshop is usually when you find yourself losing all respect for the basic selection tools. Fortunately, it also happens to be the time when the Pen Tool really shines!
Before we continue, I should point out that everything weve done up to this point has been pretty simple. Click here, click there, convert the path into a selection, done. This next part where we get into drawing curves isnt quite as simple, although its certainly not difficult, but if this is your first time with the Pen Tool or you dont have much experience with it, working with curves may seem a bit unnatural and even a little overwhelming. This is definitely where the "riding the bike" analogy comes in. You may fall off a few times at first and wonder how anyone manages to do it, but the more you practice and the more you stick with it, the more sense it all starts to make. In no time at all, it will seem like second nature to you and youll suddenly understand why so many people swear that the Pen Tool is the single greatest selection tool in all of Photoshop! Seriously, it really is.
Getting A Handle On Direction Handles
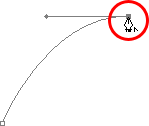
Lets start again with the Pen Tool. Open up a new blank Photoshop document, or simply delete what youve done so far in the existing document so were starting fresh. Then with the Pen Tool selected and the Paths option selected in the Options Bar (remember, it defaults to the Shape layers option so youll need to make sure you have the Paths option selected), click once anywhere inside your document, just as we did before. This time though, rather than just clicking to add an anchor point, click and then drag your mouse a short distance away from the anchor point before releasing your mouse button:
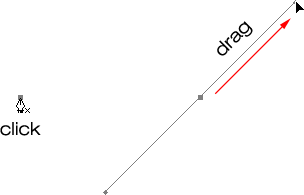
Click anywhere inside the document with the Pen Tool, then drag a short distance away from the anchor point.
When youre done, youll see an anchor point with two lines extending out from it. At first glance, you may think weve somehow managed to drag out a path with the Pen Tool. After all, it looks like we have three anchor points, one on either end and one in the middle, with two path segments connecting them. If we look a bit closer though, we can see that the points on either end are a bit smaller than the one in the middle, and that theyre actually a different shape. The one in the middle is square, and as weve seen, an anchor point is square, but the ones on either end seem to be diamond-shaped. Are some anchor points square and some diamond-shaped?
Nope. All anchor points are square, and theyre all the same size, which means those smaller, diamond-shaped points on the ends are not anchor points. And if theyre not anchor points, that means the lines are not path segments, since we need at least two anchor points to create a path and right now the only anchor point we have is the one in the middle. So what exactly are those lines then that are extending out from the anchor point? Theyre direction handles!
Ah, direction handles! you say. Now I get it!
.
Wait, no I dont. What the heck are direction handles?
Direction handles are, well, handles, and theyre used only when creating curved path segments. Theres no need for direction handles when creating straight path segments. Theres usually two of them, although sometimes theres only one, and as weve already seen, they extend out from anchor points. Theyre called handles because, as well see in a moment, you can actually grab them and move them around.
Direction handles control two things. They control the angle of the curve, and they control the length of the curve, and they do it in a really neat way. The reason theres usually two of them is because one of them controls the angle and length of the curve coming into the anchor point, and the other controls the angle and length of the curve flowing out from the anchor point.
Before we look at how to draw curves with the direction handles, lets first see how to control the handles themselves, since our success with drawing curves will depend a lot on our ability to control the handles. Dont worry, its not, as they say, rocket science. Theres just a few simple things you need to learn. Weve already seen how to create direction handles, by clicking with the Pen Tool and then dragging away from the anchor point. The further away from the anchor point we drag, the longer the direction handles will be. The longer the handle, the longer the curve. Short handle, short curve. Long handle, long curve.
One of the nice things youll learn rather quickly about the Pen Tool is that it is extremely forgiving. Theres no reason at all to worry about getting things right the first time when drawing paths with it because we can go back and fix things up easily when were done! Did you place an anchor point in the wrong spot? No problem! Just move it where you need it! Well see how to do that in a moment. Did you drag out a direction handle in the wrong direction? Not a problem. Grab the handle and rotate it into the direction you need. Again, well see how to do that. Is one of your direction handles too long or too short? No problem at all. Just click on it and then drag it longer or shorter as needed (yep, were going to see how to do that, too). Paths are fully editable at all times, so theres absolutely no reason to worry about making a mistake or getting it right the first time. Doesnt that make you feel a little better already?
Rotating And Resizing Direction Handles
As I mentioned, theyre called direction handles because you can grab them like handles and move them around. Lets see how to do that. First, well look at how to rotate both handles at the same time. Using the anchor point and the two direction handles weve already created, hold down your Ctrl (Win) / Command (Mac) key. Youll see your Pen Tool icon temporarily turn into the Direct Selection Tool (the white arrow) icon, and thats because with the Pen Tool selected, holding Ctrl/Command becomes a quick shortcut for temporarily accessing the Direct Selection Tool which is what we use to select different parts of our path. Then simply click directly on the small diamond shape at the end of either of the direction handles (clicking on the "line" itself wont work, so you always need to click on the diamond shape at the end of a handle to do anything with it) and drag it around the anchor point to rotate it. As you rotate one of the handles, the other handle rotates along with it in the opposite direction, sort of like a see-saw. You may also notice that as soon as you start dragging the handle, your mouse cursor icon will change once again, this time into the Move Tool icon, since were moving something from one spot to another:
Hold Ctrl (Win) / Command (Mac) and click on the end of either of the direction handles, then drag the handle to rotate it around the anchor point. As you drag one handle, the other rotates in the opposite direction.
You can release your "Ctrl/Command" key once youve started dragging the handle. No need to keep it down the whole time.
To resize a direction handle as youre rotating it, simply drag the end of the handle in towards the anchor point to make it shorter or drag it away from the anchor point to make it longer. As I mentioned above, a shorter handle will make the curve shorter, and a longer handle will make the curve longer. You cant resize both handles at the same time though, so if you need to resize both of them, youll need to drag each one longer or shorter separately. The only thing you can do to both of them at the same time is rotate them. If youve already released your mouse button after rotating the handles and the cursor has changed back into the Pen Tool icon and you need to resize one of the handles, youll need to hold down Ctrl/Command once again to temporarily switch back to the Direct Selection Tool and then click and drag the end of the handle to resize it:
Drag the ends of the handles in towards the anchor point to shorten them, or drag them away from the anchor point to make them longer.
Now lets look at how to rotate the handles independently of each other. To rotate one handle without affecting the other one, first release your mouse button if youve been rotating or resizing the handles so your cursor changes back into the Pen Tool icon. Then, instead of holding down Ctrl/Command, which moves both handles at once, hold down your Alt (Win) / Option (Mac) key and click on the end of either of the direction handles. Youll see your cursor change into the Convert Point Tool icon, which looks like a simplified arrow made of only two lines, almost like an upside down letter v (except that its not quite upside down). Then, simply drag the handle around the anchor point to rotate it, just as you did before, and this time, the handle will rotate independently of the other one, breaking the connection between them:
Hold down Alt (Win) / Option (Mac) and click on the end of either of the direction handles, then drag the handle to rotate it around the anchor point independently of the other handle.
Again, you can release your Alt/Option key after youve started dragging. You dont have to hold it down the whole time.
You can also resize direction handles using the Alt/Option key in exactly the same way as you can with the Ctrl/Command key. If youre in the process of rotating a handle, simply drag it in towards the anchor point to make it shorter or away from the anchor point to make it longer. If youve already released your mouse button and your cursor is showing the Pen Tool icon again, youll need to hold down Alt/Option once again, then click on the end of the handle and drag it to resize it.
Is there a difference between resizing the handles using Ctrl/Command and using Alt/Option to do it? Yes there is. If you havent yet "broken the connection" between the handles by dragging one independently of the other, resizing a handle using "Ctrl/Command" will keep the handles connected together. It wont resize both handles at once, but it wont break the connection between them either so youll still be able to rotate them together if you need to. If you resize a handle using "Alt/Option", youll break the connection between the handles. Even if you dont rotate the handle as youre resizing it, the connection will still be broken.
What if youve broken the connection between the handles by rotating them using "Alt/Option" and then want to rotate them together again? Can you "rebuild the connection", so-to-speak, by selecting one of them while holding down "Ctrl/Command" as before? Good question, and the answer is no. Once youve broken the connection between the handles, the "Ctrl/Command" key on its own wont bring it back. Youll need to select one of the handles while holding Ctrl+Alt (Win) / Command+Option (Mac) at that point in order to move the handles together again.
Quick Summary So Far
Weve covered a lot of information here about working with direction handles, so before we move on and start drawing some actual curves, lets do a quick recap:
- To add an anchor point, simply click with the Pen Tool.
- To add an anchor point with direction handles extending out from it, click with the Pen Tool, then drag away from the anchor point before releasing your mouse button. The further you drag, the longer the direction handles will be.
- To rotate the direction handles together, hold down Ctrl (Win) / Command (Mac), which will temporarily switch you to the Direct Selection Tool, then click on the end of either handle and drag it around the anchor point. The other handle will rotate in the opposite direction.
- To rotate the direction handles independently, hold down Alt (Win) / Option (Mac), which will temporarily switch you to the Convert Point Tool, then click on the end of either handle and drag it around the anchor point. The other handle will not rotate.
- To resize handles without breaking the connection between them, hold down Ctrl (Win) / Command (Mac) to switch to the Direct Selection Tool, then click on the end of either handle. Drag it towards the anchor point to make it shorter, or drag it away from the anchor point to make it longer.
- To resize handles and break the connection between them, hold down Alt (Win) / Option (Mac) to switch to the Convert Point Tool, then click on the end of either handle. Drag it towards the anchor point to make it shorter, or drag it away from the anchor point to make it longer.
- To rotate the direction handles together after breaking the connection, hold down Ctrl+Alt (Win) / Command+Option (Mac), then click on the end of either handle and drag it around the anchor point. The other handle will once again rotate with it.
Okay, that pretty much covers the basics of how to control the direction handles. Lets see how we can use them to draw some curves!
Weve covered a lot of ground so far. We know about anchor points and direction handles. We know that in order to draw straight path segments, all we need to do is lay down a series of anchor points wherever we need them simply by clicking with the Pen Tool, and as we add more and more anchor points, we add more straight sections to our path. We know how to create direction handles and how to rotate them, either together or separately, and how to resize them.
We know how to turn a path into a selection by clicking on the Load path as selection icon at the bottom of the Paths palette or by simply pressing Ctrl+Enter (Win) / Command+Return (Mac) on the keyboard. One thing I didnt mention yet is that regardless of whether our path consists of straight lines, curves, or a combination of straight lines and curves, converting it into a selection is done exactly the same way, and weve already learned how to do it, which means were well on our way to mastering making selections with the pen! All we need to do is get a bit of practice drawing curves, which is exactly what were about to do!
Drawing A Curve
Lets once again start fresh, either by opening up a new blank document in Photoshop or by deleting what youve already done. Were going to draw our first curve so we can put all of our newly-aquired direction handle knowledge to use. First, with the Pen Tool selected and the Paths option selected in the Options Bar, click once somewhere in your document to add an anchor point. Just click, dont click and drag. You should have one single anchor point on the screen when youre done.
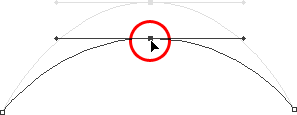
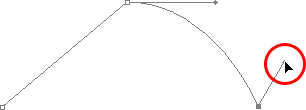
Then, move your mouse cursor up and to the right of your initial anchor point. Click again to add a second anchor point, but this time, drag your mouse a little to the right of the anchor point to drag out direction handles. Hold down Shift as you drag to constrain your movement to a horizontal direction. As you drag out the direction handles, youll see your path appearing as a curve between the two anchor points! The further you drag your mouse, the longer you make the direction handles, and the more of a curve you create:

Click once to add an anchor point, then click and drag out a second anchor point with direction handles, creating a curved path segment between the two points.
Click down and to the right of the second anchor point to add a third anchor point. This time, dont click and drag, just click:
Add a third anchor point down and to the right of the second one by clicking with the Pen Tool.
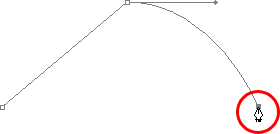
As soon as you add the third anchor point, a second path segment will appear, joining the second anchor point with the third one. And because our second anchor point has direction handles extending from it, this new path segment is also curved! We now have a nice, smooth arc starting from the first point on the left, then passing through the anchor point with the direction handles up top, and coming to an end at the third point.
One thing you may have noticed, and you can see it in the screenshot above, is that when you added the third anchor point, the direction handle extending out the left side of the second anchor point disappeared. Its still there, Photoshop simply hid it from view. To see it again, use the keyboard shortcut weve already learned to temporarily switch to the Direct Selection Tool, which is by holding down the Ctrl (Win) / Command (Mac) key, and then click on the second anchor point to select it. As soon as you do, the missing direction handle reappears as if it was there the whole time (which it was):
Hold down the Ctrl (Win) / Command (Mac) key to temporarily switch to the Direct Selection Tool, then click on the top anchor point to select it. The missing anchor point reappears.
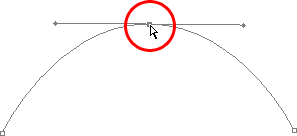
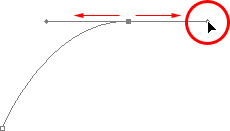
With your Ctrl/Command key still held down so you still have access to the Direct Selection Tool, try resizing each direction handle by clicking on the end of each one to select it and then dragging it towards and away from its anchor point. Again, hold Shift as you drag to constrain your movement horizontally, and watch what happens. As you increase the length of a handle, you get more of a curve, and as you decrease its length, you get less of a curve. Also notice that each handle controls its own side of the curve. The handle on the left controls the curve coming into the anchor point from the left, and the handle on the right controls the curve flowing out from the anchor point on the right.
Here, Ive made my handle on the left shorter, and as we can see, theres much less of a curve now than there was originally, almost becoming a straight line. Ive also made the handle on the right longer, and as a result, the curve on the right is now much more pronounced. The faint curve is the original for comparison:
Change the shape of the curves by resizing the direction handles. The left handle controls the left curve, and the right handle controls the right curve.
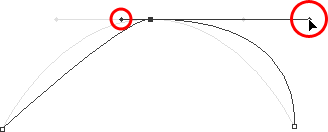
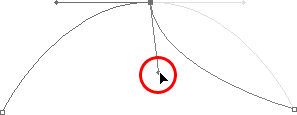
Im going to undo my changes by pressing Ctrl+Alt+Z (Win) / Command+Option+Z (Mac) a couple of times to set my direction handles back to their original sizes so theyre equal length once again. Now lets try rotating the handles. Hold down "Ctrl/Command" once again to access the Direct Selection Tool, then click on the end of either handle to select it and try rotating it around the anchor point. Since we selected the handle with "Ctrl/Command", both handles rotate together. Here Ive dragged my left handle down and to the right, and the angle of the curve on the left changed along with it, now appearing as more of a slope as it rises up towards the anchor point. By dragging the left handle down and to the right, I caused the right handle to rotate up and to the left, and again, the angle of the curve on the right changed along with it, now rising above the anchor point briefly before making a steep decent down to the anchor point on the right. Again, the faint curve is the original for comparison:
Rotate the direction handles to change the angle of the curves. Select a handle while holding Ctrl (Win) / Command (Mac) to rotate both handles together.
The Dreaded Loop
One thing you want to avoid is rotating the handles too far, which will cause your path segments to overlap and create loops. Here, Ive rotated my handles all the way around so that the left handle is now on the right and the right handle is on the left, and notice whats happened. My path segments are now overlapping each other, creating a loop:
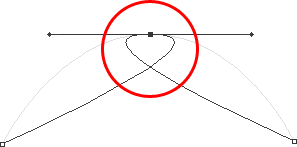
Rotating the direction handles too far causes the path segments to overlap, creating an unwanted loop in the path.
Loops can be caused by rotating the direction handles too far, as Ive done above, but more often than not, theyre caused by a handle being too long, making the curve too long and causing it to overlap with itself. If that happens, which it does sometimes as youre drawing a path, simply shorten the length of the direction handle. Most people end up creating a whole bunch of loops in their path when they first start working with the Pen Tool, so dont think youre the only one. No need to panic or become frustrated though. As I said, the problem is most likely being caused by a direction handle being too long, and all you need to do is shorten the handle to un loop the loop!
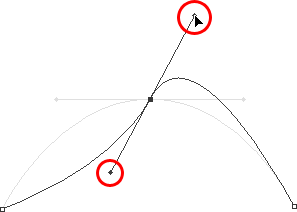
Im going to press Ctrl+Alt+Z (Win) / Command+Option+Z (Mac) a few times once again to undo my changes and reset my path back to the nice smooth arc I started with. Now, what about rotating the direction handles independently of each other? As we learned on the previous page, to rotate the handles separately, instead of selecting them with Ctrl/Command, we simply select them while holding down Alt (Win) / Option (Mac), which gives us temporary access to the Convert Point Tool. Click on the end of a handle to select it, then drag it with your mouse to rotate it and this time, the other handle will stay in place, breaking the connection between them.
Here, Ive selected the handle on the right while holding Alt/Option and then rotated it down and to the left. Notice how once again, the angle of the path segment on the right changes to match the new direction of the handle, and this time, the handle on the left, along with the path segment on the left, both stay in place. My path now looks a bit like a shark fin:
Hold down Alt (Win) / Option (Mac) to temporarily access the Convert Point Tool, then click on the end of a direction handle to select it and rotate it independently of the other handle.
Moving An Anchor Point
One thing we havent looked at yet is how to move an anchor point. If you recall, I mentioned on the previous page that the Pen Tool is extremely forgiving, and one of the reasons for it, besides being able to rotate and resize our direction handles after weve created them, is that we can easily move anchor points from one spot to another if we need to. As weve already learned, anchor points anchor a path into place. The anchor points themselves, however, are not anchored into place. You can move an anchor point anywhere, anytime, and any path segments that are connected to it will move and adjust right along with it.
To move an anchor point, hold down Ctrl (Win) / Command (Mac) to temporarily access the Direct Selection Tool as weve already been doing, then simply click on the anchor point to select it and drag it to its new location with your mouse. Any path segments connected to it will move with it to the new location. Here, Ive dragged my middle anchor point down a bit from its original location (again, the faint path marks the original location for comparison). Notice how the path itself has changed shape to adjust to the new location of the anchor point:
Hold down Ctrl (Win) / Command (Mac) and click on an anchor point to select it, then drag it to a new location. Any path segments connected to the point will move with it, changing shape as needed.
Normally, when outlining an object with a path to select it using the Pen Tool, you wont need to move to an anchor point quite as far as what Ive done above, but its very common to go back around your path after youve created it and nudge a few anchor points here and there to fine-tune the path. Once youve selected an anchor point, you can nudge it up, down, left or right using the arrow keys on your keyboard.
Combining Straight Paths With Curves
What if I didnt want both of my path segments to be curves? What if what I needed was for the first path segment to be curved, but the second one needed to be straight? Lets see how to do that. Im going to delete my existing path and start over again. First, Ill click to add an anchor point to start things off. Then, just as before, Ill click to add a second anchor point up and to the right of my initial point, and this time, Ill drag out direction handles, which will create a curved path connecting the two points, giving me exactly what I had way up at the start of this page:
Click once to add an anchor point, then click to add a second anchor point and drag out direction handles to create a curve.
I now have my initial curve, but I want my next path segment to be straight. If I was to simply click somewhere to add another anchor point right now, I would get another curve because I have that direction handle extending out from the right side of the last anchor point I added. What I need to do is get rid of that one direction handle. Without a direction handle controlling the angle and length of a curve, we get a straight line.
To remove the handle, leaving only the handle on the left of the anchor point, all I need to do is hold down Alt (Win) / Option (Mac), which will again temporarily switch me to the Convert Point Tool, and then I just click directly on the anchor point. When I do, the direction handle on the right disappears, leaving only the one on the left:
Hold down Alt (Win) / Option (Mac) and click directly on the anchor point to remove the direction handle on the right, leaving only the one on the left.
Now, with the direction handle gone, if I click to add a new anchor point, I get a straight path segment between the two points :
With the direction handle on the right now gone, clicking to add a new anchor point adds a straight path segment between the two points.
I now have a curved path segment on the left and a straight one on the right! What if I wanted the exact opposite? Suppose I needed to start with a straight path segment and then follow it with a curve? To do that, first Ill start by clicking to add an initial anchor point. Then, since I want a straight path segment, all I need to do is click somewhere else to add a second anchor point, and I automatically get a straight path connecting the two points:
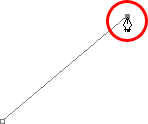
Click with the Pen Tool to add an initial anchor point, then click again somewhere else to add a second anchor point and create a straight path segment between them.
Im going to keep my mouse button held down after clicking to add my second anchor point because I want my next path segment to be curved, and we know that in order to create a curve, we need a direction handle. To add a handle extending out from the right of my anchor point, Im going to hold down Alt (Win) / Option (Mac), and with my mouse button still down, Im simply going to to drag to the right of the anchor point. As I do, a direction handle will drag out along with it:
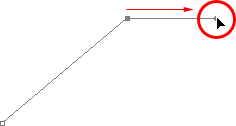
Hold down Alt (Win) / Option (Mac) and drag out a direction handle on the right of the anchor point.
Notice that the direction handle extended only from the right of the anchor point, not from both sides, leaving my straight path segment on the left in place. And now that I have my direction handle on the right, all I need to do to create my curve is click to add a third point:
Click to add a third anchor point, which creates a curved path segment between the previous anchor point and the new one.
And there we go! I now have a straight path segment on the left, followed by a curved segment on the right. Of course, most paths you draw are going to consist of more than just three anchor points. Lets say I wanted to continue this path, moving in the same general direction towards the right, and I want my next path segment to be curved as well. Just as I did a moment ago, I would leave my mouse button held down after clicking to add my third point. I would hold down Alt (Win) / Option (Mac) and I would drag out another direction handle. So far, weve only been dragging handles out towards the right, but what you really want to do is drag your handles out in the general direction you want the curve to follow. I want to create a curve that goes up and to the right, so Im going to drag out a small handle in that same general direction:
Drag out your direction handles in the general direction of the curve.
Tip! A good practice to get into is to keep your direction handles small when first dragging them out, since you never really know how long or at what exact angle they need to be until the actual curve appears, and the curve doesnt appear until youve added both of its anchor points. Once youve added both points and the curve appears, you can easily go back and make any adjustments you need to the handles. You may even want to wait until youve drawn the entire path before worrying about adjusting the handles.
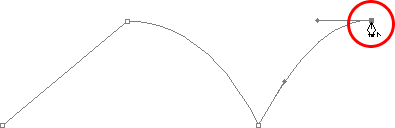
With my direction handle created, Im going to click to add a fourth anchor point, and Im going to drag out direction handles from it as well:

Adding a fourth anchor point along with direction handles extending from it.
I now have a third segment added to my path, this one being a curve. Notice that this curve actually has two direction handles controlling it, one extending from the right of my third anchor point and one extending from the left of my fourth point:

The third path segment now has two direction handles, one on either end, working together to control the curve.
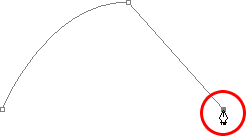
The overall shape of this curve is now being controlled by the length and direction of both of these handles. Watch what happens to the curve when I move the handles. Ill drag the bottom handle down and to the right, and Ill drag the top handle up and to the left. Ill also drag both of these handles longer. The faint curve is the original for comparison:
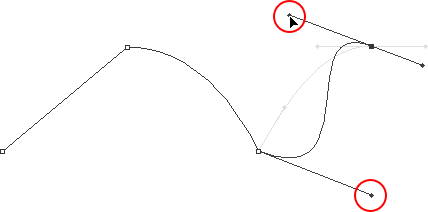
Changing the direction and/or length of either handle changes the overall shape of the curve. After rotating and lengthening both handles, the curve now appears in an S shape.
The curve is now a bit "S" shaped, and thats because the bottom handle is controlling the angle and length of the curve as it flows out from the third anchor point, while the top handle is controlling the angle and length of the curve as it flows into the fourth point. Changing the length and/or direction of either handle will change the overall shape of the curve.
Im going to press Ctrl+Alt+Z (Win) / Command+Option+Z (Mac) a couple of times to undo the changes I made, so the curve is once again in a simple arc shape as it was a moment ago, and I think Ill finish off this path with another straight segment, which means Ill need to remove that direction handle extending out from the right side of the fourth anchor point. Weve already learned how to do that, by holding down Alt (Win) / Option (Mac) and clicking directly on the anchor point itself:
Hold down Alt (Win) / Option (Mac) and click directly on the anchor point to remove the direction handle on the right.
With the direction handle gone, all I need to do now to add a straight path segment is click to add another anchor point:
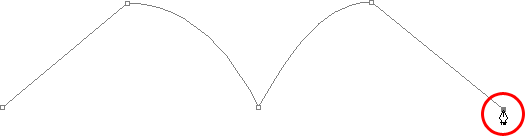
The direction handle on the right is now gone, so we can add a straight path segment simply by clicking to add another anchor point.
We could continue this path for as long as we wanted, adding more straight segments and curves, but I think well stop here because weve pretty much covered everything we need to know about drawing paths with the Pen Tool at this point. That was a lot of information to take in, especially if this is your first time learning about paths. As I mentioned at the beginning, you wont become a Pen Master simply by reading through this tutorial, just as you wont learn how to ride a bike, or drive a car, learn to swim, or play the piano simply by reading about it. But hopefully you have some sense at this point of how to draw paths with the Pen Tool, how to draw straight path segments, how to draw curves by dragging out direction handles, how to change the length and angle of the curve by rotating and resizing the handles, and how to combine straight and curved segments in a path.
To finish off our look at making selections with the Pen Tool, lets see a practical example of how to select an object with curves.
Here, we have a photo of a couple of dolphins leaping out of the water. Definitely a couple of very curvy creatures:

A photo of two dolphins jumping out of the water.
Lets say we want to select these dolphins so we can use them for a design or a collage, or whatever the case may be. If you were to try selecting them with the Lasso Tool, which is most likely what you would end up using if you didnt know how to use the Pen Tool, not only would you have a tough time, youd have an even tougher time trying to convince yourself that you were happy with the results when you were done. The reason is because the Lasso Tool simply isnt capable of making curved selections very well. The biggest problem with it, besides being a pixel-based selection tool, is that it relies on you having a steady enough hand to move it smoothly around the curves. Even if you dont suffer from a caffeine addiction, you could drive yourself crazy trying to draw a perfectly smooth curve with your mouse, or even with a pen tablet, and when youve finally given up, youll still be left with a selection full of rough, jagged edges that just scream "amateur!". No one likes to be called an amateur, especially when theres no need for it thanks to the Pen Tool!
Examine The Object First
Whenever youre about to select something with the Pen Tool, before you begin, take a moment to examine the object carefully to get a sense of where youre going to need to place your anchor points. Forget about all the details in the object and focus only on its shape. Where are the areas where the shape changes direction? Which parts of the shape are straight? Which parts are curved? If theres a curve, is it a smooth, continuous arc or does the angle change at a spot along the curve? Visualize in your mind where youre going to need to place your anchor points, because when you place one, you always want to be thinking about the next one and what the path segment between the two points needs to look like.
A Tool Of Elegance
One more thing to keep in mind is that the Pen Tool is meant to be a tool of elegance . Its not a nail gun or a staple gun. You dont want to just go clicking around your shape adding anchor points all "willy nilly" (thats a technical term). When using it to draw curves, you want those curves to be nice and smooth, otherwise we might as well just stick with the Lasso Tool. To keep the curves flowing smoothly, we need to limit the number of anchor points we use to create them. Thats why you want to take a moment to examine the object first and visualize where the anchor points need to be. If you can outline a large section of the shape using only one curve with an anchor point on either end, thats what you want to do, because thats whats going to give you the kind of results youre looking for. The kind of results that scream definitely not an amateur!.
Lets select these dolphins. Im going to start my path in the middle of the photo, at the spot where the side of the dolphin on the left overlaps the rear flipper of the dolphin on the right. Theres no right or wrong place to begin a path. This is just where Ive decided to start. The first part of that rear flipper is straight, so since I dont need a direction handle to create a straight path segment, Im simply going to click once with my Pen Tool to add my first anchor point, which will serve as the starting point for my path:
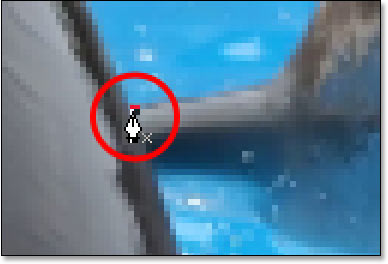
Adding the first anchor point.
As I mentioned earlier, youll probably find it helpful to zoom in on your image as youre drawing your path. To scroll the image around on the screen as youre zoomed in, hold down the spacebar, which will switch you temporarily to the Hand Tool and allow you to move the image around on the screen by clicking and dragging it.
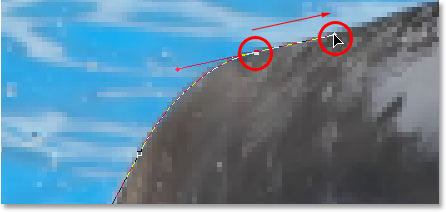
The top of that flipper actually has a slight curve to it as it approaches the dolphins tail section, so for my second anchor point, Im going to click at the point where the flipper and tail section meet, and Im going to drag out short direction handles, dragging up and to the right in the direction that the tail section is moving. Notice that Ive now created a slight curve along the flipper:
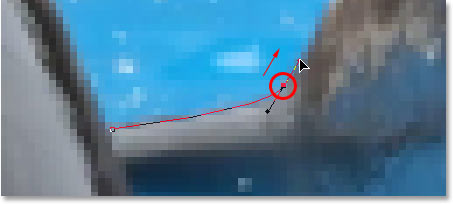
Adding the second anchor point and dragging out small direction handles to add a slight curve to the first path segment.
As I continue up along the tail, I can see that it stays straight for a short distance, followed by a curve to the right, so Im going to click to add a third anchor point at the spot where the curve begins. This gives me a straight path segment between the previous point and the new one. I know theres a short direction handle extending out from the previous anchor point, which normally means that my new path segment will be a curve, not a straight section, but because the handle is so short and is also moving in the same direction as the path segment, there is no noticeable curve to it. Consider it a mostly straight path segment:
Clicking to add the third anchor point, creating a (mostly) straight path segment.
Continuing along, we come to the first real curve in our path. For this, Im going to need to drag out a direction handle from the anchor point I just added, so Im going to hold down Alt (Win) / Option (Mac), then drag out a handle in the general direction where I want the curve to flow as it starts. Notice how Im only dragging out a handle from the one side of the anchor point, not both:
Hold Alt (Win) / Option (Mac) to drag out a direction handle from one side of an anchor point.
To add the curve, Ill click and drag at the spot where the curve ends, shaping the curve as I drag out the handles until it matches the curve of the dolphins tail. If I needed to, I could also go back and change the length and direction of the handle at the start of the curve to fine-tune it, but in this case, I dont need to do that:
Adding an anchor point at the opposite end of the curve and dragging out direction handles from it, rotating and resizing them as needed until the curve matches the curve of the object.
The next area of the dolphin is pretty straight, right up until its back begins to merge with its dorsal fin, at which point theres another curve, so Im going to click to add an anchor point just before the curve up the dorsal fin begins, which is going to give me another mostly straight path segment between the previous point and the new point. Then Im going to once again hold down Alt (Win) / Option (Mac) and drag out a direction handle as I prepare for my next path segment which will be curved:
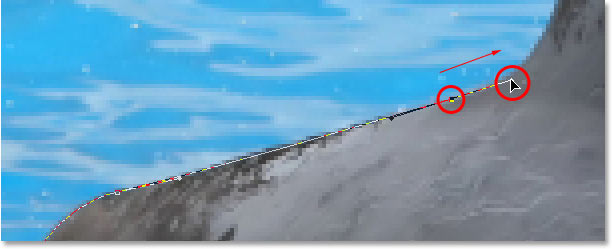
Click to add an anchor point, then hold down Alt (Win) / Option (Mac) and drag out a direction handle to prepare for the next path segment.
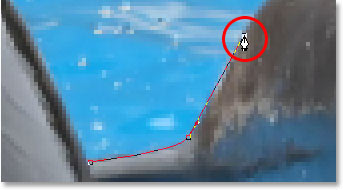
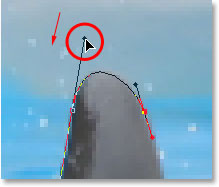
The left side of the dorsal fin consists mainly of one continuous curve upward until it gets near the very top, at which point the shape changes, so to create this curve, Im going to click and drag at the point near the top where the curve will change direction. As we can see in the screenshot, this adds a curved path segment between the previous anchor point and the new one, but the curve is not yet following along the shape of the fin. Its going to need some fine-tuning:
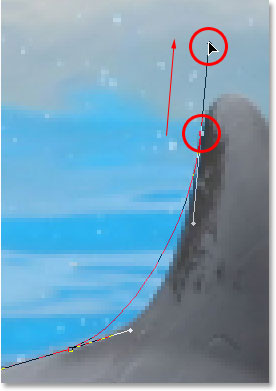
Adding a curve along the left side of the dorsal fin. The curve still needs some adjusting.
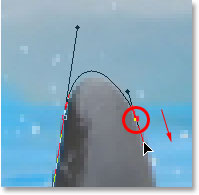
To adjust the curve, Im simply going to hold down the Ctrl (Win) / Command (Mac) key, which gives me temporary access to the Direct Selection Tool, and Im going to drag the handle extending out from the bottom anchor point towards the right to lengthen it, which is going to pull the angle of the curve in towards the right along with it, lining it up nicely with the curve of the fin. Ive also rotated the top direction handles slightly in a clockwise direction just to be nit-picky, but the majority of the adjustment was done using the bottom direction handle:

Adjust the curve by adjusting its direction handles.
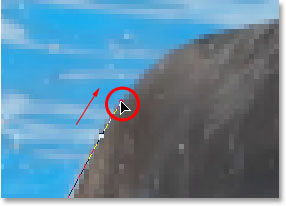
To add a curve around the top of the fin, Ill click and drag on the opposite side of it to add another anchor point with short direction handles. Notice though that we run into a bit of a problem. The direction handle on the left side of the curve is too long and its pulling the curve away from the top of the fin:
The direction handle on the left of the curve is too long, resulting in the curve not following the shape of the fin.
To fix that, all I need to do is once again hold down Ctrl (Win) / Command (Mac), then click on the end of the handle to select it and drag it shorter until the curve is the proper shape:
Shortening the length of the direction handle to adjust the shape of the curve.
Lets finish creating our path around the dorsal fin. The remainder of the fin is basically a straight line, so Im going to click at the base of the fin to add another anchor point which adds the straight path segment, completing our path around the fin:
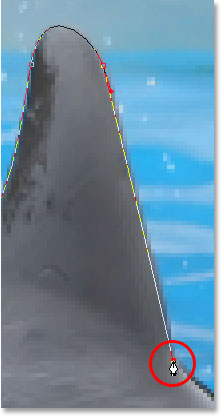
Adding an anchor point at the base of the fin to finish drawing the path around it.
Since you and I would both be here all day if I was to continue commenting on every anchor point, direction handle and path segment as we make our way slowly around the dolphins, and since weve covered everything we need to know at this point, Im going to go ahead and draw the rest of the path, outlining both dolphins:

Both dolphins are now outlined by the path.
The dolphins have now been outlined with the path, and if we look at the Paths palette, we can see that sure enough, we have a path in the shape of the dolphins:
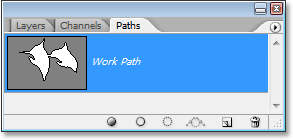
Photoshops Paths palette showing the outline of the dolphins in the preview thumbnail.
As weve learned, Photoshop automatically names the path Work Path, which means its temporary and will be replaced if we start a new path. If you wanted to save it, you would need to double-click on the name Work Path and rename it to something else, like Dolphins in this case. Im not going to worry about that, since I have no need to save it. All I want to do at this point is convert my path into a selection, and since Im already in the Paths palette, Ill do that by clicking on the Load path as selection icon at the bottom of the palette:
Clicking the Load path as selection icon at the bottom of the Paths palette.
I could also have used the keyboard shortcut Ctrl+Enter (Win) / Command+Return (Mac) . Either way converts my path into a selection, and if I look at my photo, I can see that my path has indeed become a selection around the dolphins:

The path around the dolphins has now been converted into a selection.
And there we have it! The dolphins are now selected and ready for whatever plans we have for them. And with that, we wrap up our look at drawing paths and making selections with the Pen Tool in Photoshop!
You May Also Like...
Making Selections With The Pen Tool In Photoshop
I know I said theres two modes the Pen Tool can work in and yet, as if to make things more confusing, theres three icons, but the icon on the right, which is
Photoshop Tutorial: Make Selection With the Pen Tool -HD-
In this tutorial, you will learn how to make selections using the pen tool in Photoshop CS5. Be sure to SUBSCRIBE because there will be a new tutorial
Making a selection with the Pen tool from the Course ...
Making a selection with the Pen tool. Making Step and Repeat web buttons in Quick Mask Photoshop CS5: You have completed Practical Photoshop CS5 Selections.
Making a selection with the Pen tool from the Course ...
Making a selection with the Pen tool. While the many selection tolls we've looked at, will make sense for most situations, sometimes you want to get a little bit more
Photoshop Pen Tool Tutorial - Creating Selections With The ...
Photoshop upgrade options and the best prices at the Adobe Store. Find the latest Photoshop CS3 tutorials on our Photoshop CS3 Tutorials Page. Buy.
Making Selections With The Pen Tool - Photoshop tutorials ...
The Photoshop Lasso Tool The Photoshop Polygonal Lasso Tool The Rectangular Marquee Tool The Photoshop Elliptical Marquee Tool Why Make Selections In Photoshop Useful
Photoshop Pen Tool - Drawing Shapes and Making Selections
The pen tool in Photoshop is an extremely versatile feature used to create your very own vector shapes, and even make custom selections. With Photoshops pen tool
Make selections with the Pen Tool | PSD Box
In this tutorial Ill show you how to use the Pen Tool in Photoshop to create selections and how to embed paths into Jpeg images so you can load the selection when
Make selections with the Pen Tool - Photoshop Tutorial - PSD Box
Learn how to subtract objects from the background using the Pen Tool, how to turn a selection into a path. I'll also show you an awesome tip for how to
Using the pen tool to extract or make selection ...
In this demonstration, we will extract this boy's face from the background using the Pen tool: We can either use the Pen tool or the Freeform Pen tool.
Travelling is my life
ConversionConversion EmoticonEmoticon