Creating a good mask is one of the essential skills in compositing images within Photoshop. Recognizing the right tool for the masking job is an art in itself. Today, well look at an often overlooked, but highly effective way of creating a very good mask using the Pen Tool in Photoshop.
Lets consider this image:
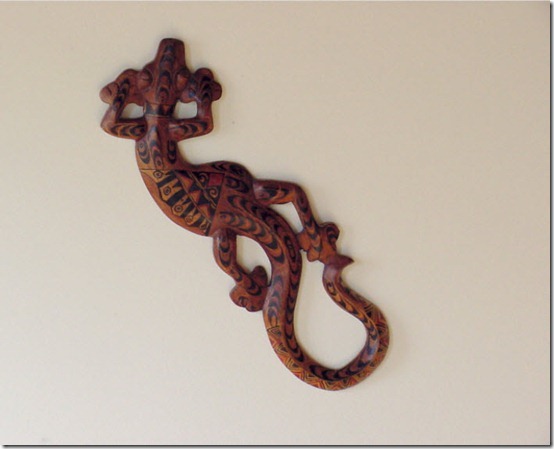
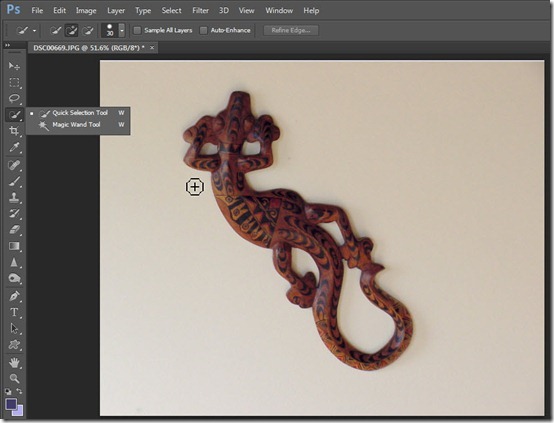
We want to extract the lizard from a seemingly simple background. So, why not go to the go-to tool for starting a mask the Quick-Select tool (W). After all, with the great new Adobe technology, the Quick-Select tool can perform small miracles. Grab it and start dragging to select the image:
After dragging out a selection in the inside of the lizards body, we have the beginnings of a selection that can become a mask. But, lets look closer:

Looking closely, we can see that the edge isnt as smooth as wed hoped. There are several places where the selection tool under- or over- selected, and the edges are a bit lumpy. Were missing the holes in the middle, too. Lets hold the Alt (PC) or Option (Mac) key down to subtract from the selection and paint in the gaps:
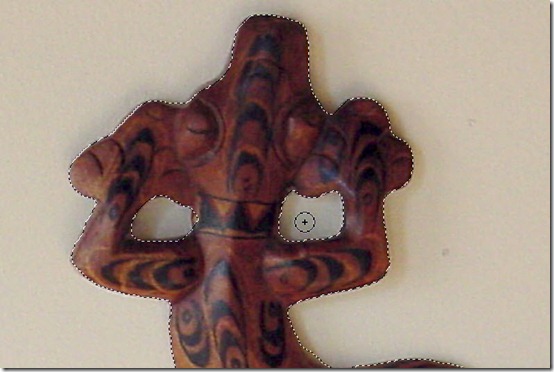
Again, not bad, but not real good either. A few more passes of the quick-select tool, and well have something ok but not something great. The shadows around the edge of the lizard really interfere with the Quick-Select tool and can cause it to create irregular boundaries. We can continue tweaking, adding and subtracting as we go, and then even go on to Refine Selection and burn a lot of time trying to finalize our mask. But due to the way these tools work, well still end up with an edge that wants to be a little rough and organic. This is great for soft edged objects, but sometimes, you want a really crisp, razor edge to your mask.
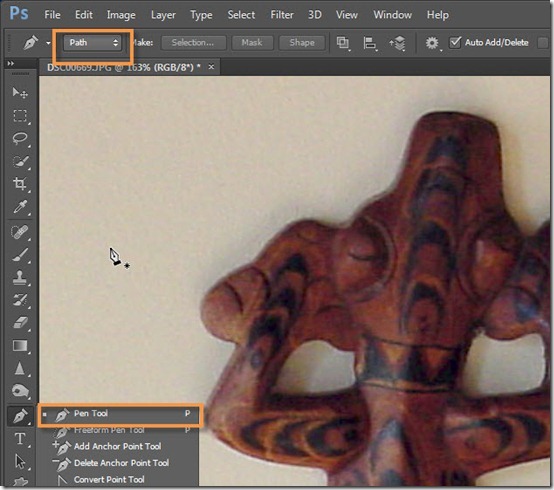
Enter the Pen Tool.
Now, dont be scared off the pen tool takes some getting used to, but it really isnt all that difficult (you can find many excellent tips on using the Pen Tool right here on TipSquirrel). But, heres what to do if you have a target that has (or should have) clean edges:
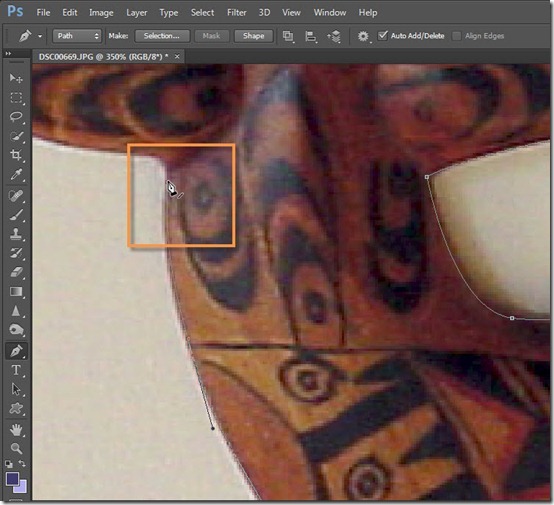
- First, grab the Pen Tool (P) and make sure the toolbar option is set to create a Path (not pixels or shapes). Then, zoom in quite closely to start dragging out your path.
- As you draw, try not to create too many points. Lots of points make a jagged path, fewer points will make gently curving paths with really clean lines.
- Stay zoomed in close try to keep the path at least 1-2 pixels inside the edge of the object youre selecting, so that you dont have a fringe of color. Staying inside the edge is better than going out of bounds, as the fringe will be noticeable.

- Use the Space Bar to momentarily switch to the hand tool, and drag your drawing around as you create your path.
- If you get a point in the wrong place, hold down the Control (PC) or Command (Mac) key to temporarily switch to the white arrow tool, and drag your points into better position. You can also adjust the control handles the same way.
- If you edit one of the points you already drew, you can hover over the last point on the path a(the pen cursor will change so that you see a stroke / icon next to it) and click the last point you can now continue where you left off:
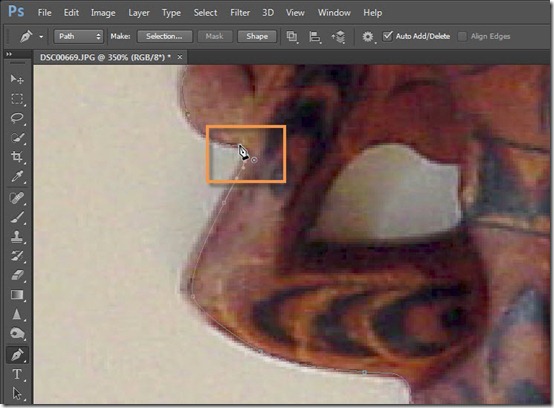
Once you have the outline complete, click on the first point to complete the loop and finish the path. The pen cursor changes again so that you see a O icon, indicating that you will close the path:
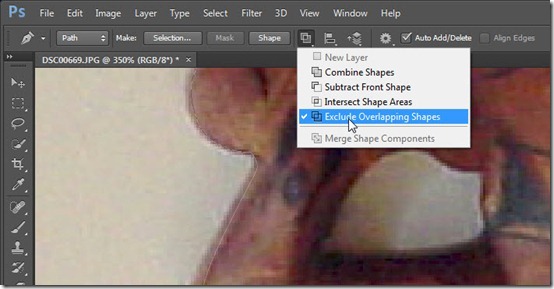
Now, its time to add the interior sections.Make sure the [en tool option to Exclude Overlapping Shape Areas is selected (or for simple paths such as this, Subtract Front Shape Area will do). Now draw in the holes with additional paths:
The great thing about the path tool is its ability to make smooth lines, even when the edges of your object are ragged or out of focus.

Once you have your path created, you have a couple of choices:
- In any version of Photoshop, you can open the Paths panel, and Control Click (PC) or Command Click (Mack) to load the path as a selection.
- In CS6 (new) you can click on the Selection button in the Toolbar of the Pen Tool. This brings up a dialog:

In this case, we dont want a feathered edge, so well just accept the default and click OK. The marching ants appear, and we have our selection:

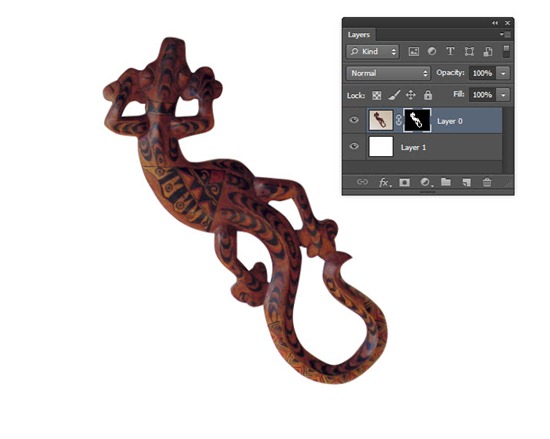
Now, in the Layers panel, just click the Add Layer Mask icon to mask our object from the background:

And the image is masked, nice and clean:
If we zoom in closer, we can see that the edges are as clean as you can get given the resolution of the image, thanks to the smooth paths:
So if youre looking to select or mask an object that has a clean edge, consider the Pen Tool. With a little practice, youll find this can be much more effective at getting sharp edges and nice corners compared to the quick-select tool or similar methods. And, more often than not, youll save time, because you wont be going back to try to refine your selection over and over.
I hope you learned something from todays tip! Next week, well look at combining selections made by a path with selections made in other ways. Stay tuned!
Masking with The Photoshop Pen Tool - TipSquirrel
Creating a good mask is one of the essential skills in compositing images within Photoshop. Recognizing the right tool for the masking job is an art in itself.
Photoshop Type Mask Tool - TipSquirrel
Photoshop Type Mask Tool is a 2012 in Top Tip Tuesday // Masking with The Photoshop Pen Tool; with Photoshop. Starting TipSquirrel.com as a hobby he is
Masking with Photoshop Pen Tool | Photoshop & Lightroom ...
Masking with Photoshop Pen Tool. English (US) Log in. Home Categories. Featured! Ideas for 2015 Home Feed Popular tipsquirrel.com. Found on tipsquirrel.com
Mixed Masking In Photoshop Tipsquirrel
masking with the photoshop pen tool tipsquirrel. masking with the photoshop pen tool tipsquirrel. More Pic
Photoshop Tutorial: Pen Tool as Mask Selector
Pen Tool as Mask Selector photoshop tutorial once you master the PEN tools ANCHOR POINTS and DIRECTION POINTS (those knobby things!) you can create
Quick Tip: Quick Masking with the Pen Tool in InDesign ...
If you did spend time perfecting your clipping path using Photoshop, Quick Tip: Quick Masking with the Pen Tool a circle will appear next to the pen
Quick Tip: Quick Masking with the Pen Tool in InDesign
Quick Masking with the Pen Tool in InDesign Quick Tip: Quick Masking with the Pen Tool in time perfecting your clipping path using Photoshop,
Learn Adobe Photoshop - Masking With the Pen Tool
Check out Bas Rutten's Liver Shot on MMA Surge: http://bit.ly/MMASurgeEp1 Learn the basics of creating a mask with the Pen Tool. Previous Lesson: Masking
Photoshop Masking With Pen Tool | Photoshop CC Tutorial
Pen Tool Masking In this Photoshop masking tutorial I http://youtu.be/dikhcu3xtI8 Photoshop CC Masking Tutorial: Pen Tool Masking In this
Photoshop Masking Techniques Everyone Should Know
The mysterious Pen Tool is often avoided by Photoshop newcomers, Normally I go for the pen tool and layer masking but this is a pain for hair. tip: always
Travelling is my life
ConversionConversion EmoticonEmoticon