![]()
![]()
Try before you buy. Download any Adobe product for a free 30 day trial.![]()
Mysteries Of The Favicon.ico — How To Create A Favicon In Photoshop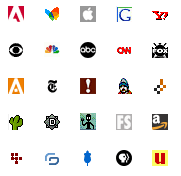 A Favicon is a little custom icon that appears next to a website's URL in the address bar of a web browser. They also show up in your bookmarked sites, on the tabs in tabbed browsers, and as the icon for Internet shortcuts on your desktop or other folders in Windows. And when I say little, I mean 16 pixels by 16 pixels. So if you like a good design challenge try your hand at this one.
All you need to add a Favicon to your site is a Windows Icon (.ico) file usually called favicon.ico that you upload to the main directory of your website. Nowadays, most browsers besides Internet Explorer can use a GIF (including animated ones) or PNG (including full transparency) instead. But since all browsers including IE understand the .ico format, and because it's got a lot of intriguing features that GIFs and PNGs don't, read on to find out how to make one.
Download The Plugin
You'll need the Windows Icon (ICO) file format Photoshop Plugin to export to the .ico file format. You can download the plugin from Telegraphics. The plugin reads and writes ICO files in 1, 4 and 8-bit Indexed and 24-bit RGB modes, and also reads and writes 32-bit "XP" icons (with 8-bit alpha channel). Make sure to install the plugin before you begin this tutorial.
Let's Begin
Because 16 x 16 is such a small canvas area, it can be very difficult to be creative. So instead start your project with a canvas set at 64 x 64 (always use even multiples when you plan on resizing files). Do this by selecting File>New, and opening a new canvas that is 64 x 64 pixels in size.
The Design
If you already have a logo you should reduce it to the 16 x 16 size to see if it holds up. If it doesn't look good at this size, work with the 64 x 64 canvas and try creating a simple design that incorporates colors from your website's palette.
When you're ready to test the design select Image>Image Size menu and enter 16 x 16. Click on Resample Image and choose "Bicubic Sharper" from the drop-down menu (CS only for this step). This is the best setting for making sure that an image doesn't blur as it's being resized. If its still not sharp enough, go back and oversharpen, oversaturate and/or heighten the contrast of the original image and then resize it again.
If you feel the icon is not quite what you wanted, just keep tweaking it until it is perfect. At this tiny size it can take a few tries before you get it right.
Saving The Custom Icon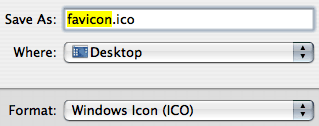 Go to File>Save As and make sure you name the file favicon.ico. Under Format you must choose Windows Icon (ICO) from the pulldown menu. This format will only be available in Photoshop after you download and install the plugin. In the next step you'll need to upload this new file to the root folder of your website, so it's a good idea to navigate and save it to that location on your hard drive now.
Uploading The Favicon.ico File
Connect to your server and upload your Favicon.ico file to your website. You must place it into the same directory as your home (index) page, and leave it loose, making sure not to put it in an images directory or other folder. The standard location is the root folder of your site, which is same directory as your home (index) page, not inside an images directory or other folder. If you put it there (and name it favicon.ico), most browsers will find it automatically.
Some browsers will look for a direct link in the HTML source code to your site's favicon.ico file. You can help these browsers by adding this link in the head section of each page on which you want the Favicon.ico to appear.
Here is the link code to include: <link rel="Shortcut Icon" href="/favicon.ico">
Once you've added this code, upload all of your modified pages.
(Some people suggest that the following is actually more correct: <link rel="icon" href="/favicon.ico" type="image/x-icon"> You can use both if you want!)
If you want to use a GIF or PNG instead, use this format instead (just remember that it wont work in IE):
<link rel="icon" href="/favicon.png" type="image/png"> or
<link rel="icon" href="/favicon.gif" type="image/gif">
Testing
If your new Favicon does not show up right away, try refreshing the page or clearing your cache — or put a '?' at the end of the url, which will trick a browser into thinking the page is new and not cached.
Troubleshooting![]() Browser Issues: Microsoft IE 6 for Windows will not display the favicon until the URL has been added to the favorites. Or try this trick: go up to the address bar, click on the existing (usually the IE default) favicon, then "jiggle" it a bit and let go. That will reload the page and should get the new favicon to show up.
Browser Issues: Microsoft IE 6 for Windows will not display the favicon until the URL has been added to the favorites. Or try this trick: go up to the address bar, click on the existing (usually the IE default) favicon, then "jiggle" it a bit and let go. That will reload the page and should get the new favicon to show up.
Safari for the MAC will not display an updated favicon until the browser cache has been cleared. But choosing empty cache from the menu won't help because Safari stores favicons in a separate cache. Go to Edit > Reset Safari, and check Remove all website icons. If you cant find that, you must empty the icon cache yourself. Look for it in User>Library>Safari>Icons. On the Windows version of Safari, find C:\Documents and Settings\YourUserName\Local Settings\Application Data\Apple Computer\Safari\WebpageIcons.db. Quit Safari, delete the file, restart Safari. (Sometimes you need to restart the computer too.)
On FireFox, clear the cache and restart the browser. On Opera, just refresh.
Windows can actually be the most beligerent about not updating favicons for Internet shortcuts (on your desktop, for instance). This tip from www.vistax64.com/tutorials:
1. Right-click on the Desktop.
2. Select Personalize and select Display Settings (or simply Settings on XP).
3. Change the Color from 32 bit to 16 bit and click Apply.
4. Change the Color back to 32 bit and click Apply.
![]() File Format Not Available: The Windows Icon (ICO) file format will not be available until you have downloaded and installed the plugin, and then Quit and Restarted Photoshop.
File Format Not Available: The Windows Icon (ICO) file format will not be available until you have downloaded and installed the plugin, and then Quit and Restarted Photoshop.
Troubleshooting Update
One person who had trouble with Internet Explorer 7 has sent us a little tip:
I had some trouble with IE 7 but the addition of these 2 lines of code solved the problem:
<link rel="shortcut icon" href="favicon.ico">
<link rel="icon" type="image/ico" href="favicon.ico">
I found the info here:
www.webmasterworld.com/html/3251565.htm
And Shareef sends this in: In my experience, Internet Explorer seems to be a bit flaky in the length of time it takes before deciding to display the favicon. I have tried many variations in the code, but the majority of the time the favicon wont display immediately.However, I recently discovered what may be a helpful tip: Once you place the code in your web pages and upload the favicon.ico file to your server, navigate to the favicon.ico file (www.yoursite.com/favicon.ico) and the browser (IE 7) will immediately display the favicon and keep it there.
Multi-Resolution Favicons
So if youve gotten this far, you can already see your favicon in your browsers address bar, and it probably looks great. Feeling ambitious and want to go one step further?
In Windows especially, favicons show up all over the place. For instance, if you put a shortcut to a website on your desktop, Windows often uses the favicon of the site as the shortcut icon. But on the desktop, Windows uses a much larger size icon, usually 48x48 pixels. When this happens, Windows has to scale up your favicon and it will probably look blurry and not so great anymore.
You can fix this. One of the neat things about .ico files is that they can contain multiple versions of the icon, at different sizes and color depths (kinda like an animated GIF contains multiple frames). When they do, Windows uses whichever size and color depth is most appropriate. For the sizes, 16x16, 24x24, 32x32 & 48x48 pixels are most common, and all can put bundled together in a single .ico file.
Creating a multi-resolution icon isn't much harder than what you did to create your 16x16 favicon, Telegraphics, the same place you got your favicon plugin, also has another plugin http://www.telegraphics.com.au/sw/info/icobundle.html that allows you to bundle multiple icons together in a single .ico file. It's not actually a plugin, but a standalone program for Windows (used at command prompt) or MacOS (drag and drop). There are also many standalone tools that will create a multi-resolution icon for you from a single starting image. Here's a couple that are free to try: www.sibcode.com/icon-studio and www.aha-soft.com/anytoicon.
As for color depth... again, if you're on Windows, you may have noticed before that some icons on your desktop have jaggedy (aliased) edges, while others blend smoothly on the edges. The smooth blending is because those icons contain a version with 32-bit color depth, which allows true transparency, just like your layers in Photoshop. You can create a 32-bit version of your icon, along with 24-bit (16 million colors, gif-like transparency), 16-bit (256 colors) or even 8-, 4- or 2-bit... all of which could again be stored in one .ico file!
So if you want to make sure your favicon looks great wherever people might see it, try creating a few versions in your favicon.ico file. For example:
16x16, 16-bit (256) colors
16x16, 32-bit colors
32x32, 16-bit (256) colors
32x32, 32-bit colors
48x48, 16-bit (256) colors
48x48, 32-bit colors
But dont go too crazy, because every variation makes your favicon a little bit bigger, which means it will take longer to download.
Inspiration
If you need some inspiration have a look through this nice collection of favicons. Also look at the nice categorized list of 50 remarkable favicons at Smashing Magazine. You might find something that triggers an idea for your own.
That's it. Enjoy your Favicons!
![]()
![]()
Creative Cloud Discount - Adobe Creative Cloud 40% Off Discount Current Creative Suite users - Save 40% off the first year on Adobe Creative Cloud. Offer available to all registered users of individual products and suites, CS3 or later. Not available for education or volume licensing customers.
With Adobe Creative Cloud, a simple monthly membership gives you the entire collection of CS6 tools and more. Love print? Interested in websites and iPad apps? Ready to edit video? You can do it all. Plus, Creative Cloud members automatically get access to new products and exclusive updates as soon as theyre released. And, with cloud storage and the ability to sync to any device, your files are always right where you need them. Creative Cloud is available for individuals or teams.![]()
onOne Software For Digital Photographers Exclusive 15% Discount
onOne Software is the fastest and easiest way to make your images extraordinary. They work everywhere with Photoshop, Lightroom, Aperture, and as standalone applications. Use discount code PSSPPT06 to get 15% off any onOne product.
Perfect Photo Suite
- Everything You Need to Realize Your Photographic Vision
- Seven integrated products for your photography workflow
- Perfect Effects: Create images with impact
- Perfect Portrait: Simply powerful retouching
- Perfect Resize (Genuine Fractals): Enlarge images for print
- Perfect Layers: The power of layers without Photoshop
- Perfect Mask: The essential cut-out tool
- FocalPoint: Put the focus where you want
- PhotoFrame: Borders, backgrounds, textures and adornments
Perfect Effects
- Add popular HDR and retro looks
- Recreate the look of film and darkroom techniques
- Finish images with vignettes, textures and borders
Perfect Portrait
- Simply powerful portrait retouching
- Automatic skin smoothing and blemish removal
- Instant enhancement of eyes and teeth
Perfect Mask
- Remove backgrounds with a single click
- Easily cut around the tough stuff like hair, glass, and tree branches
- All of the best masking tools without Photoshop
Perfect Resize
- Get the highest quality image enlargement, powered by Genuine Fractals
- Enlarge mobile phone to DSLR images up to 1000%
- Maintain all the sharpness and detail of your original photo
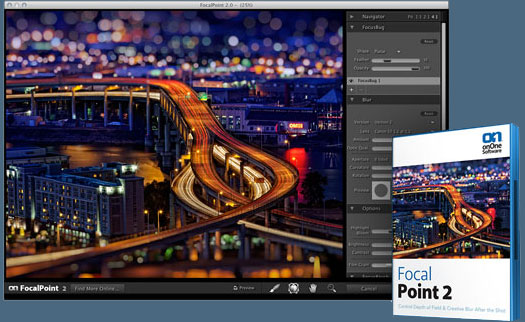
 FocalPoint
- Create the look of fast, expensive lenses instantly
- Control depth of field after the shot
- Simulate the creative look of tilt-shift lenses
PhotoFrame
- Enhance images with borders, textures and adornments
- Add authentic film and darkroom edge effects
- Complete library of more than 1000 professional design elements
Perfect Layers
- Extend the image editing power of Lightroom & Aperture
- Combine the best parts of multiple photos
- Retouch portraits and landscapes ![]()
Exclusive 15% Discount On Topaz Plugins, Bundles And Upgrades Enter our exclusive discount coupon code PHOTOSHOPSUPPORT during the checkout process at Topaz Labs for an instant 15% discount on any Topaz product, including bundles and upgrades.
Topaz Labs Photoshop plug-ins are specifically designed to expand a photographer's creative toolbox by harnessing powerful image technology developments. Photographers everywhere are now taking advantage of the creative exposure effects, artistic simplification, unique edge manipulation, and top-of-the-line noise reduction offered in Topaz products. The Topaz Photoshop Plugins Bundle is a super powerful Photoshop plugins package that includes the following Topaz products:
Topaz Adjust
Deliver stunning and dynamic images with this uniquely powerful plug-in that features HDR-like abilities and enhances exposure, color and detail.
Topaz InFocus Topaz InFocus uses the latest advancements in image deconvolution technology to restore, refine and sharpen image detail.
Topaz Detail
A three-level detail adjustment plug-in that specializes in micro-contrast enhancements and sharpening with no artifacts.
Topaz ReMask
The fastest and most effective masking and extraction program with one-click mask refining.
Topaz DeNoise
Highest-quality noise reduction plug-in that removes the most noise and color noise while preserving the most image detail.
Topaz Simplify
Provides creative simplification, art effects, and line accentuation for easy one-of-a-kind art.
Topaz Clean
Take control of the detail depth of your images with extensive smoothing, texture control and edge enhancement tools.
Topaz DeJPEG
Drastically improves the quality of web images and other compressed photos.
Learn more about the Topaz Photoshop Plugins Bundle. Download a free trial version.![]()
![]()
![]()
![]() Photoshop Web Template — Web Site Design Tutorial
Photoshop Web Template — Web Site Design Tutorial
Learn how to make a Photoshop web template with this web site design tutorial. Includes finished web page with code and links to free resources.
![]()
![]() Pixel Fonts To The Rescue — How To Use Them & Where To Get Them
Pixel Fonts To The Rescue — How To Use Them & Where To Get Them
Graphic designers working on web projects often complain that when typefaces designed for print are set to lower sizes that they become harder to read and unattractive to the eye. Even using anti-aliasing (the smooth option in the Character Palette) is not enough to help these fonts look better on screen. The solution when this happens is to abandon the printer fonts altogether and to try using a Pixel font, which will produce a crisp, clean image at very small sizes.
![]()
![]() Blog Templates & Blog Design Tips
Blog Templates & Blog Design Tips
This Photoshop tutorial offers tips on how to improve blog templates by adding your own design elements. Includes a list of free blog resources, and a martini recipe.![]()
![]()
![]() The Photoshop Blog offers the latest Photoshop and Digital Photography news and software updates, tips and tutorials, and random thoughts from graphic artist, digital photographer and Photoshop expert Jennifer Apple.
The Photoshop Blog offers the latest Photoshop and Digital Photography news and software updates, tips and tutorials, and random thoughts from graphic artist, digital photographer and Photoshop expert Jennifer Apple.![]()
Site Grinder Web Design Tool There often seems to be a strict division of labor within the world of web design and development. Creative professionals tend to stick to the Photoshop domain, while those well-versed in scripting are left to the task of implementing their work. Indeed, the two realms are quite different from each other, to which any of us even vaguely familiar with either can easily attest.
Essentially, Photoshop is a no-holds-barred design studio, offering the artist a seemingly endless array of creative options. On the other hand, HTML, CSS, Java and the like follow strict rules of engagement, requiring the developer to take any number of esoteric concerns into consideration in order to ensure that designs are properly displayed on the web.
Turn Photoshop Into A Complete Web Design Tool
SiteGrinder seeks to bridge this gap between design and development. Basically, SiteGrinder turns Photoshop into an easy-to-use and fully functional web design tool. With SiteGrinder, designers will now have the freedom to totally let their creativity loose and then, without skipping a beat, transfer their designs to the web. Bringing esthetic concerns together with more practical considerations, SiteGrinder is an amazingly powerful tool that would make a fantastic addition to any web designer's bag of tricks. Mac OS X and Windows versions of the SiteGrinder unlockable demo are available now via download.![]()
lynda.com Online Training Library - View Free Video Clips
 Subscriptions to the lynda.com Online Training Library provide anytime access to tens of thousands of video tutorials covering Photoshop, Illustrator, Dreamweaver, web design, digital imaging, 3D, digital video, animation, and many other topics. View free video clips.
For less than a dollar a day, members have the opportunity to stay current and keep skills sharp, learn innovative and productive techniques, and gain confidence and marketability - all at their own pace. Premium subscriptions include instructors exercise files so that members can follow along with the exact examples onscreen. Customers learn at their own pace and may stop, rewind, and replay segments as often as necessary. View some free video clips (high resolution).![]()
Photoshop Masking Plugin Fluid Mask - Exclusive Instant Discount The 4 1/2 out of 5 star review of Fluid Mask at MacWorld begins by saying that this "Photoshop plug-in takes the pain out of extracting backgrounds," and goes on to recommend the latest version, stating that "Fluid Mask is a very effective tool for separating objects from their backgrounds. It offers a variety of useful features for tackling almost any difficult image, from wispy hair to complex foliage. Online video tutorials and live training sessions help ease the learning curve."
Our friends at Vertus, the makers of Fluid Mask Photoshop Plugin, have set up a special exclusive discount for PhotoshopSupport.com. Go to our Fluid Mask page for a special, exclusive discount link.
Fluid Mask is designed for photographers, image editors, graphic designers and all those who take digital image editing seriously. In a streamlined interface and workflow, Fluid Mask instantly shows key edges in the image and provides comprehensive easy to use tools that work with difficult-to-see edges and tricky areas like trees & lattices. Fluid Mask will also preserve all-important edge information for a professional quality cut out. Go to our Fluid Mask page for more info.![]()
![]()
![]()
![]()
Travelling is my life
ConversionConversion EmoticonEmoticon