Written by Steve Patterson. In this Photoshop text effects tutorial, were going to learn how to use Layer Styles to easily create a gel text effect. The great thing is that you can have lots of fun playing around with the Layer Style settings to create your own custom gel text effect, or if you prefer, you can use the settings Im using in the tutorial. When were done creating the effect, were going to save it as a preset style which we can then apply to other text instantly, and at the end, well see how to change the color of the effect, which may not be quite as straightforward as you think.
Heres the gel text effect were going for:
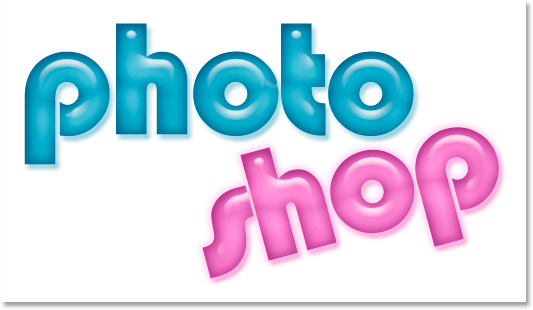
The final gel text result.
Lets get started!
Step 1: Open A New Photoshop Document
Go up to the File menu at the top of the screen and choose New to bring up Photoshops New Document dialog box and enter a width and height for your document. Im going to use a preset size of 640×480 pixels. Click OK to create your new document:
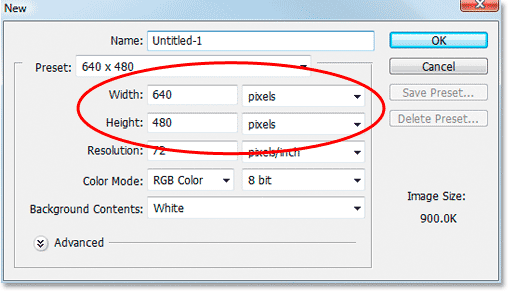
Create a new document in Photoshop.
Step 2: Choose A Color For Your Text
Select the Type tool from the Tools palette:

Choose the Type tool from the Tools palette.
You can also press T on your keyboard to quickly select it. Then, with the Type tool selected, go up to the Options Bar at the top of the screen and click on the text color swatch:

With the Type tool selected, click on the text color swatch in the Options Bar.
This will bring up Photoshops Color Picker. Choose a color for the text. Im going to choose a light blue for mine:
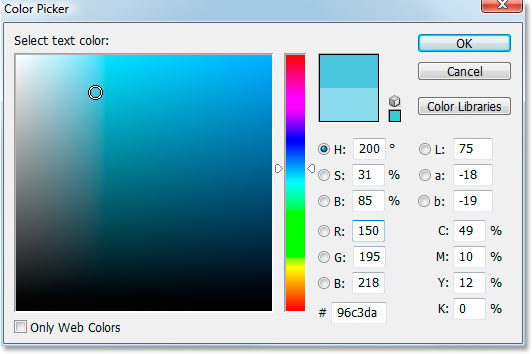
Choose a color for your text with Photoshops Color Picker.
Click OK once youve chosen a color to exit out of the Color Picker.
Step 3: Enter Your Text
Choose a font from the Options Bar. Im using Bauhaus 93. Then click inside your Document Window and enter your text. Im going to type the word photo:
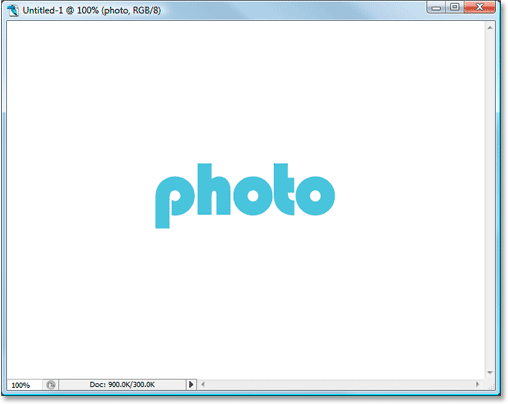
Enter your text into the document.
Step 4: Use Free Transform To Resize The Text If Needed
Im going to enlarge my text a little using Photoshops Free Transform command. With my text layer selected in the Layers palette, Im going to use the keyboard shortcut Ctrl+T (Win) / Command+T (Mac) to bring up the Free Transform box and handles around my text. Then Im going to hold down Shift+Alt (Win) / Shift+Option (Mac) and drag out one of the corner handles to enlarge my text. Holding Shift constrains the text proportions, and holding Alt/Option forces the text to resize from the center:
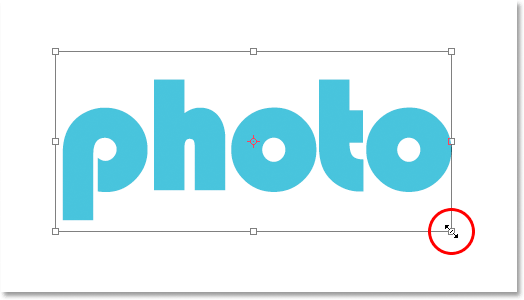
Use Free Transform to enlarge the text if needed.
Step 5: Select The "Drop Shadow" Layer Style
Were going to head into the wacky world of Layer Styles at this point, and the first Layer Style were going to add to the text is a drop shadow.
Before we continue, I just want to say again that you should feel free to experiment with the different settings were using for this effect. You dont have to use the specific settings Ill be using. Theres lots of wiggle room to play around with in creating this gel text effect.
Now lets add our drop shadow. Click on the Layer Style icon at the bottom of the Layers palette:
With the text layer selected, click on the Layer Styles icon at the bottom of the Layers palette.
Select Drop Shadow from the list:
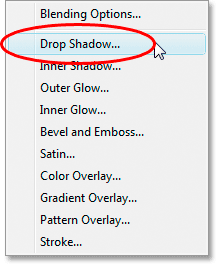
Select Drop Shadow from the list of Layer Styles.
This brings up Photoshops Layer Style dialog box set to the Drop Shadow options in the middle column:
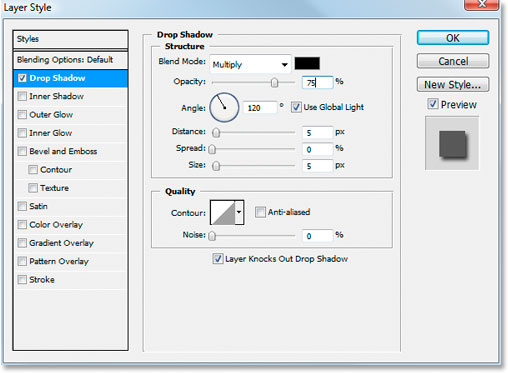
The Layer Style dialog box set to the Drop Shadow options in the middle column.
Step 6: Choose A Color For The Drop Shadow And Apply It
Click on the Drop Shadow color swatch:
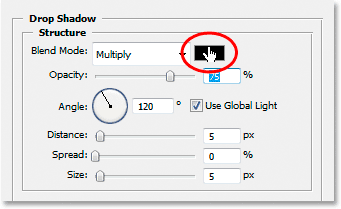
Click on the Drop Shadows color swatch to choose a color.
This will bring up the Color Picker. Rather than choosing a color in the Color Picker, hover your mouse over the text, which will turn your mouse cursor into the Eyedropper, and click on the text to sample its color:

Click anywhere on the text to sample the color.
Then go to the Color Picker and select a darker shade of that color to use for the drop shadow:

Select a different shade of the sampled color in the Color Picker to use for the drop shadow.
Click OK to exit out of the Color Picker, and your drop shadow will appear in the color you selected:

The drop shadow applied to the text using the color chosen in the Color Picker.
Dont click OK in the Layer Style dialog box yet. Weve only just begun.
Step 7: Apply An "Inner Shadow" Layer Style
Click directly on the words Inner Shadow in the Layer Style menu on the left of the Layer Style dialog box, directly below Drop Shadow:
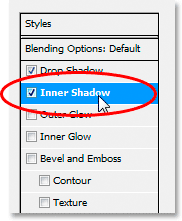
Click directly on the words Inner Shadow below Drop Shadow in the menu on the left of the Layer Style dialog box.
The first thing were going to do here is select a color to use for the Inner Shadow, just as we did for the Drop Shadow. Click on the Inner Shadow color swatch:
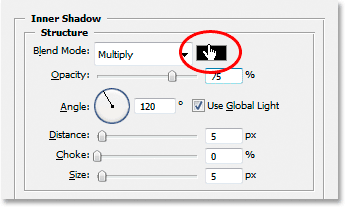
Click on the Inner Style color swatch to choose a color.
This will bring up Photoshops Color Picker. Just as we did with the Drop Shadow, rather than selecting a color directly in the Color Picker, move your mouse over the text and click on it to sample the text color:

Click anywhere on the text once again to sample the color.
Then select a darker shade of the color in the Color Picker to use for the Inner Shadow:
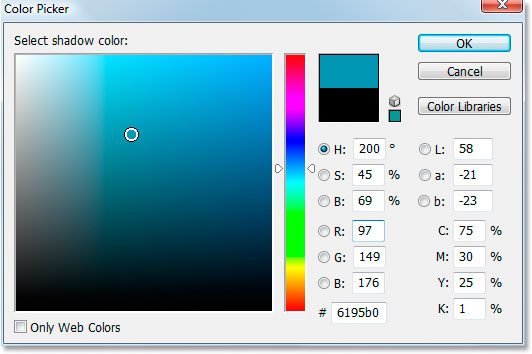
Select a different shade of the sampled color in the Color Picker to use for the inner shadow.
Click OK to exit out of the Color Picker once again. The inner shadow will appear in the color you selected:

The Inner Shadow is now applied to the text using the color selected.
Im going to increase the size of my Inner Shadow effect by clicking on the Size slider and dragging it to the right. Ill increase mine to about 16 pixels:
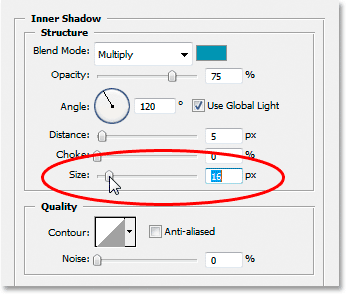
Increase the size of the Inner Shadow effect by dragging the Size slider to the right.
Heres the result after increasing the Inner Shadow size:

The effect so far after increasing the Inner Shadow size to 16 pixels.
Step 8: Apply An "Outer Glow" Layer Style
Click directly on the words Outer Glow in the Layer Style menu on the left of the Layer Style dialog box, directly below Inner Shadow:
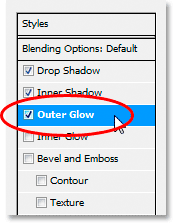
Click directly on the words Outer Glow in the menu on the left of the Layer Style dialog box.
Once again, the first thing were going to do is select a color for our Outer Glow, the same way weve done it for the Drop Shadow and Inner Glow. First, click on the Outer Glow color swatch:
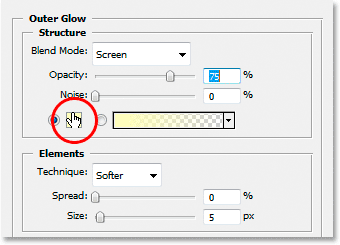
Click on the Outer Glow color swatch to choose a color.
This brings up the Color Picker. Click directly on the text once again to sample the color. Then go back to the Color Picker, but this time, rather than choosing a darker shade of the color, choose a lighter shade:
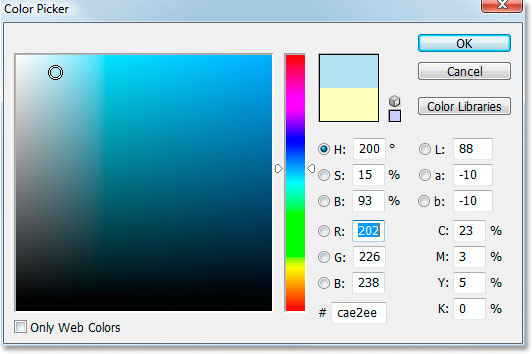
Choose a lighter shade of the text color this time to use for the Outer Glow effect.
Click OK to exit out of the Color Picker.
With my color applied, Im going to change a few of the other Outer Glow options. Again, feel free to experiment here on your own, but if you want to follow along, heres the settings Im using. First, lower the Opacity value at the top to around 60%. Then, in the Elements section in the middle, increase the Spread to around 15% and the Size to about 10 pixels:
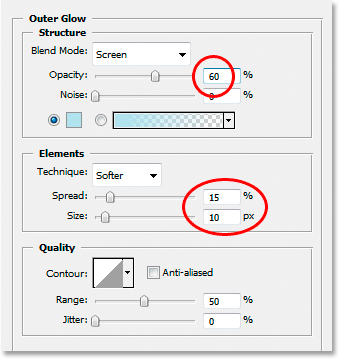
Make the changes circled in red above to the Outer Glow options.
Heres my result after making the changes:

The effect so far after applying the Outer Glow layer style.
Step 9: Apply An "Inner Glow" Layer Style
Click directly on the words Inner Glow in the Layer Style menu on the left of the Layer Style dialog box, directly below Outer Glow:
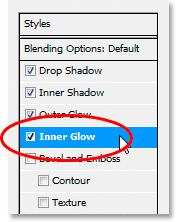
Click directly on the words Inner Glow in the menu on the left of the Layer Style dialog box.
What are we going to do first? Yep, were going to pick a color to use for the Inner Glow. Go ahead and click on the Inner Glow color swatch:
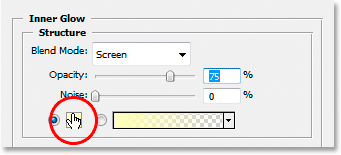
Click on the Inner Glow color swatch to choose a color.
This brings up the Color Picker. This time, rather than clicking on the text color itself and then selecting a darker shade in the Color Picker, just click on one of the darker areas in the text. Well use that color for the Inner Glow:
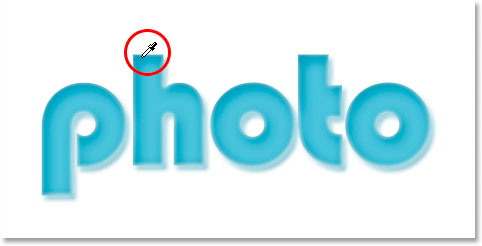
Click on a darker color in the text to sample it and use it for the Inner Glow effect.
Click OK in the Color Picker to exit out of it once youve sampled your color.
We have our darker color selected, but by default, the blend mode for the Inner Shadow is set to Screen, which means were not going to see our darker color. Basically, we need to change the effect from an inner glow to an inner shadow, and for that, all we need to do is change the blend mode from Screen to Multiply:
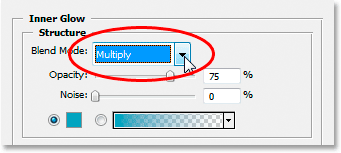
Click on the down-pointing arrow and change the blend mode for the Inner Glow effect to Multiply.
Im going to change a few other options here as well for the Inner Glow. First, Im going to lower the Opacity value to around 50%. Then, in the Elements section in the middle, Im going to raise the Choke value to about 10% and the Size value to 13 pixels:
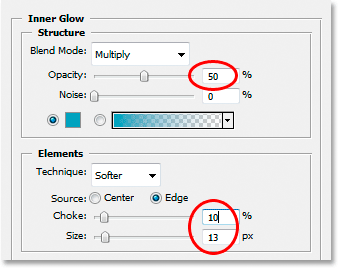
Change the options circled in red above for the Inner Glow.
Again, feel free to experiment with those values on your own.
Heres my effect so far with the Inner Glow applied:

The effect after applying the Inner Glow layer style.
Step 10: Apply The "Bevel and Emboss" Layer Style
Were going to add the Bevel and Emboss style next, so click directly on the words Inner Glow in the Layer Style menu on the left of the Layer Style dialog box, directly below Inner Glow:
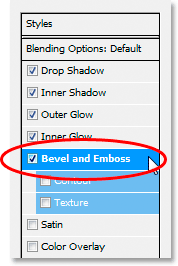
Click directly on the words Bevel and Emboss in the menu on the left of the Layer Style dialog box.
This time theres no colors to choose. Instead, theres a few options that need to be changed. I know Ive already said it a few times, but you dont need to use these specific settings for your effect. In fact, youll probably need to play around with them a little if youre using a different font type or size. However, having said that, heres the settings Ive used in the Bevel and Emboss options:
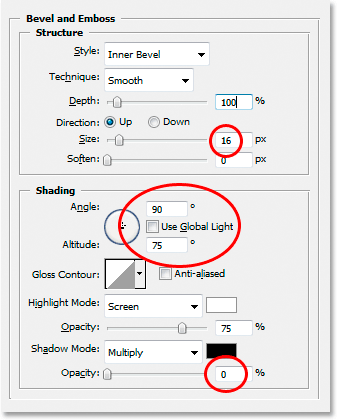
Change the options circled in red above.
First, I increased the Size to about 16 pixels. Then, in the Shading section, I unchecked Use Global Light, set the Angle to 90° and set the Altitude to 75°. Then, at the very bottom, I dragged the slider bar for the Shadow Mode option all the way to the left to set its value to 0%, since we already have more than enough shadows in the effect.
Were going to add the Contour effect in here as well, so click directly on the word Contour in the menu on the left. Its below Bevel and Emboss:
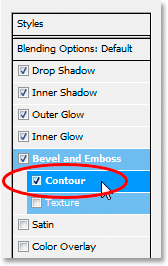
Click directly on the word Contour in the left menu.
In the Contour options, click on the down-pointing arrow to the right of the Contour preview thumbnail, then click on the Half Round option to select it (its the first one on the left, bottom row):
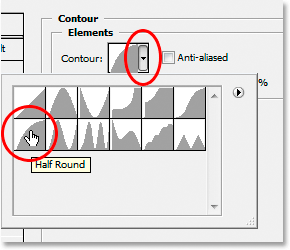
Click the down-pointing arrow and select the Half Round contour, bottom row, far left.
Heres my text after applying the Bevel and Emboss filter:

The effect after applying the Bevel and Emboss style.
Step 11: Apply The "Satin" Layer Style
One more layer style to apply, and its the Satin style, so click directly on the word Satin in the Layer Style menu on the left of the Layer Style dialog box, directly below Texture:
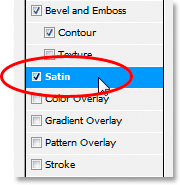
Click directly on the word Satin in the menu on the left of the Layer Style dialog box.
Were back to choosing a color once again, this time for the Satin effect, so click on the Satin color swatch:

Click the color swatch to choose a color for the Satin layer style.
Then click in the text to sample a darker shade of the text color. If the colors in your text turned strange when you clicked on the word Satin in the menu on the left, dont worry. Just click once anywhere on the text and the colors will revert back to the way they should be. Then click on any darker area to sample that color:

Click in a darker area of the text to sample that color to use with the Satin layer style.
As soon as you click your mouse to sample a color, youll see the Satin effect apply itself using that color. If you want, you can keep clicking around inside the text to choose a different color, and the Satin effect will be updated each time you click, so you can keep clicking until you find a dark shade youre happy with. Its basically a live preview of the effect.
Once you have your color selected, click OK in the Color Picker to exit out of it, then make the changes Ive circled below:
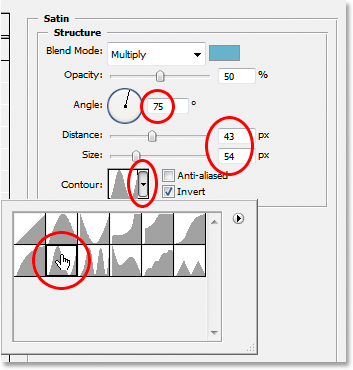
Change the Satin options circled in red above.
In the case of the Satin effect, youre really going to want to experiment with these settings yourself, but for the sake of following along, first I changed the Angle to 75°. Then I increased the Distance to 43 pixels and the Size to 54 pixels. Finally, I clicked on the down-pointing arrow to the right of the Contour preview thumbnail and chose the Ring contour, which is the second one from the left, bottom row.
Heres my text after applying the Satin filter:

The effect after applying the Satin style.
Step 12: Save The Layer Style
Were done adding layer styles at this point, but before you close out of the Layer Style dialog box, click the New Style button on the right:
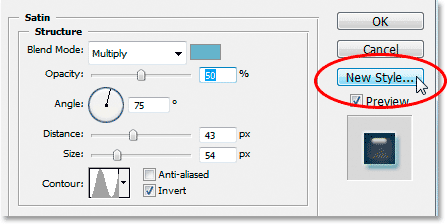
Click the New Style button on the right.
Were going to save this gel effect style so that we can re-use it whenever we want. When you click the button, Photoshop pops up the New Style dialog box. Im going to name my new style Gel effect:

Photoshops New Style dialog box. Name the new style Gel effect.
Then Ill click OK and I now have my style saved in Photoshop. Lets see how we can instantly apply it to something else.
Since I already have the word photo entered into my document window, Im going to grab my Type tool once again from the Tools palette and this time, Ill enter the word shop below it. Im also going to use the Free Transform command to resize it so its the same size as the word photo, and Im going to rotate it as well. Heres what it looks like at the moment:

Click in a darker area of the text to sample that color to use with the Satin layer style.
Right now, the word "shop" is using nothing more than the original text color, but I want it to have the same "gel effect" I created with the word "photo". I could go through all the steps again and re-create the layer style, but thankfully, I dont have to because I was smart enough to save the effect as a new style. Where can I find the style? Its in Photoshops Styles palette, located at the very bottom:
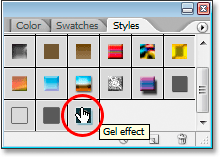
Photoshops Styles palette with my saved Gel effect style at the bottom of the list of available preset styles.
To apply it to my text, all I have to do is make sure I have the shop text layer selected in the Layers palette, and then click on the Gel effect style in the Styles palette. The effect is instantly added to the text:

The Gel effect style is instantly applied to the new text.
What if I wanted the word shop to be a different color though? Its easy to change the color, but theres a bit of a trick to it, as well see next.
Step 13: Changing The Color Of The Gel Text Effect
Were done creating the gel effect using layer styles, weve saved it as a new style named Gel effect, and weve instantly applied it to the word shop. But what if I want the word shop to be a different color? Youre probably thinking Easy, just use a Hue/Saturation adjustment layer. So lets try that and see if it works.
Ill use Hue/Saturation to change the color of the word "shop" from blue to pink. Heres the result:
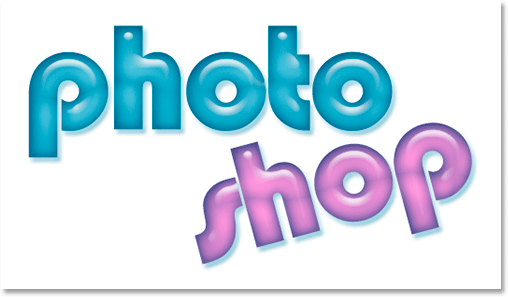
The word shop is now pink after applying Hue/Saturation.
The word itself has turned pink, but do you see the problem? The layer styles are still blue. The Hue/Saturation adjustment had no effect on them. If we want to change both the text color and the layer styles color, we need to use a bit of a trick.
With the shop layer still selected in the Layers palette, use the keyboard shortcut Ctrl+G (Win) / Command+G (Mac) to place the shop layer into a Layer Group, which Photoshop names Group 1:
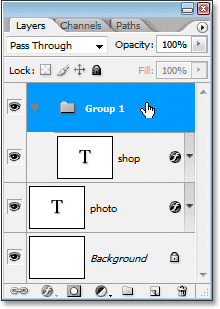
Press Ctrl+G (Win) / Command+G (Mac) to place the shop layer into a Layer Group.
We can see in the Layers palette above that the shop layer is now inside the Layer Group. Next, we need to change the blend mode for the Layer Group from its default of Pass Through to Normal:
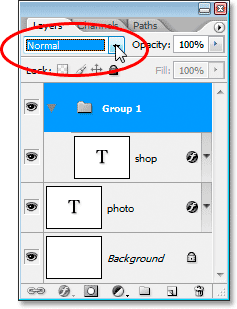
With the Layer Group selected, change its blend mode from Pass Through to Normal.
Now click on the "shop" layer to select it and then click on the New Adjustment Layer icon at the bottom of the Layers palette:
With the shop layer selected, click on the New Adjustment Layer icon at the bottom of the Layers palette.
Select Hue/Saturation from the list:
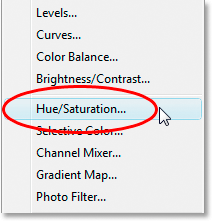
Select Hue/Saturation from the list of Adjustment Layers.
When the Hue/Saturation dialog box appears, drag the Hue slider to change the color of the text:
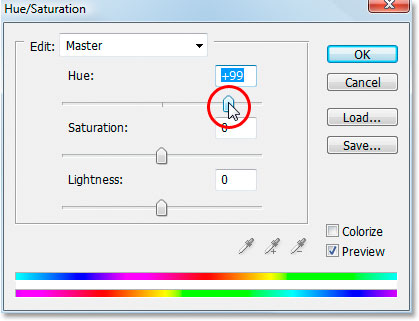
Change the color of the text by dragging the Hue slider.
Keep an eye on your text in the Document Window as youre dragging the slider. When youre happy with the new color, click OK to exit out of the Hue/Saturation dialog box, and this time, because the "shop" layer was placed inside a Layer Group, the layer styles are now colored along with the text itself:

The final result.
And there we have it!
You May Also Like...
Fun Easy Gel Text Effect With Layer Styles - Photoshop ...
In this Photoshop tutorial, learn how to use Layer Styles to create a gel text effect, then save the effect as a preset Layer Style to apply to other text!
Create A Fun, Easy Gel Text Effect With Layer Styles
Create A Fun, Easy Gel Text Effect With Layer Styles. SHARE THIS ARTICLE
Photoshop: Create A Fun, Easy Gel Text Effect With Layer ...
Learn how to use layer styles to easily create a fun gel text effect in Photoshop, then save it as a preset style that you can select instantly whenever you need it.
Photoshop Tutorial : Fun, Easy Gel Text Effect With Layer Styles
-2- . http://www.quraan-sunna.com/vb/showth
Fun Easy Gel Text Effect With Layer Styles - Photoshop ...
In this Photoshop text effects Thank you for reading Fun Easy Gel Text Effect With Layer Styles - Photoshop Fun Easy Gel Text Effect With Layer Styles
Fun Easy Gel Text Effect With Layer Styles Photoshop ...
Get Manual Guide info about Fun Easy Gel Text Effect With Layer Styles Photoshop and read our other article related to Fun Easy Gel Text Effect With Layer Styles
Create A Fun, Easy Gel Text Effect With Layer Styles
Create A Fun, Easy Gel Text Effect With Layer Styles. Step 1: Open A New Photoshop Document. Go up to the File menu at the top of the screen and choose New
Create A Fun, Easy Gel Text Effect With Layer Styles
Create A Fun, Easy Gel Text Effect With Layer Styles October 07, 2007 | Under photoshop tutorials | Recommend this
Photoshop Tutorials | Photoshop Essentials
Fun, Easy Gel Text Effect With Layer Styles In Photoshop Learn how to use layer styles to easily create a fun gel text effect in Photoshop,
Fun Easy Gel Text Effect With Layer Styles Photoshop ...
Stay updated everywhere, anytime with Paraguay Post. this news about Fun Easy Gel Text Effect With Layer Styles Photoshop and read our other update related to Fun
ConversionConversion EmoticonEmoticon