In this step-by-step Photoshop tutorial, I will take you through the making of a vintage-themed poster which has a train as its subject. The design process involves Photoshop filters, layer masks, vector drawing and trendy typography techniques.
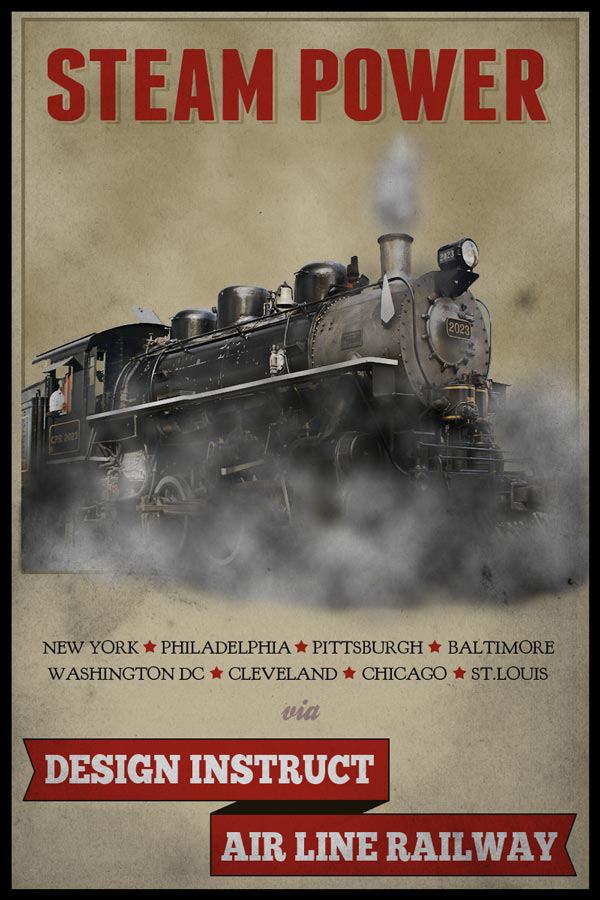
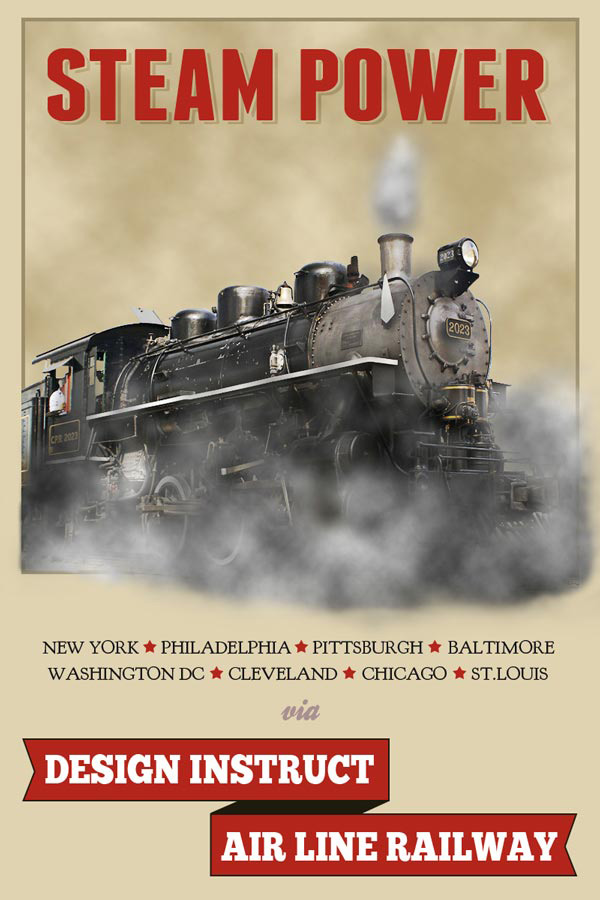
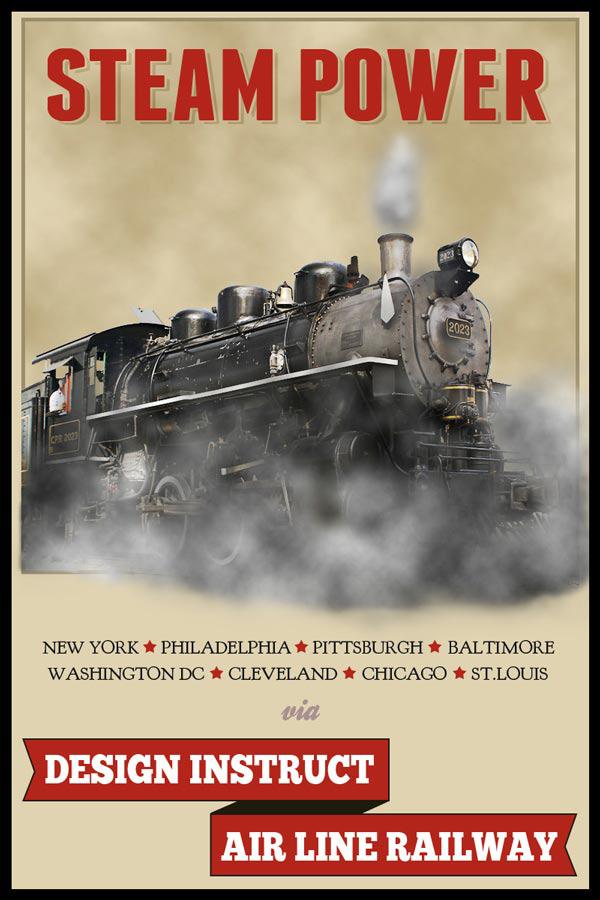
Preview
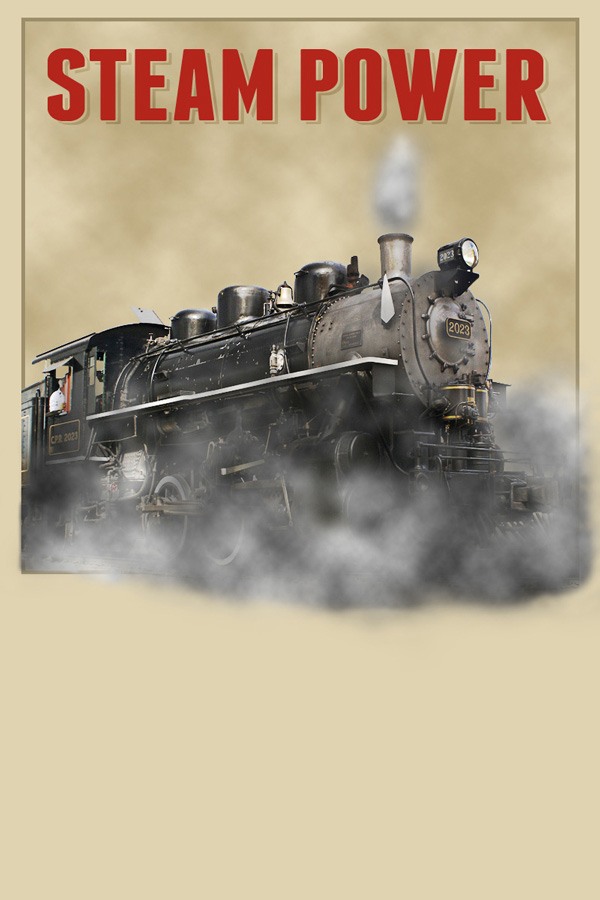
Click the image to see the final result in full size.
Tutorial Resources
Step 1: Create the Posters Background
In Photoshop, create a new 800x1200px document. Fill the default Background layer with black (#000000).

Create a new layer (Shift + Cmd/Ctrl + N) and fill it with a beige color (#e0d3b1).
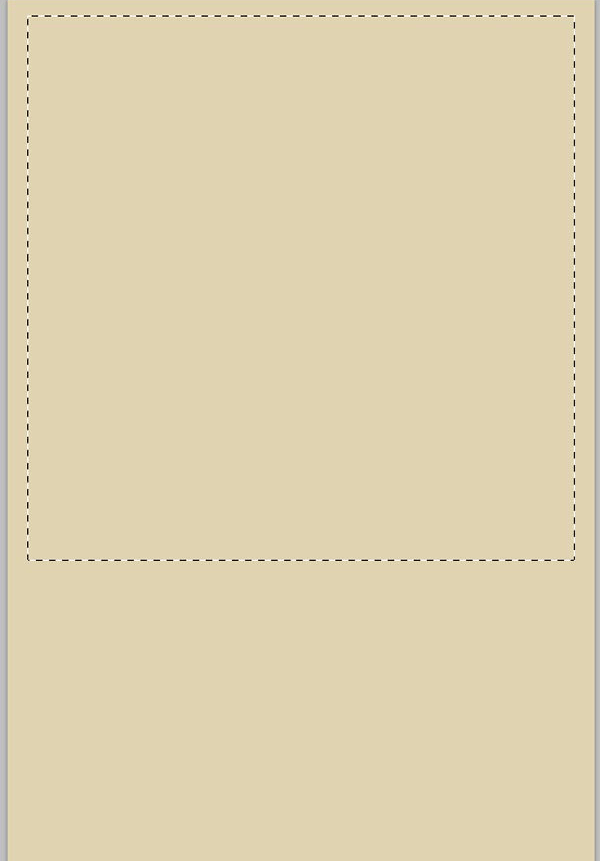
Step 2: Create a Frame Border for the Train
Create a selection using the Rectangular Marquee Tool (M) (see the image below as a reference).
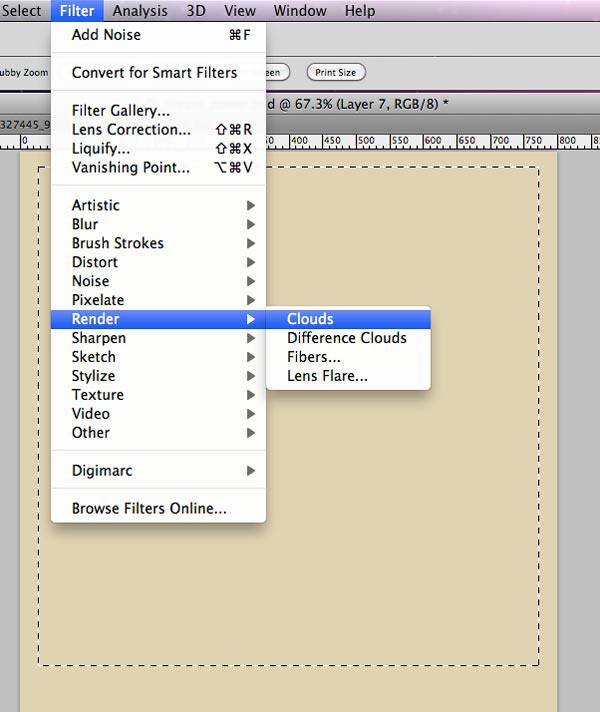
Set your Foreground color to a dark tan (#b2a37c) and your Background color to white (#ffffff). Create a new layer. Hold down Option/Alt (so the resultant effect is stronger), then go to Filter > Render > Clouds.

Change the Blend Mode of the layer to Multiply and set its Opacity to 55%.
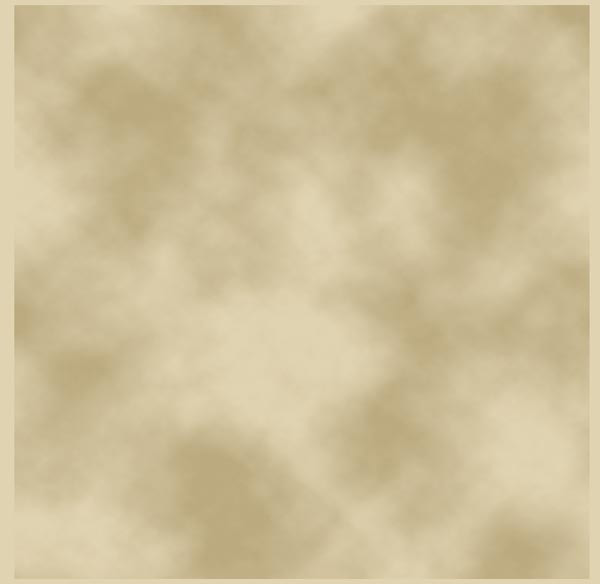
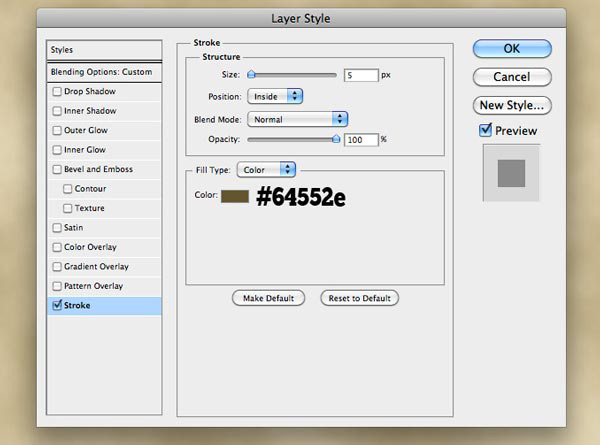
Go to Layer > Layer Style > Stroke and give the layer a stroke effect using the following settings:
Here is how our frame border should look:

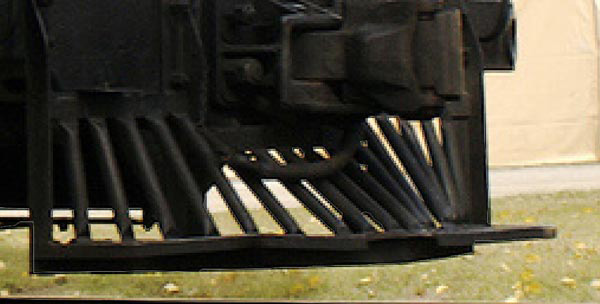
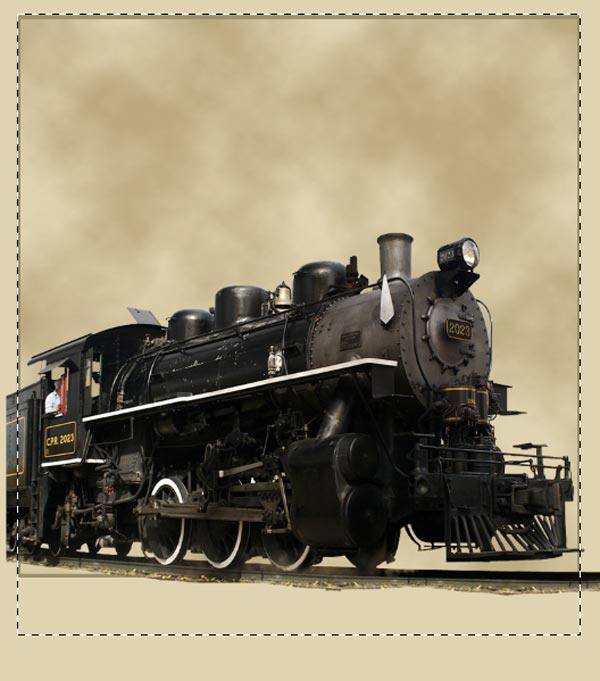
Step 3: Isolate the Train
Download the Old train CPR_2026_5 image and open it up in Photoshop. Zoom in as needed, and then use the Pen Tool (P) to trace carefully around the train.
Once you have traced around the train with the Pen Tool (P), Control-click/right-click on the path, then choose Make Selection from the menu that appears.

Go to Select > Inverse (Shift + Cmd/Ctrl + I) to invert your selection, then just press delete to remove the background.

Step 4: Place the Train into the Scene
In the Layers Panel, Cmd-click/Ctrl-click on the trains layer to make a selection around the train. Copy (Cmd/Ctrl + C) the selection, switch to the main Photoshop document, and paste (Cmd/Ctrl + V) the train in our design.
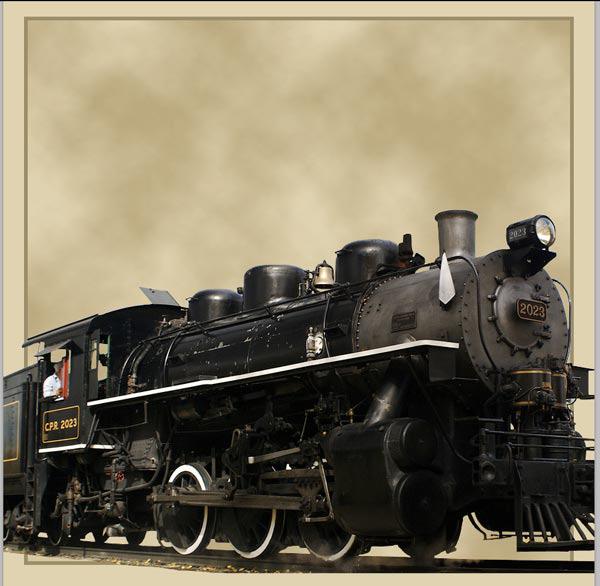
Convert train to a smart object so that we can perform nondestructive transforms on it; do so by Control-clicking/right-clicking on its layer and then choosing Convert to Smart Object.
Use Edit > Free Transform (Cmd/Ctrl + T) to adjust the size of the train (make it a bit smaller).

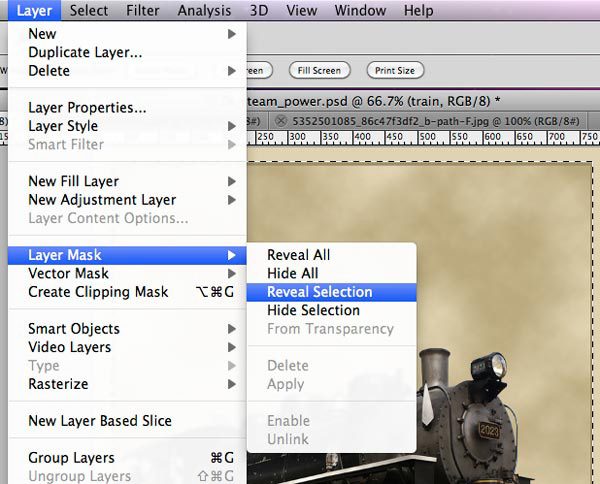
Step 5: Mask the Train
To hide a few unwanted parts of the train that spills out of the frame border, we will use a mask. To start, with the Rectangular Marquee Tool (M), create a selection like the one shown below:
To mask the areas outside the rectangular selection, go to Layer > Layer Mask > Reveal Selection.
Here is the result of our layer mask:

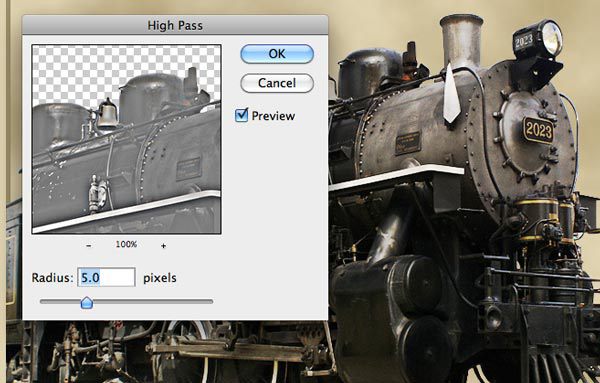
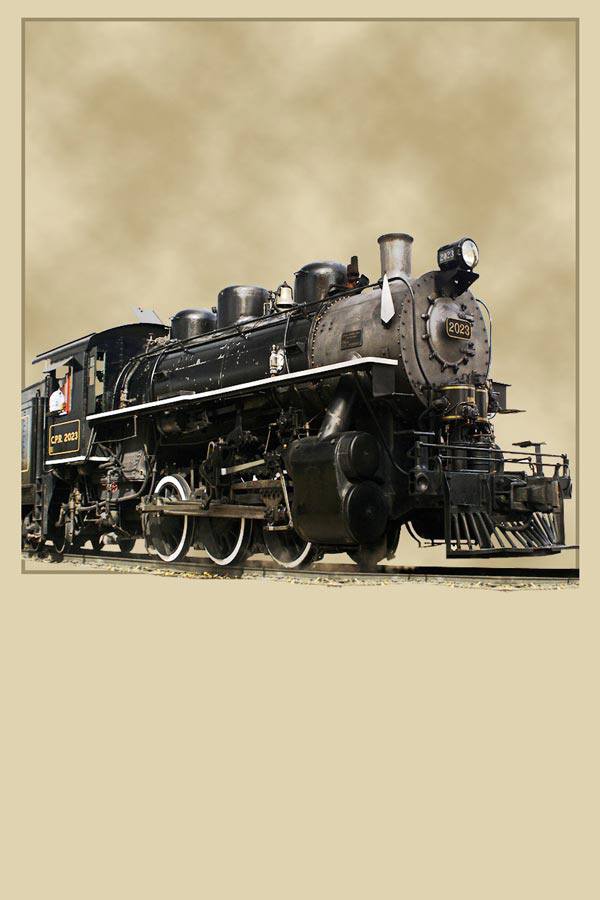
Step 6: Aging the Train
In this step, we will slightly alter the surface of the train to make it more harmonious with other design elements in the poster.
Duplicate the train layer by clicking on its layer and then pressing Cmd/Ctrl + J. Change the Blend Mode of the duplicate layer to Color Dodge and reduce the layers Opacity to 50%. Apply Filter > Other > High Pass with Radius at 5px.
As you can see in the image below, the train is now a little less saturated:
Step 7: Create Some Steam
Reset your Foreground color and Background color to black and white (press D on the keyboard). Create a new layer above the train layers. Use Filter > Render > Clouds on the new layer.
Go to Layer > Layer Mask > Hide All. Switch your Foreground color to white (#ffffff). Use the Brush Tool (B) with a very soft brush (0% Hardness) to paint and reveal steam around the train. Paint on the layer mask using different brush sizes (press [ to reduce the brush size, and ] to increase the brush size) as well as different opacities to create natural variations.
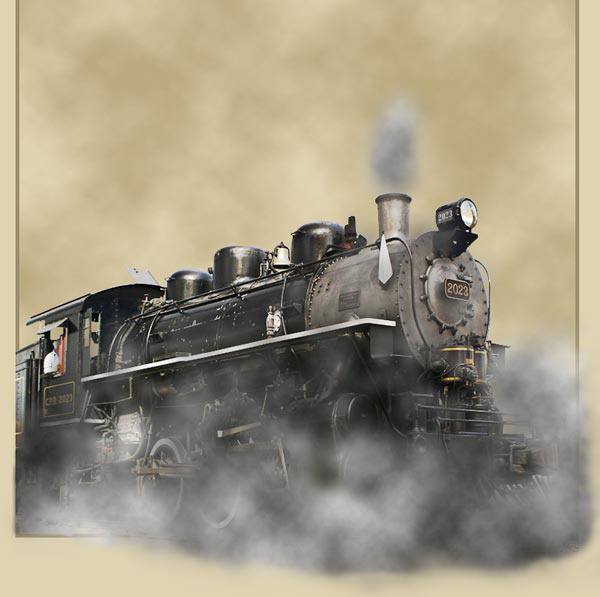
Create a new layer above the steam layer and, with a soft brush, dub a few white spots over the steam.
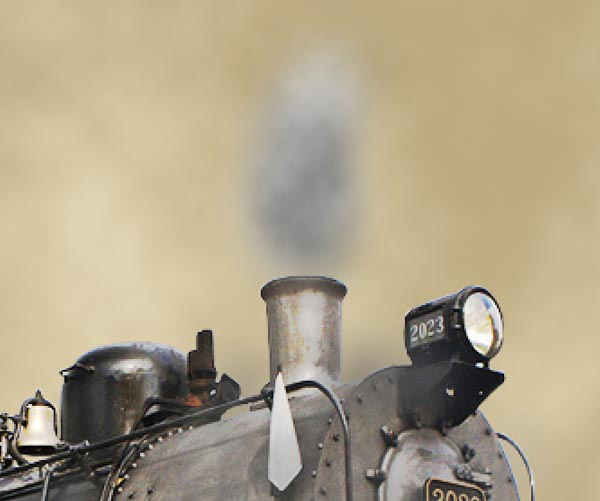
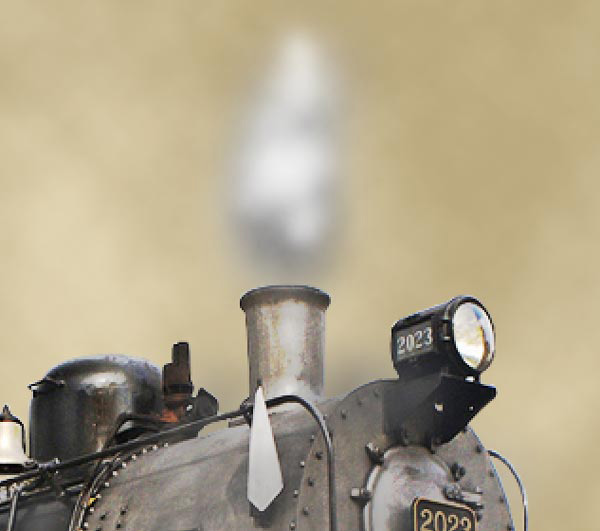
Then, change the Blend Mode of the layer to Overlay and set the Opacity to 60%.

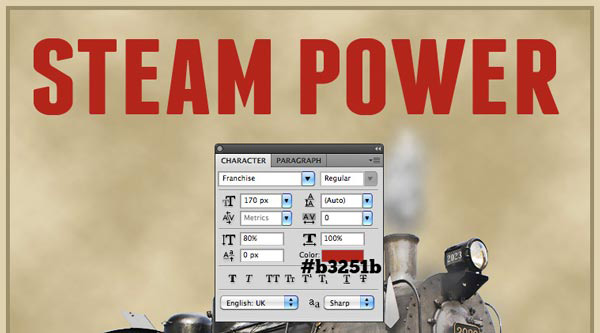
Step 8: Create the Posters Title
Use the Horizontal Type Tool (T) to write "Steam Power" onto the canvas using the Franchise font; a muted red text color (#b3251b) is a good complementary color to use.
We will now create a nice drop shadow effect for our text. To start, in the Layers Panel, Cmd-click/Ctrl-click on the text layers thumbnail to load a selection around the letters.
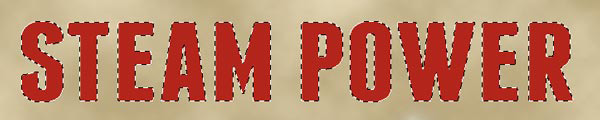
Hide the visibility of the text layer temporarily. Create a new layer below the text layer.

On the new layer, fill the selection with a dark gray color (#38383b).

Turn your text layer back on. Switch to the Move Tool (V) and then use your arrow keys to nudge the dark gray drop shadow about 7px to the right and 5px down.

Cmd-click/Ctrl-click on the text layers thumbnail (or go to Select > Reselect) to reload the selection around the letters. Nudge the selection 3px to the right and 2px down; we only want to move the selection, so if you still have the Move Tool activated, switch to the Rectangular Marquee Tool (M). Make sure you are on the gray drop shadow layer, then hit Delete to remove a small section of the drop shadow around the edge of the text layer.
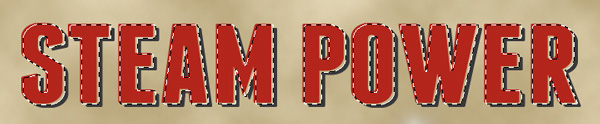
Set the Blend Mode of the drop shadow layer to Soft Light.

Here is a preview of our progress so far:
Step 9: Add More Text to the Design
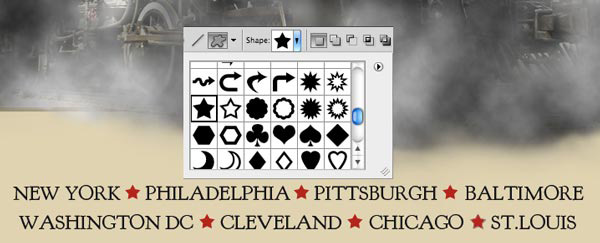
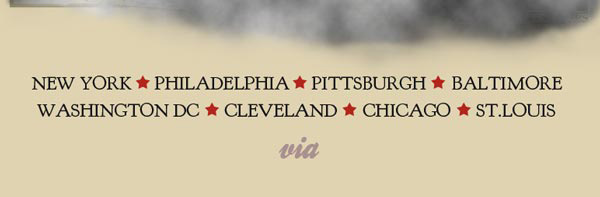
Using Goudy Bookletter 1911, type some city names towards the bottom of the canvas.

With the Custom Shape Tool (U), insert red (#b3251b) stars between the city names.
Type word "via" using the Ballpark Weiner font below the train station names. Use a medium gray text color (#aa9090) and a font size of about 42px.
Step 10: Create a Trendy Ribbon
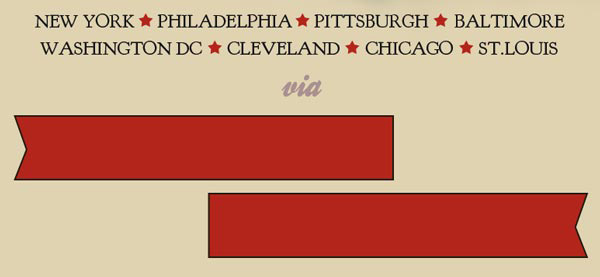
Switch to the Rectangle Tool (U). In the Options Bar, make sure that the tool is set to Shape Layers. Create a red (#b3251b) vector rectangle under the text we added in the previous step.

Place a horizontal guide (View > New Guide) in the middle of the rectangle to help us make the proper adjustments to the red rectangle. In the Layers Panel, select the vector mask of the red rectangle shape layer by clicking on it (it is the thumbnail preview on the right of the link icon).
Click-and-hold on the Pen Tool in the Tools Panel to find the Add Anchor Point Tool. Use the Add Anchor Point Tool to create an anchor point on the left side of the rectangle, using the horizontal guide we created to aid in the creation of the anchor point.

Switch to the Convert Point Tool by, again, clicking-and-holding the Pen Tool button in the Tools Panel to find the tool. Click once on the anchor point we just created to delete the Bezier curve handles.

Next, use the Direct Selection Tool (A) to select the anchor point, and then pull the anchor point to the right.

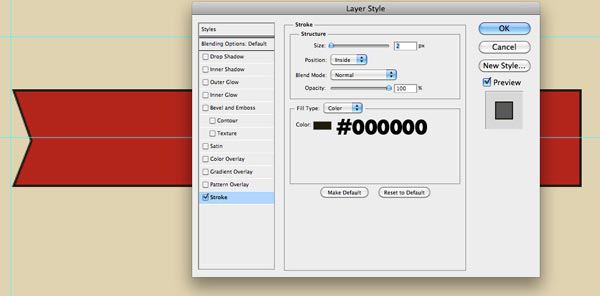
Go to Layer > Layer Style > Stroke and use the following settings:
Duplicate the ribbon layer. Go to Edit > Transform > Flip Horizontal to change the orientation of the duplicate layer. Use the Move Tool (V) to position the ribbons as shown below:
With the Rectangle Tool, create a diagonal rectangle as shown below, and fill it with a very dark gray (almost black) color (#1f1a0d). You could draw the dark gray rectangle horizontally, then use Free Transform to rotate it.
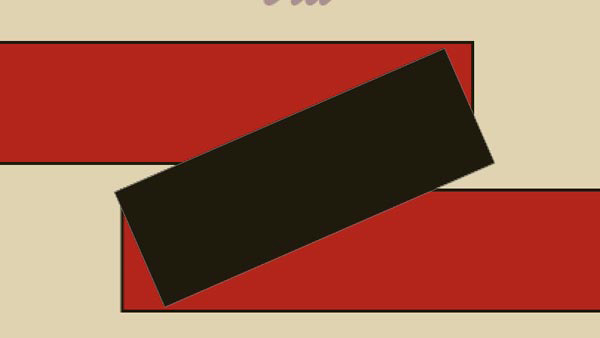
Using the Direct Selection Tool, adjust the anchor points of the dark gray rectangle using the image below as a reference:

After adjusting the anchor points of the dark gray rectangle, move its layer below the ribbon layers.
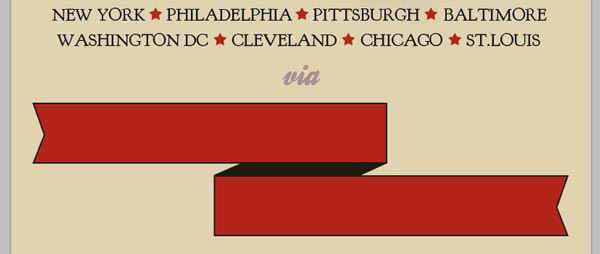
Lets add text on the ribbon. For the font, choose ChunkFive with the text color set to white, and font size set to 45px. Also, increase the Vertically scale option (found in the Character Panel) to 120%.

Here is our ribbon completed:
Step 11: Create the Posters Border Using a Layer Mask
In the Layers Panel, select all the layers except the black background. Then go to Layer > Group Layers (Cmd/Ctrl + G) to place all the selected layers into a layer group.
With the Rectangular Marquee Tool (M), create a selection that is slightly smaller than the canvas.
Be sure that the layer group is selected in the Layers Panel, and then go to Layer > Layer Mask > Reveal Selection. The black default Background layer we created in the first step now shows through the borders of the canvas.
Step 12: Add a Paper Texture
Download and open up a paper texture (such as this Vintage Page texture) in Photoshop. Using the Magic Wand Tool (W), click on the white background to select the white background of the paper texture.
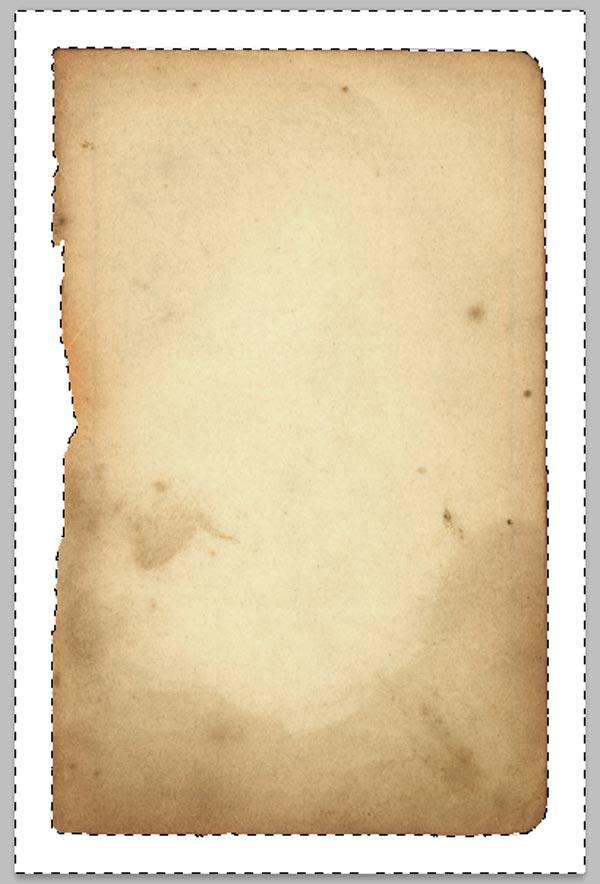
Invert the selection (Shift + Cmd/Ctrl + I) to select just the paper texture.
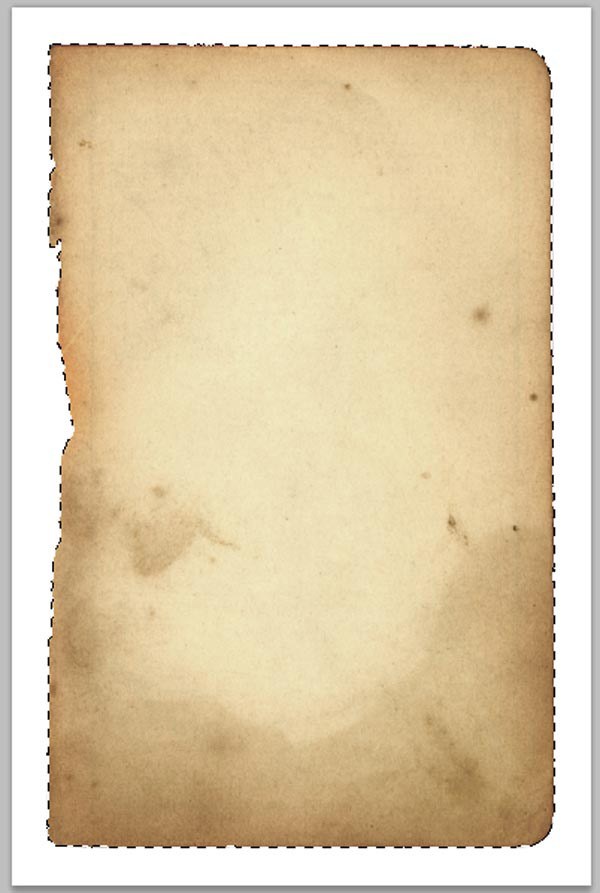
Copy and paste the paper texture into our design and scale it with Free Transform (Cmd/Ctrl + T) to fit the canvas.
Go to Image > Adjustments > Desaturate to remove the colors of the paper texture.

Change the paper texture layers Blend Mode to Multiply.
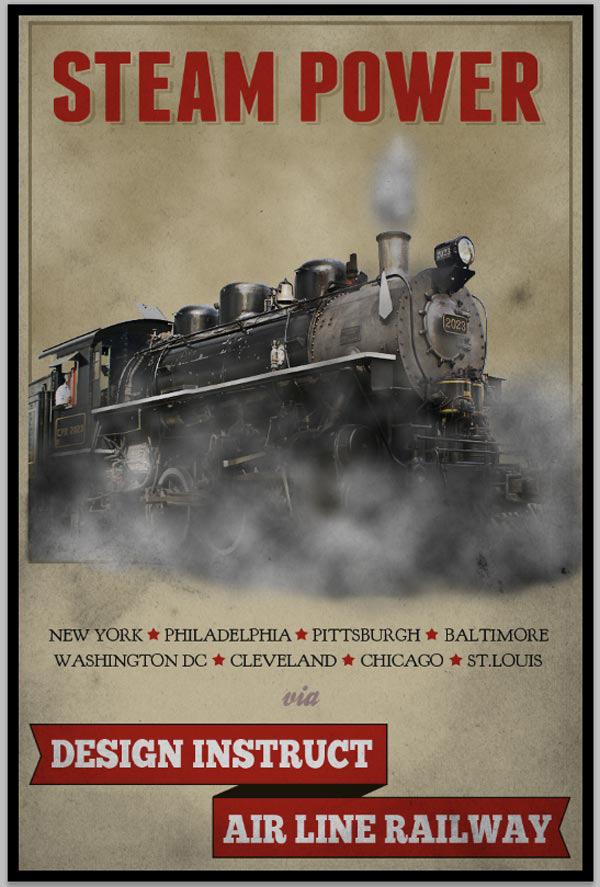
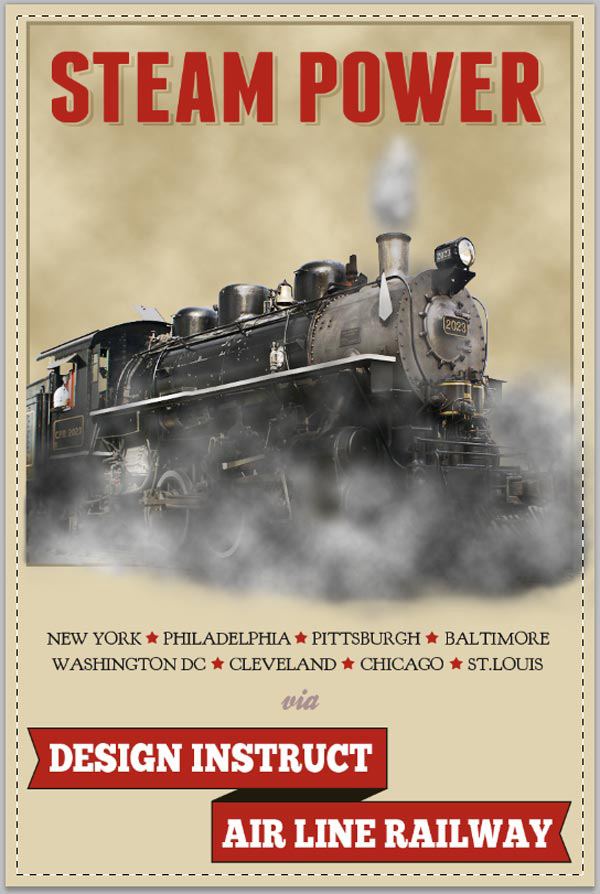
We are finished!
Tutorial Summary
I hope you enjoyed this Photoshop tutorial! To summarize, we created a vintage-inspired poster using an old train photo, paper textures, basic shapes, layer styles, layer masks, blend modes, Photoshop filters and more. We used some trendy design techniques such as creating a cool drop shadow on the posters headline text and a ribbon banner. Thanks for reading this tutorial and I hope you have learned some useful tips and tricks.
If you have any questions or comments, feel free to post them in the comments section below.
Download Source Files

Create a Vintage Steam Locomotive Poster in Photoshop
In this step-by-step Photoshop tutorial, I will take you through the making of a vintage-themed poster which has a train as its subject. The design process involves
30 Poster Design Tutorials for Photoshop - Vandelay Design
How to Design a 1980s Movie Poster in Photoshop. Create a Vintage Memorabilia Poster. Create a Vintage Steam Locomotive Poster in Photoshop.
Create a Vintage Steam Locomotive Poster Adobe Photoshop
How To Create a Vintage Style Zombie Movie Poster Follow this step by step process of designing your own retro/vintage style horror movie poster.
10 Awesome Vintage Photoshop Tutorials - Design Instruct
10 Awesome Vintage Photoshop Tutorials. Nov 13 2013 3 Comments By Jacob Gube ; Vintage Steam Locomotive Poster. 7. Vintage-Inspired Movie Poster in Photoshop. 8.
30 Latest Photoshop Poster Tutorials | Naldz Graphics
How to Create a Vintage Circus Poster with the Photoshop Puppet Warp Tool In this tutorial, Create a Vintage Steam Locomotive Poster in Photoshop
50+ Inspiring Photoshop Tutorials for Professional Poster ...
The internet is littered with the options of having quality tutorials and poster designing in Photoshop. Create a Vintage Steam Locomotive Poster in Photoshop.
40+ Awesome Photoshop Poster Tutorials For Your Inspiration
Design a Vintage Car Poster in Photoshop MORE INFO. Create a Vintage Steam Locomotive Poster in Photoshop MORE INFO.
40 Useful Photoshop Poster Design Tutorials - Creative ...
How to Create a Vintage Party Poster in Photoshop. How to create retro aesthetic poster in Photoshop. Create a Vintage Steam Locomotive Poster in Photoshop.
TUTORIAL | PHOTOSHOP | Pinterest
your own Pins on Pinterest. | See more about trains, steam locomotive and posters Create a Vintage Steam Locomotive Poster in Photoshop PHOTOSHOP. PHOTOSHOP
Clipping Path Photoshop
Create a Vintage Steam Locomotive Poster in Photoshop http://ping.fm/1FsOn. Posted by Clipping Path at 12:58 AM. Create a Vintage Steam Locomotive Poster in Photos
Travelling is my life
ConversionConversion EmoticonEmoticon