Like this article? We recommend
The Photoshop clipping mask feature is a quick way to create effects such as text filled with a photograph. Helen Bradley points out more handy uses for clipping masks, such as limiting the effect of adjustment layers, or simplifying the process of editing a portion of an image. You can follow along with the accompanying video tutorial to see exactly how it's done.
In this series, Helen Bradley discusses some handy Photoshop tools that are often overlooked or misunderstood, either because theyre hidden away or because their use isnt immediately apparent. Yet these tools provide smart and useful ways to perform various tasks in Photoshop, so theyre worthy of adding to your Photoshop skill list.
In the third article in the series, we consider the clipping mask feature, which is often incorrectly referred to as "clipping paths" and sometimes called a "clipping group." This feature often is used to create text effects in which the text looks like its cut from a photo, but clipping masks have other uses that well examine in a bit.
A clipping mask is created using two layers of a Photoshop image. Transparent pixels in the bottommost layer act as a mask for the image on the layer above.
The easiest way to understand how clipping masks work is to try one yourself. Follow these steps to use a clipping mask to create text that looks like its cut from a photo:
- Open a photograph in Photoshop, double-click the background layer, and click
OK to convert this layer to a regular layer. Click the Horizontal Type tool,
click on the photo, and type some text on the image. (Choose a font with thick,
solid letters so theres plenty of room for the photo to show through.)
Dont worry about the text color; when this effect is complete, you
wont see the color anyway. Figure 1 shows the sample Im
using.
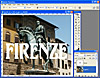
Figure 1 Turn the background layer of an image to a regular layer and then add some text to a new layer, using a thick, heavy font.
- Drag the text layer below the photo layer. Position your mouse pointer over
the border between the two layers and hold down the Alt key (Option key on the
Mac). When the mouse pointer changes to two overlapping circles (see Figure 2),
click once to create a clipping mask. This is the equivalent of clicking the
topmost of the two layers and choosing Layer > Create Clipping Mask.
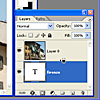
Figure 2 To create a clipping mask, hold down the Alt key (Option on the Mac), position the cursor over the border between the two layers, and click.
- The photograph is masked by the text, so only those areas of the photograph
that appear over the text are visible (see Figure 3). One benefit of this
technique is that its editable, so you can move the photograph or the
text around on its respective layer. As you do, the visible portion of the
photograph on the screen changes. You can also click the layer containing the
text and change the text or its formatchoosing a different font and font
size, for example.
As Figure 3 shows, when you create a clipping mask the top layer thumbnail is inset slightly in the Layers palette, and a down arrow appears to the left of the thumbnail, indicating that the layer is part of a clipping mask. The name of the bottommost layer of the clipping maskthe one thats acting as the maskis underlined.
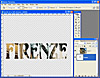
Figure 3 With the clipping mask applied, the text layer masks the image layer above.
To undo the clipping mask, position the mouse pointer over the border between the two layers and Alt-click (Option-click on the Mac).
- Lets complete the effect in this example by adding a lighter version
of the image below the clipping mask. Duplicate the image layer and drag it
below the clipping mask. Add a white-filled layer above that layer, and decrease
the opacity of the white-filled layer to reveal some of the image below. Add a
small Outer Glow layer style to the text layer to draw attention to it (see
Figure 4).
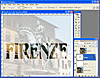
Figure 4 Finish the effect by adding a duplicate of the image layer, and lighten it with a partially opaque white-filled layer.
Misunderstood Photoshop: Clipping Masks | Clipping Mask ...
The Photoshop clipping mask feature is a quick way to create effects such as text filled with a photograph. Helen Bradley points out more handy uses for clipping
Other Techniques | Misunderstood Photoshop: Clipping Masks ...
Other Techniques. Once you have a clipping mask in place, you can add more layers to the clipping mask, and theyll form part of it. For example, choose Layer > New
Photoshop Clipping Mask: How to Use it Effectively
Clipping masks are among the most powerful, yet most misunderstood features in Photoshop. While most people are familiar with layer masks, clipping masks are still
Photoshop Clipping Masks Tutorial
Clipping masks are a lot like Photoshops layer masks in that both allow us to show and hide When you see your mouse cursor change into the clipping mask icon,
Masking in Photoshop: Understanding Layer Masks and ...
Understand how Photoshop layer masks and clipping masks work in yet misunderstood features in Photoshop. Now go to Layer Menu and select Create Clipping Mask.
Photoshop Help | Revealing layers with clipping masks
Photoshop Help / Revealing layers with clipping masks. Adobe Community Help. Applies to: You can use multiple layers in a clipping mask,
Layer Mask Vs. Clipping Mask: Don't Get Confused ...
yet most misunderstood feature in Photoshop. A mask is a virtual entity that layer masks and clipping masks. clipping mask is a layer that can
Spiringuacchi - Misunderstood Photoshop: Clipping Masks >...
Misunderstood Photoshop: Clipping Masks > Clipping Mask Basics Search, and ye shall find:
How To Use Clipping Masks (And Not Layer Masks) in Photoshop
Simply read on to see how you can start incorporating Clipping Masks into your Photoshop technique. What is a Clipping Mask? Clipping Masks are not
The basics of clipping masks in Photoshop Elements ...
Tutorial explaining the basics of how to create and use clipping masks in Photoshop Clip your image to the mask by with the clipping mask
Travelling is my life
ConversionConversion EmoticonEmoticon