Whether you're working with a photo or creating an image from scratch, you may want to add some rays of light to a scene. Here's how to make them look realistic!
| This tutorial will work just fine with either Photoshop or Elements. I wrote it using PS 7, so the screenshots are from that program. If you're using another version, or Elements, your screen will look a bit different from mine, but you'll get the same results. |
As you work through this tutorial, you'll learn or practice the following:
|
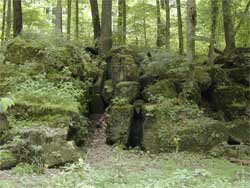
Just for practice, if you'd like, you may use my photo*. Click the before image at the right to get to the larger version. Right-click and choose Save as. Then open it in PS or Elements.
* You do not have my permission to publish this photo for gain. You may publish it as part of your portfolio or in an educational setting, if it is accompanied by my copyright notice: Photo is ©2003, myJanee.com.
1. Here comes the sun.
a. Duplicate the photo layer, by dragging it to the Create a New Layer icon at the bottom of the Layers palette next to the trash can.
b. On the top of these layers, do Filter > Render > Lens Flare to make your sun. In that dialog box, drag the + to where you want the sun to be. (See at right.)
Experiment with all the choices till you like the effect.
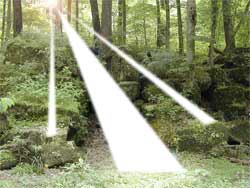
2. Make the ray layers.
a) Add a new layer above your forest layer. Label this layer "Rays."
b) Use the Polygonal lasso tool (not magnetic) and make a long thin triangle in the shape of one of the rays you want. Have it start at your "sun."
c) Make white your Foreground color and Alt-Backspace to fill this selection. I know it looks horrible, but stick with me.
d) Select and fill again to make a second ray. Continue till you have as many rays as you need. I made three.
e) Duplicate the Rays layer and turn off the visibility eye for the lower one. This enables you to see what you're doing just on the top Rays layer.
f) Reduce opacity on the top Rays layer so it looks remotely like rays. I like 25% for this.
g) On this Rays layer, Filter > Blur > Gaussian Blur. Make it blurry enough that the parts touching the forest floor look blurred enough for your tastes.
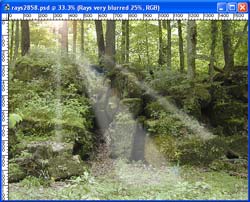
If you like this.. fine. For more realism, though, you will want to do a little more work.
3. Mask out part of the top ray layer.
a) Make the mask.
Now well make a Layer Mask. (Elements users, see the box just below.) We'll use this to mask out the upper part of the top ray layer, letting the less blurred part of the rays show through.
If you're using Photoshop, click the top Rays layer to make it active in your Layers palette.
Click the Add a Layer Mask icon at the bottom of the Layers palette. It is a white circle on a gray background. You'll see your Layer Mask appear beside your Rays layer.
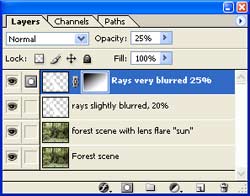
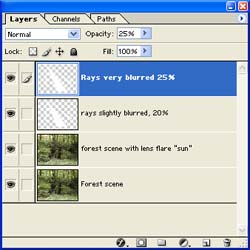
Layers palette with Layer Mask shown
(This is after I've painted the mask in step b.)
Elements Users, use an Elemask* i. Click the Create a New Adjustment Layer icon at the bottom of the Layers palette. Choose something.. like Hue/Saturation. Click OK without changing anything. ii. Drag this Elemask layer to between the two ray layers. iii. With the pointer between the Elemask and the top ray layer, hold the Alt key and click. This clips the Elemask to the top layer. The white square is your Elemask. * If you are new to myJanee.com, you may be new to the idea of Elemasks. This is a name that I invented for this nifty little way of making a Layer Mask in Elements. Experiment with drawing on the Elemask. I like using them to cut subjects away from their backgrounds, too. |
b) Paint on the mask.
Click the mask you just made.
With black as foreground and white background (type D for Default colours!), choose the Gradient tool.
In the Options bar, choose the Linear Gradient. Be you are using the foreground/background gradient, Mode is Normal, Opacity is 100%, and Reverse is not on.
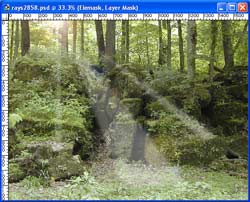
Drag a gradient from top to bottom over your canvas.
This hides the top part of the blurrier ray layer, leaving the more edgy ray layer showing there. This should look pretty good. Muck around with opacity further if necessary.
4. Shine the light on me!
Your illusion wont look realistic unless the rays are lighting the ground! Heres how to make this happen:
Click the top photo layer, the one where you made your sun. Then click the black/white circle at the bottom of the Layers palette to make an Adjustment Layer.
Choose Levels. Move the sliders toward the left so that it looks like the sun has gotten much too close to the earth. Dont panic. You are going to mask out most of this!

Click the white mask for the Levels Adjustment layer. With black as your Foreground colour, Alt-backspace to fill the mask. This will hide the whole adjustment.
Now well paint some of the brightness back in. Choose white for the foreground. Pick a wide soft brush. Paint some areas of light on the canvas where the rays might hit. You can see on my active layer to the right where I have painted in some brightness.
Adding Rays of Light: a Tutorial in Photoshop or Elements ...
Whether you're working with a photo or creating an image from scratch, you may want to add some rays of light to a scene. Here's how to make them look realistic!
Photoshop Elements - Light Rays - Sun Rays Tutorial
Written By Steve Patterson. In this photo effects tutorial, we'll learn how to quickly and easily add rays of sunlight to an image with Photoshop Elements 8!
Add Rays Of Light To A Photo - Photoshop Tutorial
learn a fast and easy way to add rays of Add Rays Of Light To A Photo With Photoshop Ill be using Photoshop CS5 throughout this tutorial but any
Ray of Light | Photoshop Tutorials
In this Photoshop Elements tutorial, you will learn how to use a combination of tools to digitally add a realistic ray of light to the rays might look as clean
Ray of Light | Photoshop Tutorials
Photoshop Tutorials. Photoshop Use Photoshop to create and add a dramatic ray of light to The sun was strong enough to make light rays in the
Add Rays of Light to a Photo - Photoshop-Elements Tutorial ...
In this photo effects tutorial, we'll learn how to quickly and easily add rays of sunlight to an image with Photoshop Elements 8! This tutorial is also fully
Adding rays of light in Photoshop Elements
In this video we take a look at adding beams of light or sun rays using Adjustments layers. The colours and tones are also enhanced in t
How To Add Light Rays To Your Images Photoshop and Elements
Learn from a pro Photographer and Action Maker how to add realistic light effects to your images. www.MagicAndLightCollection.com.
Add Rays Of Light To A Photo | Tutorials photoshop
Let's get started! View the Photoshop Elements version of this tutorial. Step 1: Add A New Blank Layer With the photo newly opened in Photoshop, we can see in the
Adding Rays Of Light A Tutorial In Photoshop Or Elements ...
Excellent photoshop abstract and light effect tutorials. the demand for photoshop tutorials are too much in these days and finding the best tutorials from the pool.
Travelling is my life
ConversionConversion EmoticonEmoticon