![]()
![]()
![]() Buy. Download. Create. Get Photoshop Elements now at the Adobe Store.
Buy. Download. Create. Get Photoshop Elements now at the Adobe Store.![]() Download a free 30 day Photoshop Elements trial at the Adobe site.
Download a free 30 day Photoshop Elements trial at the Adobe site.![]()
![]()
Adobe Photoshop Elements 11 Learn by Video - 7 Free Clips
 Here are 7 free videos for Photoshop Elements 11 (30-day free trial) taken from the video tutorial series Adobe Photoshop Elements 11 Learn by Video - Manage, Optimize, and Share Your Photographic Memories. If you decide to purchase the complete training, use our discount code PSSEP30 for an instant 30% savings, good through end of October 2012.
Updating an Existing Catalog
If you've been using Photoshop Elements prior to version 11, you'll want to watch this lesson so you'll know exactly how to update your existing Elements catalog.
Identifying the People in Photos
The Elements Organizer includes a powerful "people recognition" feature that enables you to automatically identify the people in your photos. This lesson will show you how to put this feature to use.
Performing a Visual Search
The Elements Organizer lets you find images that are visually similar to a particular photo that you've identified. This lesson will show you how to use this impressive capability.
Creating a Perfect Portrait
In this lesson you'll learn how to apply a variety of adjustments to improve any photo that features a person, making it look like a great portrait.
Creating an Out of Bounds Effect
With the Out of Bounds guided edit you can make a subject pop out of the photo, as you'll see in this lesson.
Creating Reflections
This lesson will show you how to create a reflection effect that can add some elegance to a photo.
Creating Greeting Cards
This lesson will show you how to create custom greeting cards that feature your photos.
Photoshop Plugins - Get 15% Off All onOne, Topaz & Nik Plugins
![]() Enter coupon code - PSSPPT06 - during checkout at onOne Software for an instant 15% discount on any onOne product.
Enter coupon code - PSSPPT06 - during checkout at onOne Software for an instant 15% discount on any onOne product.
Topaz Labs Photoshop Plugins 15% Off
Enter coupon code PHOTOSHOPSUPPORT at Topaz Labs for an instant 15% discount, including bundles and upgrades.
NIK Photoshop Plugins 15% Discount Coupon
Enter coupon code NIKPSS during the checkout process at Nik Software for an instant 15% discount on any Nik plugin or bundle.
Adobe Photoshop Elements 11 At A Glance Adobe Photoshop Elements 11 helps you enhance your photos with powerful, easy-to-use editing options; showcase them in personalized printed keepsakes like calendars and photo books; and share them on Facebook and YouTube, in interactive Online Albums, and more.
The friendly and intuitive Photoshop Elements 11 environment offers bold icons, a helpful Action bar, and the ability to choose from Quick, Guided, and Expert editing modes to fit your needs.
Easily organize and find your photos
Keep track of all your memories with intelligent options that help you quickly organize, find, and view all your photos and video clips.
Manage your photos more easily
Intuitively sort and manage photos and video clips based on people, places, and events using new Organizer views.
Enhance photos to create perfect shots with ease
Make every photo look its best with powerful yet simple editing options that offer everything from quick fixes to unlimited creative possibilities.
Learn more or buy now.![]()
Photoshop Elements 10 Tutorial - 16 Bits Channel Editing Secrets
Multi-layered editing in 16 Bits/Channel is the 'professional's approach to image editing, but it was never supposed to be possible in Photoshop Elements. In this extract from the full 16 bit tutorial (available in Photoshop expert Mark Galer's new Photoshop Elements Maximum Performance 10 book) he adopts the age old adage "never say never" and demonstrates how you can edit at the higher bit depth so that you can achieve maximum quality from your Raw files.
This project requires the use of camera raw files, rather than JPEG files. The bit depth of a Raw file is higher than the 8 Bits per channel of a JPEG file. If files are edited at a higher bit depth the color and tone of the image can be corrected or optimized to a much greater extent without the risk of introducing image artifacts and color banding in the final image. This is essential when the user requires maximum quality for a fine print.
All professional photographers know that major edits to color and tone are best done in Adobe Camera Raw (ACR), as these changes are applied at the native bit depth of the sensor (usually 12 or 14 Bits/Channel). This ensures the histogram is kept in pristine condition and massively reduces the risks of tonal banding when the file is opened in the full edit space and then printed or saved for the web.
For most photographers, however, the full version of Photoshop is a simple case of overkill. Photoshop Elements can pretty do most things photographers want and need to do. Perhaps the most disappointing omissions in the budget version of Photoshop, however, are the lack of localized editing features in Adobe Camera Raw. This forces most Elements users to prematurely open the file in the main editing space of Elements to fine-tune some target colors, add a gradient or vignette and do simple spotting to remove the annoying dust bunnies.
This editing is usually performed at the lower 8 Bits/Channel as Photoshop Elements is not supposed to be able to support additional layers or adjustment layers and most editing tools do not function at all in the higher bit depth. Adobe has disabled these features but has mysteriously left enough of an odd assortment of tools and commands available (perhaps by accident) to make multi-layered editing at the higher bit depth possible if you know Mark Galers secret workarounds. Although the workflow outlined in this project will demonstrate how we can edit multi-layered files at 16 Bits/Channel we will have to flatten the file before saving as Photoshop Elements will not open multilayered files at the higher bit depth - the price to pay for increased tonal quality.
Read the full tutorial -- 16 Bits/Channel Editing in Photoshop Elements
Create A Tilt Shift Effect In Photoshop Elements 10 Our friend Mark Galer has written a tutorial that shows you how to create a tilt shift effect using Photoshop Elements 10. And remember, if you can do this in Elements, then you can surely do it in Photoshop.
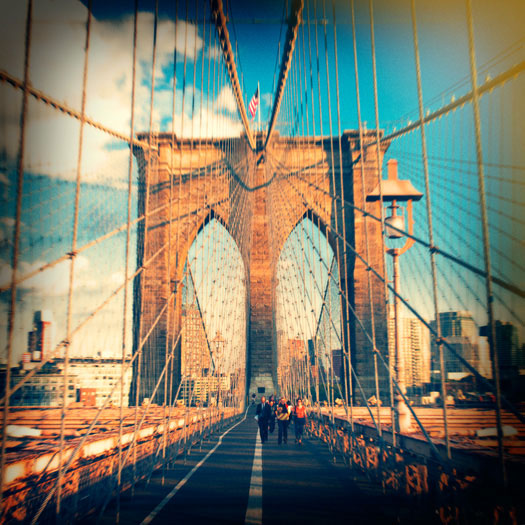
The Tilt Shift effect is a popular technique that originated from the use of 'Tilt Shift' lenses. Architectural photographers use these specialized lenses to correct the converging verticals of the buildings they are photographing, but they can also be used creatively to shift the plane of focus so that areas of the image are thrown dramatically out of focus.
One of the most popular effects is to create a 'toy town' look where figures and cars look more like they have been placed in a model village. This effect can be created easily in post-production and the advantage is the cost saving (tilt shift lenses are extraordinarily expensive) and the fact that the point of focus can be changed at any time when and if you change your mind.
Read the full tutorial, How To Create The Tilt Shift Effect Using Elements 10.
High Key Portrait - Mark Galer Photoshop Tutorial - High Key Effect
In this tutorial Mark Galer shows you how to create the classic High Key look, using a combination of simple lighting and some judicious Photoshop techniques.
High Key is one of the classic looks in photographic portraiture. The look is clean and light and the images have very few midtones or shadows. The darker tones that remain serve to shape the contours and define important details. If the treatment is clumsily done the image will just look like it has been badly overexposed. To avoid this disaster the final image must display bright highlights that are not clipped (overexposed) and the darker details must have depth and weight.

Before and After. Photography by Ed Purnomo
The camera technique is relatively simple just photograph your sitter using a large soft light or window light. Choose a light background and ask your sitter to wear light-coloured clothing. The rest of the treatment can be created in Photoshop. Unfortunately there is no single adjustment feature or filter that provides the High Key look. A sequence of adjustments and simple masking techniques can, however, deliver the goods every time. The resulting histogram will look like all the levels are making friends with the right-hand wall. Let the show begin.
Read the full tutorial Create A High Key Portrait Effect In Photoshop
Tonal Mapping And Faux HDR Effects In Photoshop Elements 9 - Tutorial
Adapted from "Adobe Photoshop Elements 9.0 Maximum Performance" by Mark Galer and Dr. Abhijit Chattaraj.
In this tutorial Mark Galer demonstrates how to give your photographs a tonal mapping or Faux HDR treatment to create a signature style. Mark Galer shows you how to boost detail by pushing some adjustments in Photoshop Elements 9 to the max.


The final effect is one where the image seems to be part photograph/part illustration. Read the full tutorial.
Create A Faux Holga Effect In Photoshop
Adapted from "Adobe Photoshop Elements 9.0 Maximum Performance" by Mark Galer and Dr. Abhijit Chattaraj.
The Holga is a cheap (US $30) plastic medium format film camera mass-produced in China. Originally manufactured in the early 80s for the home consumption, it has now gained cult status amongst bohemian western photographers who are drawn to the grunge art aesthetic. The camera represents the antithesis of everything that the modern digital camera manufacturers are striving to achieve. If you are looking for edge-to-edge sharpness and color-fidelity then give the Holga a very wide berth. If, however you are looking to create images that are full of character, but without the hassle of going back to film, then you may like to look into the wonderful, and weird, world of Holga-style imagery and give this Photoshop workflow a spin (no Holga required).

Getting tired of pin-sharp, noise-free, character-free images from your 24 Megapixel Pro DSLR? Then try this grunge effect to give your images the toy camera aesthetic - think WEIRD think GRUNGE, think ART! The treatment outlined in this tutorial is also available as an automated Photoshop action that can be downloaded from www.markgaler.com. Read the full How To Create A Holga Effect In Photoshop Tutorial.
Photoshop Elements 10 Upgrade Offer - Upgrade From Any Previous Version For $79.99
 Adobe Photoshop Elements 10 for Windows and Mac is available now at www.adobe.com. Photoshop Elements 10 Windows and Mac is available for a suggested retail price of US$99.99. New upgrade pricing allows past Photoshop Elements users of any version to purchase Photoshop Elements 10 for US$79.99.
Powered by the same engine as Adobe Photoshop, the industry standard for digital imaging, Photoshop Elements 10 utilizes intelligent technology that makes it easy to give everyday photos a boost. Photoshop technology is brought to life through easy to follow steps for achieving stunning photo effects in an approachable way with new Guided Edits, which are very popular and successful.
These include innovations such as creating a shallow depth of field or designing a fun layout of snapshots with Picture Stack, or even adding a dream-like diffused glow with the Orton effect.
New text functionality, which scrapbookers will especially love, allows users to add curving, flowing text to a photo that automatically follows the outline of a subject, custom path or shape. In addition, special crop guides now help users at any level easily achieve interesting, visually appealing compositions. Also, the Smart Brush lets users paint unique effects onto specific areas of photos and now features 30 new effects like Pencil Sketch and Oil Pastel.
With Photoshop Elements 10, users not only have access to fun editing and creation features, but also the ability to organize photos. Object Search automatically finds objects within photos, such as a landmark, flower or pet. The Elements Organizer can even automatically detect duplicate or near-duplicate photos so users can clean up and delete the photos they dont need and quickly group similar collections of photos. Also, photo enthusiasts who shoot video can now upload their clips directly to Facebook or YouTube®.
Photoshop Elements 10 users can purchase Adobes integrated online service, Photoshop Elements Plus, which includes 20GB of storage for automatic online backup and sharing (up to 15,000 photos or four hours of DVD-quality video), as well as access to an extensive library of how-to's, artwork and Online Album templates for sharing online.
Whether users are social networking or using sharing sites like Facebook, Flickr®, YouTube or Photoshop.com, Photoshop Elements 10 lets customers share their photos directly from within the Elements Organizer and view them from virtually anywhere on the go, offering a comprehensive set of sharing capabilities for todays increasingly social and mobile worlds. For Facebook lovers, Photoshop Elements integrates users Facebook Friend Lists for easily tagging photos that can then be shared directly to Facebook.
On top of all these new features and capabilities, Photoshop Elements 10 enables developers to create tablet and mobile applications that interact with the software via the included API. This opens Photoshop Elements 10 to a new world where the fun and interactivity of touch devices and Photoshop Elements intersect.
Visit our Photoshop Elements 10 Resource Center. You can also signup to download a free 30-day trial of Elements 10. Also see our Photoshop Elements 10 Tutorials page, featuring a special Tilt Shift Tutorial from Photoshop expert Mark Galer.
Adobe Photoshop Elements 9.0 Maximum Performance - Photoshop Elements 9 Book Let Mark Galer and Abhijit Chattaraj guide you through the most powerful photo editing tools and techniques that Elements has to offer. Adobe Photoshop Elements 9.0 Maximum Performance is a unique cominbtion of step-by-step projects, movie tutorials and sample images that will have you creating stunning images in no time at all. Whether you want to enhance your images for maximum impact, optimize your photos for perfect print quality, or create amazing, seamless montages, Adobe Photoshop Elements 9.0 Maximum Performance will give you the skills and know-how to create professional quality results, enabling you get maximum performance from this credit crunch approved software.
Full of far more content than any other Elements title hours of tutorials, hundreds of images, and automated actions are just the start Adobe Photoshop Elements 9.0 Maximum Performance will let you get Photoshop-quality results with Elements-priced software. Create stunning images using powerful, little-known techniques.
The package is completed with an astonishingly supportive website packed with over 8 hours of movie tutorials, high resolution tutorial images, multimedia content and stock photography as well as automated actions to get even more out of the software.
High Dynamic Range - HDR - In Photoshop Elements 8 Tutorial
Adapted from "Adobe Photoshop Elements 8.0 Maximum Performance" by Mark Galer
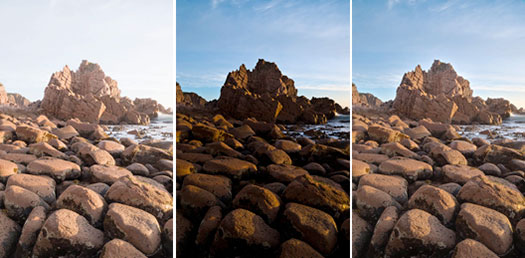
 Contrary to popular opinion, what you see is not always what you get. You may be able to see the detail in those dark shadows and bright highlights when the sun is shining but can your image sensor? Contrast in a scene is often a photographers worst enemy.
Contrast is a sneak thief that steals away the detail in the highlights or shadows (sometimes both). Wedding photographers will deal with the problem of contrast by using fill flash to lower the subject contrast; commercial photographers diffuse their own light source or use additional fill lighting and check for missing detail using the Histogram.
Landscape photographers, however, have drawn the short straw when it comes to solving the contrast problem. For the landscape photographer there is no quick fix. A reflector that can fill the shadows of the Grand Canyon has yet to be made and diffusing the suns light is only going to happen if the clouds are prepared to play ball.
Read the complete tutorial.
Photoshop Elements 7 Tutorial - Smart Brushes And The Action Player
Here is a sample tutorial from the new book from Mark Galer, Adobe Photoshop Elements 7
Maximum Performance. In this tutorial you will see how to use the new Smart Brushes and the Action Player in Photoshop Elements 7. (Download the tutorial - PDF - 1.8MB) From the intro:

OK, here is a few interesting questions, what does acronym HSL stand for in Adobe image editing software? Would that be Lightness or Luminance? And why do we have an L anyway when Photoshop Elements uses HSB (Hue, Saturation and Brightness) in the Color Picker as its standard RGB color model? Is the L having an identity crisis and do Luminance, Lightness and Brightness sliders all do the same thing? In order to take control over our colors and tones when image editing we have to understand one of the most basic image adjustment features inside of Photoshop Elements - Hue/Saturation. The third slider in the Hue/Saturation dialog is the Lightness slider and this is so useful that even Adobe decided to leave its name off the adjustment feature!
If you try to make a target color lighter or darker using the Lightness slider in the Hue/ Saturation adjustment dialog it is always desaturated the color in the process. In this project we will explore how to adjust the brightness of a color without desaturating it. Adjusting how bright a colors appears without shifting its Hue or Saturation is what Adobe now calls a Luminance adjustment.
This, however, can only be made possible in Photoshop Elements 7 with the new Smart Brushes that come shipped with the Maximum Performance DVD and some very clever Maximum Performance know-how. This project concludes with a few automated actions courtesy of the new Action Player in Photoshop Elements 7 and some action presets from the Maximum Performance DVD.
Download the tutorial - PDF - 1.8MB.![]()
Sample Chapter - Working With Photomerge In Photoshop Elements 6
They say that sequels are never as good as the original - try telling that to Adobe. There fully revamped Photomerge now comes in three flavors and is fully fantastic. You get to explore the greatly improved Photomerge features only in Elements 6 and Photoshop CS3. Photomerge is now capable of aligning and blending images without any signs of struggle - banding in smooth areas of tone. The fully revised Photomerge feature first made its appearance with CS3 but the maths seems to have got even better with the release of
Elements 6 and the stitching is so clever it will really have you amazed at the quality that can be achieved inside this budget program.
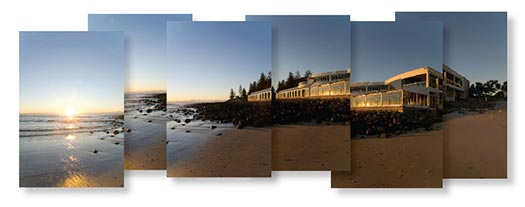

The quality will be even better if you capture the component images of your panorama in vertical format (to reduce the effects of converging verticals) with a 50% overlap and you also use a manual exposure, focus and white balance setting on your camera (or process the images identically in camera Raw). The results will now truly be seamless - an excellent way of widening your horizons or turning your humble compact into a 30-megapixel blockbuster.
The Photomerge feature in previous versions of Photoshop Elements (and the full version for that matter) left a lot to be desired. All of the flaws and weaknesses of the original feature are now gone with the release of Elements 6.0.
Read the full sample chapter, Working With Photomerge In Elements 6.![]()
Contrast Tutorial - Working With Adjustment Layers In Elements 6
We've got a new Elements 6 tutorial, Contrast Tutorial - Working With Adjustment Layers In Elements 6. This tutorial is an extract from Adobe Photoshop Elements 6.0 Maximum Performance by Mark Galer. Here's the intro...
Working With Adjustment Layers
One of the most important image adjustment features in a professional photographers workflow is Curves (a sort of Levels command on steroids). Color Curves has now made a welcome appearance in the Enhance menu in Photoshop Elements but it is still not available as an adjustment layer. This project shows you several ways to control contrast using adjustment layers to increase your post-production editing power to maximum performance.


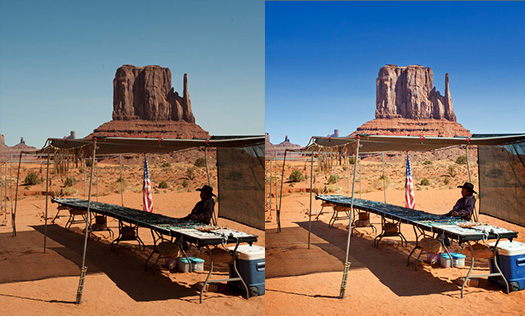
Fig 01 Before and after
Read Contrast Tutorial - Working With Adjustment Layers In Elements 6 by Mark Galer.![]()
Exclusive 15% Discount On All Topaz Plugins - Use Coupon Code PHOTOSHOPSUPPORT - Includes Bundles And Upgrades Enter our exclusive discount coupon code PHOTOSHOPSUPPORT during the checkout process at Topaz Labs for an instant 15% discount on any Topaz product, including bundles and upgrades.
Topaz Labs Photoshop plug-ins are specifically designed to expand a photographer's creative toolbox by harnessing powerful image technology developments. Photographers everywhere are now taking advantage of the creative exposure effects, artistic simplification, unique edge manipulation, and top-of-the-line noise reduction offered in Topaz products. The Topaz Photoshop Plugins Bundle is a super powerful Photoshop plugins package that includes the following Topaz products:
Topaz Adjust
Deliver stunning and dynamic images with this uniquely powerful plug-in that features HDR-like abilities and enhances exposure, color and detail. Topaz Detail
A three-level detail adjustment plug-in that specializes in micro-contrast enhancements and sharpening with no artifacts.
Topaz ReMask
The fastest and most effective masking and extraction program with one-click mask refining.
Topaz DeNoise
Highest-quality noise reduction plug-in that removes the most noise and color noise while preserving the most image detail.
Topaz Simplify
Provides creative simplification, art effects, and line accentuation for easy one-of-a-kind art.
Topaz Clean
Take control of the detail depth of your images with extensive smoothing, texture control and edge enhancement tools.
Topaz DeJPEG
Drastically improves the quality of web images and other compressed photos.
Learn more about the Topaz Photoshop Plugins Bundle. Download a free trial version.
Adobe Photoshop Elements 9 Top Reasons To Buy - Top New Features
Here are the top reasons customers purchase Adobe Photoshop Elements 9.
 Do it all with one powerful yet easy-to-use product
Use Adobe Photoshop Elements 9 for all your photo needs. Manage, edit, and enhance photos; make photo creations that look just the way you want; and share in print, on the web, and on popular devices.
Experience the ultimate media-management hub
Quickly organize all your media in one convenient place. Find your best photos and clipsor photos that feature specific peoplefast, thanks to automated options. Then dive into a full range of creative activities and start enjoying your memories.
Go from flawed to phenomenal in seconds
Get just the photo fixes youre looking for with one-step shortcuts that whiten teeth and make skies a vibrant blue. When you perform one-step photo adjustmentsincluding color, contrast, and lightingyou can quickly choose the best result from a group of adjustment previews. And instantly unclutter a photo and beautifully blend in the background.
Count on step-by-step assistance
Want to easily fix a scratch, create a reflection effect, or design a scrapbook page? Get help with key steps to get the results you want fast.
Easily create the perfect photo
Take advantage of amazing Photomerge technology to easily match the style of one photo to another; create fuller panoramas, perfectly lit shots, and great group shots; and combine elements of different faces for entertaining results.
Show off your creativity with flexible layouts
Make amazing printed photo creations like scrapbook pages, photo books, calendars, and cards. Choose your level of control: Create in minutes using professionally designed templates, or let your creativity run wild and access every photo-editing option from directly within your layout. Get fun, fresh looks with new artwork and templates.
Share experiences in fresh, exciting ways on the web
Show off your photos in one-of-a-kind Online Albums with your choice of animated templates, including all-new options for sharing photos and videos together, with music. Adobe Flash® technology lets viewers interact with your photos for an entertaining experience.
Top new benefits of Adobe Photoshop Elements 9
Instantly unclutter or repair photos
Is your photo cluttered with telephone wires, tourists, or passing cars? Make unwanted elements vanish with one stroke of the enhanced Spot Healing Brush, which beautifully blends even the most complex background. Also instantly fix old or torn photos so you can make new prints.
Easily match a favorite photo style
Want to imitate a favorite photography style, like a dramatic high contrast or a beautiful color tone? Photomerge Style Match analyzes the stylistic qualities of any photo you choose and then automatically applies those qualities to another photo.
Create fuller panoramas
Easily create your best-looking panoramas yet. With its enhanced blending capabilities, Photomerge Panorama fills in jagged edges as it automatically stitches together multiple horizontal or vertical photos.
Create stunning photo effects
Easily create stunning effects that enhance your photos with professional style. New Guided Edits help you create pop art masterpieces, reflection effects, perfect portraits, and more.
 Create richly layered photos
Bring new sophistication to your photos. Reveal one portion of a photo through another photo by using layer masks to control the transparency of specific areas.
Quickly share photos and videos on Facebook
Conveniently share photos and videos on Facebook* directly from the Organizer, which automatically optimizes your media so it looks its best.
Get a complete photo solution for Macs
Use a Mac for your photos? You can now experience the ultimate media-management hub for organizing your photos, and you can quickly find your best photos and video clipsor photos that feature specific peoplethanks to automated options.
Free Photoshop Elements 8 Video Training Tutorials From Adobe TV
There's a hefty batch of good Photoshop Elements 8 free training videos for Windows on the Adobe TV site. Below is a list of the free videos and links to each one. Enjoy!
 GETTING STARTED 01: WHAT IS PHOTOSHOP ELEMENTS?
Get an overview of what you can do in Photoshop Elements 7. Tour the Organizer and Editor workspaces and check out some of the tools. Use with either Photoshop Elements version 7 or 8.
GETTING STARTED 02: GET PHOTOS FROM FILES AND FOLDERS
Learn how to get photos from a hard disk into an indexed catalog. You'll also learn how to navigate the Folder Location view. Use with either Photoshop Elements version 7 or 8.
GETTING STARTED 03: GET PHOTOS FROM A DIGITAL CAMERA
Get photos from a camera or card reader into your computer and indexed in Elements. See why it's best to import from a USB card reader. Use with either Photoshop Elements version 7 or 8.
GETTING STARTED 04: TOUR THE ORGANIZER INTERFACE
This video gives you a review of the Organizer workspace. See how to access the Organizer and check out its different views. Use with either Photoshop Elements version 7 or 8.
GETTING STARTED 05: VIEWING PHOTOS
Check out the features in the Photoshop Elements Organizer designed to make viewing your photos easy. Use with either Photoshop Elements version 7 or 8.
GETTING STARTED 06: SELECTING PHOTOS
Discover a couple of tricks for selecting photos in the Organizer. Learn how to select multiple photos at once or select noncontiguous photos. Use with either Photoshop Elements version 7 or 8.
GETTING STARTED 07: ROTATING PHOTOS
Learn how to use the Rotate feature, which makes it easy to change the orientation of your photos. Find out what happens when you rotate JPEG images. Use with either Photoshop Elements version 7 or 8.
GETTING STARTED 08: HIDING AND DELETING PHOTOS
Don't be hasty in deleting unwanted photos. Instead, use the Hide Photos feature to hide photos from view. You can unhide photos at any time. Use with either Photoshop Elements version 7 or 8.
GETTING STARTED 09: MOVING FILES
See why it's best to use the Organizer when moving files from one location to another. Learn how to reconnect files you've moved outside of Elements. Use with either Photoshop Elements version 7 or 8
GETTING STARTED 10: GUIDED EDIT MODE
Learn how to use the Guided Edit mode. Guided Edit walks you through some basic editing tasks as well as some of the neat features in Elements. Use with either Photoshop Elements version 7 or 8.
GETTING STARTED 11: TOUR THE FULL EDIT INTERFACE
Take a tour of the Full Edit interface in Photoshop Elements. This workspace gives you full control over editing and manipulating your photos. Use with either Photoshop Elements version 7 or 8.
GETTING STARTED 12: USING TOOLS
Learn how to use Elements tools. Jan Kabili shares productivity-enhancing tips for some of the tools in the Elements toolbox, such as shortcuts and tool tips. Use with either Photoshop Elements version 7 or 8.
GETTING STARTED 13: SAVING FILES
Learn why it's important to save early and save often. In this video, photographer Jan Kabili shows you how to save your files in Photoshop Elements. Use with either Photoshop Elements version 7 or 8.
GETTING STARTED 14: MANUAL SELECTION TOOLS
Learn how to use the manual selection tools. Check out the Elliptical Marquee, Rectangular Marquee, Lasso, and Quick Selection tools. Use with either Photoshop Elements version 7 or 8.
GETTING STARTED 15: AUTOMATIC SELECTION TOOLS
Learn about the automatic selection tools in Photoshop Elements, which select areas of an image based on color and tone. Use with either Photoshop Elements version 7 or 8.
GETTING STARTED 16: USING THE NEW SMART BRUSH TOOL
Discover the brand new Smart Brush tool. This tool makes it easier than ever to apply an adjustment to an area in an image in just one step. Use with either Photoshop Elements version 7 or 8.
GETTING STARTED 17: CONVERTING COLOR TO BLACK AND WHITE
Convert an image to black-and-white. Use presets to adjust the style of the image. Then, use sliders to adjust the light and contrast. Use with either Photoshop Elements version 7 or 8.
GETTING STARTED 18: CREATING TEXT
Add editable text to any image. Then, format the text by changing the font, color, point size, style, and more. After formatting the text, move or rotate it. Use with either Photoshop Elements version 7 or 8.
GETTING STARTED 19: EDITING TEXT
Edit text by changing its font, color, size or content. Learn how to select a text layer for editing and use the type tools to make your changes. Use with either Photoshop Elements version 7 or 8.
GETTING STARTED 20: MAKING A PHOTO BOOK
Discover an elegant way to share your photos with family and friends. Create a photo book that you can print yourself or have professionally printed. Use with either Photoshop Elements version 7 or 8.
GETTING STARTED 21: MAKING A PHOTO COLLAGE
Create a photo collage using a variety of customizable themes, backgrounds, frames, graphics, and text effects included with Elements. Use with either Photoshop Elements version 7 or 8.
GETTING STARTED 22: CREATING A SLIDE SHOW
Show off your photos in a custom-built slide show complete with music, text, graphics, and narration. Share you slide show with family and friends. Use with either Photoshop Elements version 7 or 8.
GETTING STARTED 23: MAKING A PANORAMA
Combine a sequence of photos into a seamless panorama. Photographer Jan Kabili shares secrets for taking photos for a panoramic image. Use with either Photoshop Elements version 7 or 8.
GETTING STARTED 24: USING E-MAIL AND PHOTO MAIL
Learn how to prepare photos for sharing by e-mail. Use the E-mail Attachments and Photo Mail features to compact an image for delivery via e-mail.
GETTING STARTED 25: PRINTING YOUR PHOTOS
Print individual images, contact sheets, or picture packages using the Print command. Choose preset picture package layouts and add optional frames.
GETTING STARTED 26: SIGNING UP FOR PHOTOSHOP.COM
Check out Photoshop.com. This free services allows you to post your albums online and share your albums with whomever you choose. Use with either Photoshop Elements version 7 or 8.
GETTING STARTED 27: VIEWING AND SHARING PHOTOS ONLINE
Upload your albums to a personal website on Photoshop.com. Then, share them with the general public or with a restricted group of viewers. Use with either Photoshop Elements version 7 or 8.
GETTING STARTED 28: BACKING UP AND SYNCHRONZING ALBUMS ONLINE
Safeguard your photos by backing them up to the free Photoshop.com online service. Set up automatic backups and synchronization. Use with either Photoshop Elements version 7 or 8.
GETTING STARTED 29: FINDING ONGOING INSPIRATION ON ADOBE.COM
Find inspiration, tips, tricks, and tutorials on Photoshop.com. Find artwork for embellishing your photos and photo projects. Use with either Photoshop Elements version 7 or 8.
NEW FEATURES: RECOMPOSE TOOL
Discover the powerful new Recompose tool, which allows you to rearrange parts of an image without affecting the important subjects in the image.
NEW FEATURES: SHARING
Learn about the new sharing features in Photoshop Elements 8. See how you can view and sort your images in the Organizer according to your personal preferences.
NEW FEATURES: BACKUP AND SYCHRONIZATION
Learn how to safely and securely store your images on the Photoshop.com online service. See how you can also use Photoshop.com to synchronize images between multiple computers.
NEW FEATURES: PHOTOMERGE FAMILY OF FEATURES
Learn about the new Photomerge Exposure feature in Photoshop Elements 8, which allows you to create properly exposed images that you can't capture in one shot. Discover the other Photomerge features, such as Photomerge Panorama, and Photomerge Faces.
USE THE RECOMPOSE TOOL TO REFRAME A PHOTO
Learn how to use the new Recompose tool in Photoshop Elements 8 to scale an image without distorting the important elements in the image. See how you can also use the Recompose tool to remove unwanted content from an image.
USE PHOTOMERGE EXPOSURE IN MANUAL MODE
Learn how to use the new Photomerge Exposure feature in Photoshop Elements 8 to combine images with different exposures into one perfect image. See why Manual mode is best when combining images that were taken with and without flash.
USE PHOTOMERGE EXPOSURE IN AUTOMATIC MODE
Learn how to use the new Photomerge Exposure feature in Photoshop Elements 8 to automatically combine images with different exposures into one perfect image.
SHARE ALBUMS ONLINE
Learn how to use a wizard-guided workflow and templates to create a personalized album. Then, learn how to share your album online at Photoshop.com.
SET UP AN ADOBE ID
Learn how to set up an Adobe ID so you can link your work in Photoshop Elements to Photoshop.com. Get an overview of the features of Photoshop.com.
PHOTOSHOP.COM MEMBERSHIP BENEFITS
Discover the benefits of using the Photoshop Elements Organizer with Photoshop.com. Learn how to use Photoshop.com to share your images and videos or store them securely online.
CURVING PHOTOS FOR A PRINT LOOK
This very easy-to-follow tutorial walks you through adding a thin white border and a paper-like curve and drop shadow to your digital photo for a very realistic effect.
TIPS EVERY NEWBIE SHOULD KNOW
Learn quick keyboard shortcuts for actions youll use all the time, including zooming and moving around an image, moving an outline, and duplicating and moving objects.
![]()
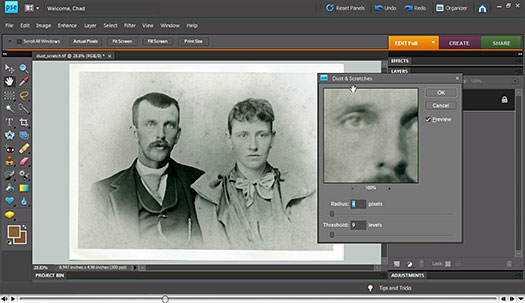
Retouching Your Photos Using Photoshop Elements - Free Video Tutorials - Working With The Healing Brush Tools, The Clone Stamp Tool, And Removing Dust And Scratches
Total Training has given us an entire free sample chapter from their Photoshop Elements 8 Training Videos. You can learn about using the healing brush tool, using the clone stamp tool, and removing dust and scratches from your images using Photoshop Elements 8.
View the video tutorial Using the Healing Brush Tools. View the video tutorial Using the Clone Stamp Tool. View the video tutorial Removing Dust and Scratches, or click on the screenshot below.
Total Training for Adobe Photoshop Elements 8 introduces you to the new features of Photoshop Elements 8, including the new Photomerge Exposure command and the Tag Cloud, plus it shares best practices for Elements fundamentals, including making coloring adjustments and sharing photos with family and friends.
Save 20% On Any Total Training DVD
Use our exclusive discount coupon code save20photosupport and save 20% off any Total Training DVD. Visit our Photoshop Support page at the Total Training site for more details.![]()
Photoshop Elements 7 Tips, Tricks And Tutorials
Here are some tips and tricks and tutorials to help you work more efficiently in Photoshop Elements 7, all from Peachpit Press.
Why Wont Photoshop Elements Do What I Tell It To Do?
Here's a list of explanations and solutions for common issues that might be blocking your progress in Adobe Photoshop Elements 7.
A Quick Tour of Photoshop Elements
If you're new to Photoshop Elements, this lesson will familiarize you with the Adobe Photoshop Elements 7 workspace and provide you with an overview of the tools and procedures youll use to capture and edit your digital images.
Getting Professional Results with Photoshop Elements and Your Inkjet Printer: Toning
Before digital photography, only black and white images could be chemically toned, but today toning can be applied to color images too. Tim Daly shows you how.
Sharing photos in e-mail
If you're new to Photoshop Elements, this lesson will familiarize you with the Adobe Photoshop Elements 7 workspace and provide you with an overview of the tools and procedures youll use to capture and edit your digital images.
 Automatic Photo Backups
So what are you going to do with 20 GB (or more) of online storage at Photoshop.com? Photoshop Elements 7 introduces an extremely welcome new feature: Automatic online backups of your images.
Importing media
Bringing your digital files into Photoshop Elements is easy.
Photomerge Scene Cleaner
Youve probably seen the photo on the Internet or forwarded via email from a friend: a couple in full wedding attire are exchanging vows on the beach, the ocean meeting the sky in the background, and...whats that? Yes, a topless sunbather is walking into the frame, ruining an otherwise romantic wedding photo. In Elements 7, however, that photo would be easily salvageable.
Smart Brush
You could accomplish the same results as the Photomerge Scene Cleaner by hand-editing areas between images, but it would take up more time. In the same spirit, the new Smart Brush tool offers a collection of common editing tasks that can be applied simply by painting areas of your photos.![]()
Photoshop Elements Tutorials From Lesa Snider King
 Lesa Snider King is the founder of the creative tutorial site The Graphic Reporter, and author of "Graphic Secrets for Business Professionals" (Lynda.com Online Training Library). She writes regularly for NAPP, Macworld, and Layers magazines, plus teaches yearly at Photoshop World and Macworld Expo. Lesa co-hosts the YourMacLifeShow.com Internet radio show and hosts her own podcast, "Graphic Secrets."
![]() Vector Shape Your Way To A Picture In A Picture
Vector Shape Your Way To A Picture In A Picture
"Wow!" your friends will say. "How'd you do that?" will soon follow. These are the exclamations you'll hear while showing off your new Elements chops with this slightly magical and creative photo effect.
We'll take an ordinary photo and place a Polaroid-ish color picture box on top of a grayscale version of the same image. It's a really neat way to draw the viewer's eye and accentuate the subject matter or focal point of a photo. The magical part is that the color picture box will be movable! By using two different kinds of adjustment layers to create the effect, you'll be able to move the color picture box anywhere you want, leaving the grayscale version of the photo in its wake. Sound intriguing? Read on!
![]() Top 17 Keyboard Shortcuts For Photoshop and Elements
Top 17 Keyboard Shortcuts For Photoshop and Elements
Thanks to Your Mac Life listener, Marc Rizzolo, for asking about keyboard shortcuts, and thus giving me the idea to post a few of my favorites from Photoshop and Elements. The terrific thing is that most of these apply to all Adobe apps. Gotta love that! And if these shortcuts don't light your fire, I'm going to show you how to make Photoshop build you a web page of *all* of them... all by itself.
![]() Removing Objects With The Spot Healing Brush
Removing Objects With The Spot Healing Brush
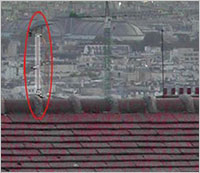
Has that ever happened to you? You snap the perfect photo only to find it riddled with antennas or power lines? I'll go all in and bet the answer is yes. Luckily, there's a tool in both Photoshop and Elements that's surprisingly adept at eliminating unwanted bits against the sky, though it may never occur to you to actually use it.
I'm going to show you how to use the Spot Healing Brush to repair the sky and while we're at it, we'll zap some power lines from beneath some unsuspecting birds. It's much easier than you thought, though it does take some time and patience.
![]() How To Create A Photo In Text Effect In Photoshop Elements
How To Create A Photo In Text Effect In Photoshop Elements
I'm going to show you how to place text inside a photo. It's easy enough to do in Elements, though the secret lies in how you stack up the layers. Let's get started!![]()
Digital Basics 101 The Seven Steps Tips For Working In Photoshop Here are some Frequently Asked Questions from photographers who are new toPhotoshop. In response, Mark Galer offers professional tips and advice for Photoshop beginners.
The answers have been arranged in order to follow the typical editing workflow in Photoshop.
Working With Photoshop Preferences
OK, Mark, I figured out how to get the CD into my computer and load the program. But what about the preferences? Yikes, Im already lost!
The great thing about Photoshop is that it comes ready to use. Dont get hung up on trying to make decisions about all of those settings until you have been using the software for a couple of months. Nothing is going to get screwed up in the first instance just because you forgot to check the beep when done preference.
Working With Photoshop Color Spaces
My friends keep talking about the color space they are using. I just nod my head and pretend I know what they are talking about. What is it and what do you recommend?
Space is about size. Think of color space as a box of colored pencils. sRGB is the small box of colored pencils and Adobe RGB is the medium sized box of colored pencils (not many people have need for the supersize-me box of colored pencils called ProPhoto). Small may not sound so great but the computer monitor you are now looking at probably cant display the extra colors that can be found in the larger box (Adobe RGB). These colors come in to play if you use an inkjet printer or a better quality photographic lab (print service provider).
Photo Optimization Tips
How do I quickly fix an image to look better?
Some people have turned editing images into a science and an art form all rolled into one, but it is possible to get some good results by just hitting a few buttons that have the word Auto written on them. Most digital images will benefit from a couple of simple quick fixes to optimise the color and contrast. The camera may have done a reasonable job but the chances are that Photoshop will be able to further improve the image (well thats why you purchased the software right). If you are new to digital image-editing then Photoshop will complete these steps automatically with just a click of the mouse and do a pretty good job pretty much most of the time. Just duplicate the original image first (just in case you make a pigs ear out of things and want to start again).
How To Crop An Image In Photoshop
How do I crop an image?
Before I tell you how, I should really answer why. With most photographers capturing images in excess of 8-Megapixels you have way more pixels than you need for most normal everyday uses. Uploading an 8-megapixel image to an online gallery or eBay is overkill (there are only 2-megapixels on a full HD widescreen TV!). The second reason you should crop an image is ensure that it is the correct shape (there is no use giving somebody an oblong image if their one and only photo frame is square). The third reason you should crop is to improve the composition (which is another way of saying that it is a good idea to get rid of all of the uninteresting or distracting parts of the image that you dont want people to see). You can enhance or improve the image by just cutting, or cropping, the unwanted parts of the image off. This will make people think you are a much better photographer than you really are!
Image Resolution Tips
What is resolution and which one is right?
The issue of resolution can sometimes get confusing because the same word is often applied to different aspects of photography. Imagine, for a moment, that the word Device was the name for a camera, a computer screen and a printer. If you were having a conversation with a friend and were discussing a photographic workflow from capture to print, imagine the confusion that could occur (which device called device are you now referring to?). This is what currently happens when some people talk about resolution but dont have a good understanding of when and how to use the word appropriately or clarify what they are referring to. When you talk about resolution you have to add a second word before or after the word resolution, e.g. optical resolution (of your lens), image resolution (the file), monitor resolution, printer resolution etc.
Tips For Saving Images In Photoshop
Now that I have edited my image I want to save it but there are so many options which do you recommend?
If you open your original file, change something and then hit the Save command in the File menu you run the risk of writing over your original file which is not a good idea. In a years time you could be editing like a professional and regret the work you carried out on the image you are working on now. Its always good to know that the original can be edited again at some point in the future.
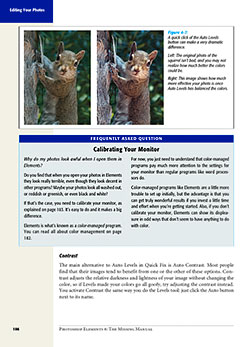
All About Monitor Calibration And Printing
My prints look different to the images on my screen why?
Your monitor is only accurate if you have calibrated it using a monitor calibrator. These are relatively inexpensive devices now and are easy to use. Companies such as Gretag-Macbeth and datacolor make inexpensive units that will enable you to make sure that the colors captured by your camera are displayed accurately on your screen. When you adjust the image colors on a calibrated screen you will be confident that it actually needs adjusting. A good print service provider should now be able to provide you with prints that are very similar to the images that appear on your screen.![]()
![]()
View some free clips from the training:
Photoshop Elements 5 Video Tutorial — Quick Fix Mode
In this video clip tutorial you will learn the following:![]() How to start working in the Quick Fix Mode.
How to start working in the Quick Fix Mode.![]() How to use Auto Levels to get pure whites in your images.
How to use Auto Levels to get pure whites in your images.
Photoshop Elements 5 Video Tutorial - Create A DVD Cover
In this video clip tutorial you will learn the following:![]() How to make a dvd cover using a template.
How to make a dvd cover using a template.![]() How to select a theme and add a photo.
How to select a theme and add a photo.
Photoshop Elements 5 Video Tutorial - Create Warped Text
In this video clip tutorial you will learn the following:![]() How to create warped text.
How to create warped text.![]() How to change styles and how to accept the text style changes.
How to change styles and how to accept the text style changes.![]()
![]()
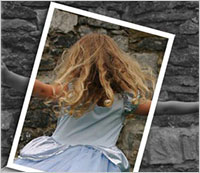
Photoshop Elements 5 - Free Tutorial - Selecting Hair![]() Selecting & Extracting Hair - Masking Tutorial - Extraction Tips
Selecting & Extracting Hair - Masking Tutorial - Extraction Tips One of the most challenging montage or masking jobs in the profession of post-production editing is the hair lift. Get it wrong and, just like a bad wig, it shows. The first secret step must be completed before you even press the shutter on the camera. Your number one essential step for success is to first shoot your model against a white backdrop, sufficiently illuminated so that it is captured as white rather than gray.
The post-production is the easy bit - simply apply the correct sequence of editing steps and the magic is all yours. This is not brain surgery — but follow these simple steps and you will join the elite ranks of Photoshop gurus around the world. Celebrity status is just a few clicks away.
Photoshop Elements 5 - Free Tutorial - Displacement Map![]() Use The Displace Filter & Displacement Maps To Make A Realistic Flag
Use The Displace Filter & Displacement Maps To Make A Realistic Flag The layer blend modes are an effective way of merging or blending a pattern or graphic with a three-dimensional form. By using the blend modes the flag in this project can be modified to respect the color and tonality of the undulating silk beneath it.
The highlights and shadows that give the silk its shape can however be further utilized to wrap or bend the flag so that it obeys the materials shape and sense of volume. This can be achieved by using the Displace filter in conjunction with a displacement map. The map defines the contours to which the flag must conform. The final effect can be likened to shrink-wrapping the flag to the 3-D form of the undulating silk.![]()
Photoshop Elements 6: The Missing Manual - Free Sample Chapter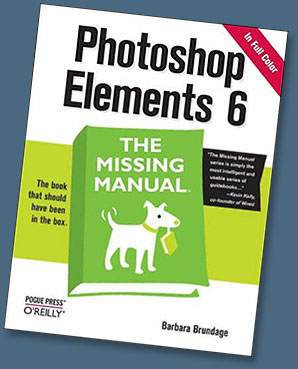 Bestselling author Barbara Brundage — whose day job is playing the harp — didn't plan on becoming an authority on Photoshop Elements, one the world's most popular photo-editing programs. Yet her newest publication — Photoshop Elements 6: The Missing Manual (O'Reilly, $26.39 at Amazon.com) — clearly secures Barbara's position as the premier Elements' expert.
"I'm a lowly musician, but if I can learn Elements anyone can," insists Barbara, the author of three previous books about Elements 3, 4, and 5. A few years back in 2001, Barbara chose Elements to create graphics for her new website and promo materials. She soon discovered the nifty software program also made arranging and publishing her harp music a whole lot easier. Then she got hooked on digital photography and relied on Elements to improve and organize her images.
"Fortunately, the folks at Missing Manuals know that sometimes it's easier for someone who isn't from a technical background to explain things to people who don't have a lot of technical knowledge," says Barbara about her road to authorship.
Indeed Barbara's technical knowledge combined with her appealing, down-to-earth writing style made her a perfect addition to the Missing Manual roster of authors. Founded by New York Times technology columnist David Pogue, O'Reilly's Missing Manual series specializes in producing beautifully written manuals for popular consumer software and hardware products — the book that should have been in the box.
Photoshop Elements 6: The Missing Manual provides the best possible guidance to scrapbookers, photographers at every level, budding graphic artists — anyone who wants to get the most out of the latest Elements upgrade. She clearly explains Photoshop Elements 6's exciting array of new features, including the new Quick Edit function, Windows Vista compatibility, improved RAW conversion, a handy Quick Selection Tool, and more. Under Barbara's intelligent tutelage, readers learn how to:
- Import, organize, and fix photos quickly and easily.
- Repair and restore old and damaged photos, and retouch any image.
- Jazz up their pictures with dozens of filters, frames, and special effects.
- Learn which tools the pros use — and finally understand how layers work!
- Create collages and photo layout pages for greeting cards and other projects.
- Get downloadable practice images and try new tricks right away.
Photoshop Elements 6: The Missing Manual progresses from simple to complex features. Those ready for the more sophisticated tools can easily jump around to learn specific techniques. As always, Barbara lets you know which Elements features work well, which don't, and why — all with a bit of wit and good humor. Adds Barbara: "Elements is wonderful software, but there's a lot going on there. I wanted to help people find their way around and to understand some of the great things they can do with the program."
Free Sample Chapter — Chapter 4: The Quick Fix
At the O'Reilly site you can find a great free sample chapter from the book — Chapter 4: The Quick Fix (PDF Format - 26 MB). From the intro:
 With Elements Quick Fix tools, you can dramatically improve the appearance of a photo with just a click or two. The Quick Fix window gathers easy-to-use tools that help adjust the brightness and color of your photos and make them look sharper. You dont even need to understand much about what youre doing. You just need to click a button or slide a pointer, and then decide whether you like how it looks.
If, on the other hand, you do know what youre doing, you may still find yourself using the Quick Fix window for things like shadows and highlights because the Quick Fix gives you a before-and-after view as you work. Also, the Temperature and Tint sliders can come in very handy for advanced color tweaking, like finessing the overall color of your otherwise finished photo. You even get two tools—the Selection brush and the Magic Selection brush—to help make changes to only a certain area of your photo.
In this chapter, youll learn how to use all of the Quick Fix tools. Youll also learn about what order to apply the fixes so you get the most out of these tools. If you have a newish digital camera, you may find that Quick Fix gives you all the tools you need to take your photos from pretty darn good (the way they came out of the camera) to dazzling.
Buy Photoshop Elements 6: The Missing Manual at Amazon.com and save 34% off the cover price.![]()
Total Training For Photoshop Elements 4![]() Styles And Effects
Styles And Effects![]() How to call up all kinds of special effects from the Styles and Effects palette.
How to call up all kinds of special effects from the Styles and Effects palette.![]() How to use the different Frames and Image effects.
How to use the different Frames and Image effects.![]() Spot Healing Brush Tool
Spot Healing Brush Tool![]() What the Camera Raw format is.
What the Camera Raw format is.![]() How to use the Camera Raw Dialog Box to your advantage.
How to use the Camera Raw Dialog Box to your advantage.![]()
![]() Adjust Hue/Saturation
Adjust Hue/Saturation![]() How to unleash the full potential of the Hue/Saturation Dialog Box.
How to unleash the full potential of the Hue/Saturation Dialog Box.![]() How to selectively shift the colors in an image down the color wheel.
How to selectively shift the colors in an image down the color wheel.![]() Edit Camera Raw
Edit Camera Raw![]() What the Camera Raw format is.
What the Camera Raw format is.![]() How to use the Camera Raw Dialog Box to your advantage.
How to use the Camera Raw Dialog Box to your advantage.![]() Healing Brush
Healing Brush![]() Keyboard Shortcuts for brushes.
Keyboard Shortcuts for brushes.![]() How to use the Healing Brush to fix minor and even major flaws in an image.
How to use the Healing Brush to fix minor and even major flaws in an image.![]() Print Preview
Print Preview![]() How to print an image.
How to print an image.![]() How to use and understand the functionality of the Print Preview Dialog Box.
How to use and understand the functionality of the Print Preview Dialog Box.![]() Quick Fix Color Cast
Quick Fix Color Cast![]() How to use the Auto Button in the Color Palette to correct an image with a color cast.
How to use the Auto Button in the Color Palette to correct an image with a color cast.![]() How to quickly compare your new image with the old version with just a click of a button
How to quickly compare your new image with the old version with just a click of a button![]() Rotate Image
Rotate Image![]() How to use the tools provided in the Photo Browser.
How to use the tools provided in the Photo Browser.![]() How to rotate an image directly from the Photo Browser and have it apply to the image on disk.
How to rotate an image directly from the Photo Browser and have it apply to the image on disk.![]() Save For Web
Save For Web![]() How to use the Save For Web Dialog Box.
How to use the Save For Web Dialog Box.![]() How to take a high resolution image, compress it, crop it and e-mail it to a friend.
How to take a high resolution image, compress it, crop it and e-mail it to a friend.![]() Show File Name
Show File Name![]() How to change preferences in the Photoshop Elements Organizer.
How to change preferences in the Photoshop Elements Organizer.![]() How to reveal the actual names of the files along with the dates.
How to reveal the actual names of the files along with the dates.![]()
![]()
Here's the latest list of Photoshop Elements 4 video tutorials (and some version 3 tutorials) that are available at the Adobe Digital Kids Club site:
Photoshop Elements Video Tutorials
![]() Advanced skin tone adjustment
Advanced skin tone adjustment![]() New ways to order prints online
New ways to order prints online![]() New color management options
New color management options![]() Adding photos to e-mails
Adding photos to e-mails![]() Reducing noise and JPEG artifacts
Reducing noise and JPEG artifacts![]() Red eye correction
Red eye correction![]() The Magic Extractor
The Magic Extractor![]() Creating slide show extravaganzas
Creating slide show extravaganzas![]() Magical selections
Magical selections![]() The new Straighten tool
The new Straighten tool![]() New type options
New type options
 Photoshop Elements Video Tutorials
![]() The Photo Browser and Organizer work space
The Photo Browser and Organizer work space![]() Reducing Noise in high ISO pictures
Reducing Noise in high ISO pictures![]() Date View, Tags, and Collections
Date View, Tags, and Collections![]() The Red Eye Removal tool
The Red Eye Removal tool![]() Smart Fix based corrections
Smart Fix based corrections![]() Advanced tonal control with Shadows and Highlights
Advanced tonal control with Shadows and Highlights
![]() The revised Quick Fix editor
The revised Quick Fix editor![]() RAW file conversions
RAW file conversions![]() Cropping with the new Cookie Cutter Tool
Cropping with the new Cookie Cutter Tool![]() The new Print Engine
The new Print Engine![]()
![]()
![]()
![]() The following Photoshop Elements 3 tutorials are from the Adobe site. These are for Windows only. Below you can find tutorials for the Mac version of Photoshop Elements 3.
The following Photoshop Elements 3 tutorials are from the Adobe site. These are for Windows only. Below you can find tutorials for the Mac version of Photoshop Elements 3.![]() Use Stacks To Group Similar Photos
Use Stacks To Group Similar Photos
The new stacks feature in Photoshop Elements helps you organize similar photos. By placing the best photo at the top of the stack, and less-than-perfect photos under it, your Photo Browser stays tidy.![]() Tell A Story With Your Photos In A Custom Slide Show
Tell A Story With Your Photos In A Custom Slide Show
The Custom Slide Show feature of Photoshop Elements lets you create slide shows with music and narration to wow friends and family.![]() Creating A Scrapbook
Creating A Scrapbook
Putting together a scrapbook has never been easier. Using the Creations Wizard in Photoshop Elements, you can lay out and customize your scrapbook pages with a few easy steps.![]() Putting Together A Picture Package
Putting Together A Picture Package
With the great new features of Picture Package in Photoshop Elements, you can print multiple photos on a single piece of paper. You can even add borders around the photos to customize the layouts.![]() Fixing Photos Taken On Camera Phones
Fixing Photos Taken On Camera Phones
Taking photos with a camera-enabled cell phone is a fun way to catch those memorable events. But because most phones have low-resolution cameras, the photos sometimes turn out grainy or have lighting problems. Using Photoshop Elements, you can smooth away problem areas and turn your photo into a work of art.![]() Printing Custom Labels
Printing Custom Labels
With Photoshop Elements, you can print your photos onto lables to personalize anything.![]() Share Images With Photo Mail
Share Images With Photo Mail
Sending an e-mail with a photo right in the body is a great way to brighten the day of a friend. Now, with Photoshop Elements, in just a few quick steps you'll have an e-mail ready to go!![]()
![]()
![]()
![]() The following Photoshop Elements 3 tutorials are from the Adobe site. These are for Mac only. Above you can find tutorials for the Windows version of Photoshop Elements 3.
The following Photoshop Elements 3 tutorials are from the Adobe site. These are for Mac only. Above you can find tutorials for the Windows version of Photoshop Elements 3.![]() Putting Together A Picture Package
Putting Together A Picture Package
Using Picture Package in Photoshop Elements, you can print multiple copies of one or more photos on a single piece of paper.![]() Fixing Photos Taken On Camera Phones
Fixing Photos Taken On Camera Phones
Taking photos with a camera-enabled cell phone is a fun way to catch those memorable events. But because most phones have low-resolution cameras, the photos sometimes turn out grainy or have lighting problems. Using Photoshop Elements, you can smooth away problem areas and turn your photo into a work of art.![]()
![]()
![]()
 The Adobe website has a special section called the Adobe Digital Kids Club that lists all kinds of great resources for kids who are into photography and who work with Photoshop Elements and Photoshop Album. Here are some of the highlights:
![]() Training and Tutorials
Training and Tutorials
Learn the basics of Adobe Photoshop Elements and Adobe Photoshop Album software with free online product training. Photoshop Elements and Photoshop Album training includes:
Adobe Photoshop Elements Tutorials - Directory ...
Links to Adobe Photoshop Elements 4 tutorials and resources. Create awesome effects with no commercial lighting or studio equipment Extend the dynamic range
Adobe Photoshop Elements - Official Site
Adobe Photoshop Elements 13. Overview; NEW Elements family; Photoshop family; Photoshop Elements tutorials; Training and books; More;
Adobe Photoshop Elements Tutorials - Directory | 101 ...
Buy. Download. Create. Get Photoshop Elements now at the Adobe Store. Download a free 30 day Photoshop Elements trial at the Adobe site. Adobe Photoshop Elements 11
Learn Photoshop Elements 11 | Adobe TV
Learn to use Photoshop Elements with tutorials selected by experts at Adobe. Find everything from Getting Started tutorials to new features, tips, and techniques.
Adobe Photoshop Elements Tutorials - Directory | Photosho...
View changes: 2012-10-06 05:42 392 new words, 0 deleted words, 3% change Adobe Photoshop Elements 11 Learn by Video - 7 Free Clips Here are 7 free videos for
Photoshop Elements Help | Getting Started Tutorials
Get instant help from one of our awesome support people. Start now > Ask the community
Photoshop Elements Help | Create a photo book
Get started or go deeper with tutorials of all our products. Adobe Community Help. Photoshop Elements creates the photo book and displays Pages,
Photoshop Elements Techniques, Tutorials, Downloads, Video ...
tutorials and videos about Adobe Photoshop Elements. is a magazine and website devoted to helping folks get the most out of Adobe Photoshop Elements.
Learn Photoshop Elements 8 for Windows | Adobe TV
Learn to use Photoshop Elements with tutorials selected by experts at Adobe. Find everything from Getting Started tutorials to new features, tips, and techniques.
Free New Books on Photoshop & Premiere Elements 11 (185 ...
Tutorials. Photoshop Tutorials; Illustrator Tutorials; Flash Tutorials; Photography Tutorials; Free Books; i was wondering with the adobe photoshop elements 11,
Travelling is my life
ConversionConversion EmoticonEmoticon