Written by Steve Patterson. In this Photoshop Effects tutorial, were going to look at a classic Photoshop effect for wedding photography, placing the wedding couple inside a wine glass. This is a very easy Photoshop effect to create, requiring nothing more than a few basic tools, a layer mask, and a few minutes worth of effort. Well be finishing off the effect with a slightly more advanced blending option, but "more advanced" definitely doesnt mean "more difficult", as well see.
If youre not into wedding photography, you can use this Photoshop technique to place images inside any glass object, like a bottle or even an hour glass, and it also works great for placing images inside bubbles which is always a fun thing to do. Any recent version of Photoshop will work just fine.
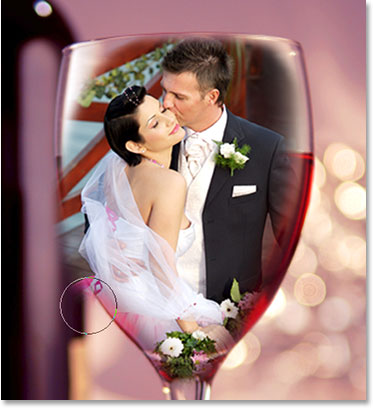
Heres the two images Ill be using in this Photoshop effects tutorial:
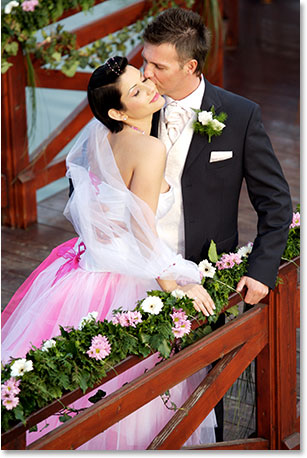
The wedding couple.
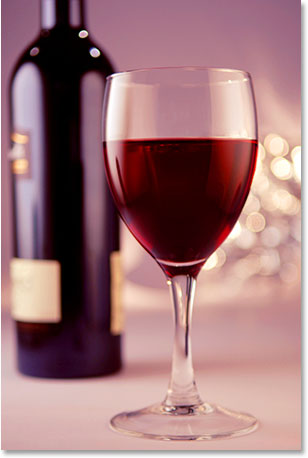
The wine glass.
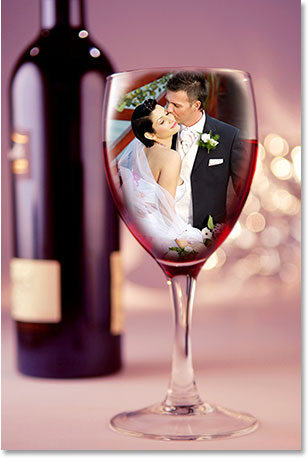
And heres the final result well be working towards:
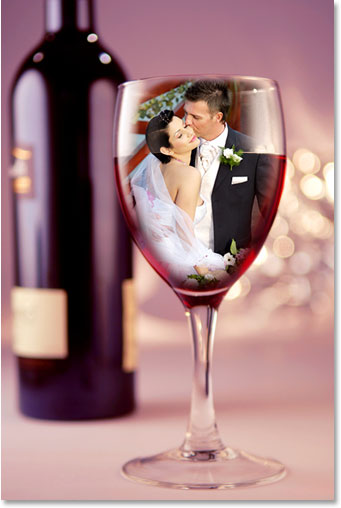
The final result.
Lets get started!
Step 1: Drag A Selection Around The Couple With The Elliptical Marquee Tool
Were going to start things off by working on the photo of the wedding couple. Select the Elliptical Marquee Tool from Photoshops Tools palette. By default, its hiding behind the Rectangular Marquee Tool, so youll need to click on the Rectangular Marquee Tool icon and hold your mouse down for a second or two, then select the Elliptical Marquee Tool from the fly out menu that appears:
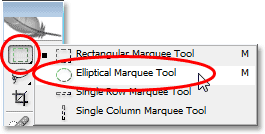
Select the Elliptical Marquee Tool.
Then, with the Elliptical Marquee Tool selected, drag out an elliptical selection around the wedding couple. If you need to reposition your selection as you drag, simply hold down the Spacebar on your keyboard and then move your mouse around to reposition it. Release the Spacebar to continue dragging out the selection:
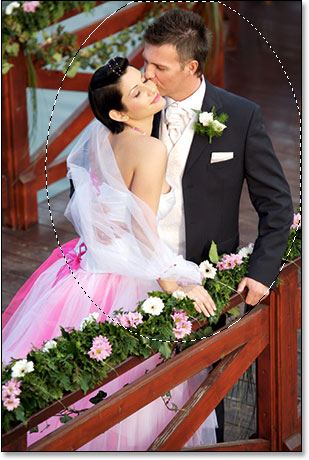
Drag out an elliptical selection around the wedding couple.
Step 2: Feather The Selection
Next, were going to feather the selection, which is Photoshop-speak for making the selection edges softer. To do that, with the selection still active, go up to the Select menu at the top of the screen and choose Feather. When the dialog box appears, enter a Feather Radius value of about 15-20 pixels. Im going to set mine to 20 pixels:
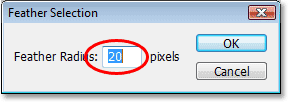
Add a feather of about 15-20 pixels to the selection to soften the edges.
Click OK to exit out of the dialog box.
Step 3: Drag The Selection Into The Wine Glass Photo
Now that we have our selection around the wedding couple and weve softened the selection edges, we need to drag the selection into the photo of the wine glass. For that, we need the Move Tool, so select it from the Tools palette or press V on your keyboard for the shortcut:
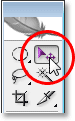
Select the Move Tool.
Then, with both images open in their own separate document windows, simply click with the Move Tool inside the photo of the wedding couple and drag the selection into the photo of the wine glass:
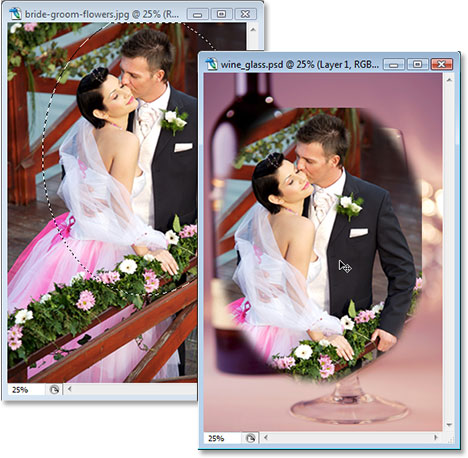
Click inside the photo of the wedding couple and drag them into the photo of the wine glass.
Dont worry if some of your edges around the couple look like theyre cut off, as mine do at the top and on the right. Well be fixing that in a moment with our layer mask. Also notice how the edges appear nice and soft (except of course for the areas that appear cut off), and thats thanks to the feather we applied to the selection.
Once youve dragged the wedding couple into the other photo, you dont need to have their original image open on your screen anymore, so you can close out of it if you wish.
Step 4: Resize and Reposition The Wedding Couple With Photoshops Free Transform Command
We need to move the wedding couple into position in front of the wine glass and well most likely need to resize them as well (I certainly need to with my image), and we can do both of these things using Photoshops Free Transform command. Press Ctrl+T (Win) / Command+T (Mac) on your keyboard to bring up the Free Transform box and handles around them. To move the couple into position, simply click anywhere inside the Free Transform box and drag them into their new location with your mouse.
The only spot you cant click on is that little target icon in the center of the Free Transform box. When I say "cant", what I mean is, you can certainly click on it if you like, but if you do, youll move the target instead of moving the image. So if your goal is to move the image, not the little target icon, click anywhere except for on that target icon. To resize the couple, hold down Shift+Alt (Win) / Shift+Option (Mac) and drag any of the corner handles. Holding down Shift constrains the proportions of the image as you drag, and holding down Alt/Option tells Photoshop to resize from the center of the Free Transform box (technically, it tells Photoshop to resize the image around that little target icon, which is why you didnt want to move it):
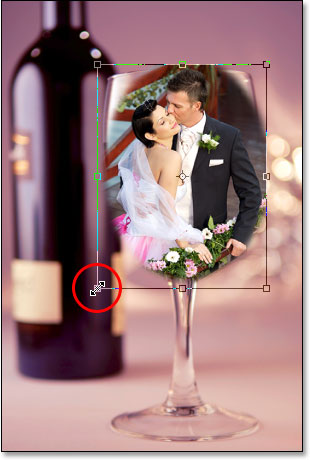
Move and resize the couple as needed with Free Transform.
Press Enter (Win) / Return (Mac) when youre happy with the size and location of the couple to accept the transformation.
Step 5: Add A Layer Mask To The Wedding Couple Layer
If we look in Photoshops Layers palette, we can see that we now have two layers. The wine glass image is on the bottom "Background" layer, and the wedding couple is on Layer 1 above it. With Layer 1 selected (the currently selected layer is highlighted in blue), click on the Layer Mask icon at the bottom of the Layers palette:
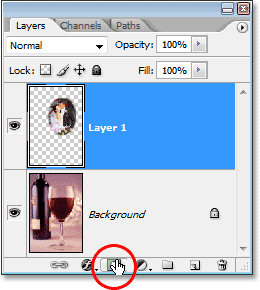
Click on the Layer Mask icon at the bottom of Photoshops Layers palette.
Youll see a layer mask thumbnail appear to the right of the layer preview thumbnail.
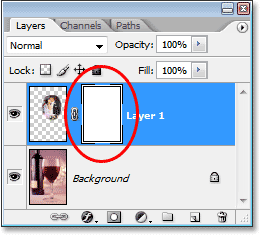
Layer 1 now has a layer mask thumbnail to the right of the layer contents preview thumbnail.
Step 6: Paint With Black Around The Edges Of The Wedding Couple
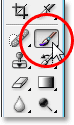
Now that we have our layer mask, were going to use it to blend the wedding couple in better with the wine glass, and well do that by painting with black and a soft-edged brush around the edges of the wedding couple image. For that, we need Photoshops Brush Tool so select it from the Tools palette. You can also press B to select it with the keyboard shortcut:
Click on the Layer Mask icon at the bottom of Photoshops Layers palette.
We also need black as our Foreground color. If black isnt currently your Foreground color, simply press D on your keyboard, which will set white as your Foreground color and black as your Background color, and then press X to swap them. Then with a medium-size, soft-edged brush, simply paint along the edges of the wedding couple image to reveal the edges of the wine glass underneath them, and continue painting until the image of the couple is completely contained inside the glass. To resize your brush, use the left and right bracket keys on your keyboard. Pressing the left bracket key makes the brush smaller and pressing the right bracket key makes it larger. To soften the edges of the brush, hold down the Shift key and press the left bracket key a few times (holding Shift and pressing the right bracket key makes the brush edges harder):
Paint with black and a medium size, soft-edged brush around the edges of the wedding couple image to reveal the edges of the wine glass underneath them.
If you make a mistake as youre painting, either press Ctrl+Z (Win) / Command+Z (Mac) to undo it or press X on your keyboard to set your Foreground color to white, paint over your mistake, then press X again to set your Foreground color back to black and continue painting around the edges.
When youre done, your image should look something like this:
The image after containing the wedding couple inside the wine glass.
Step 7: Use The Blend If Sliders To Bring Back Some Glass Highlights
The only thing left to do at this point is to bring back some of the highlights in the glass. We can do that easily using Photoshops Blend If sliders. Click on the Layer Styles icon at the bottom of the Layers palette, then choose Blending Options at the top of the list that appears:
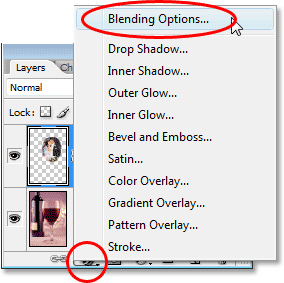
Click on the Layer Styles icon at the bottom of Photoshops Layers palette and select Blending Options from the top of the list.
This brings up Photoshops Layer Style dialog box set to the Blending Options in the middle column. The Blend If sliders are at the bottom. Youll see two black-to-white gradient bars. We want the bar at the very bottom. Click on the white slider at the bottom right of the gradient bar and begin dragging it towards the left. As you drag, youll notice any white highlights and light reflections in the glass beginning to re-appear. Problem is, they have very harsh, jagged edges. To soften them, as soon as the highlights begin to reappear, release your mouse button, hold down your Alt (Win) / Option (Mac) key, and then click back on the slider and continue dragging it towards the left. By holding down Alt/Option, you split the slider in half and youll now be dragging only the left half of it. The area in between the two halves becomes a transition area between the wedding couple image and the glass highlights, giving us nice, soft edges to the highlights. The greater the distance between the two halves, the greater the transition area and the softer the edges of the highlights:
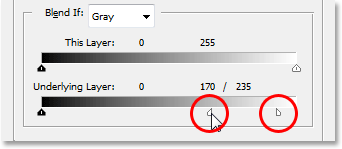
Drag the white slider for the bottom "Blend If" bar towards the left until you begin to see any highlights or light reflections reappearing in the glass, then release your mouse button, hold down "Alt" (Win) / "Option" (Mac) and continue dragging the slider to split it in half and create soft, smooth edges for the highlights.
Youll probably need to play with the slider halves a bit, moving each one left and right until youre happy with the results. When youre done, click OK in the top right corner of the Layer Style dialog box to exit out of it, and youre done!
Here, after bringing back some of the highlights in the glass with the Blend If sliders, is my final wedding couple in the wine glass result:
The final effect.
And there we have it! Thats how to place a wedding couple inside a wine glass with Photoshop!
Download our tutorials as print-ready PDFs! Learning Photoshop has never been easier!
You May Also Like...
Wedding Couple in Wine Glass Photoshop Tutorial
In this Photoshop effects tutorial, learn how to create a popular wedding photography effect by placing the wedding couple inside a wine glass.
Wedding Couple in Wine Glass - Photoshop Tutorial | 101 ...
Written by Steve Patterson. In this Photoshop Effects tutorial, were going to look at a classic Photoshop effect for wedding photography, placing the wedding couple
Wedding Couple In A Wine Glass Photo Effect
placing a wedding couple inside a wine glass. Tutorials . Photo Effects and this classic wedding photography effect in Photoshop, placing a wedding couple
Wedding Couple In A Wine Glass - Tutorial Outpost ...
placing a wedding couple inside a wine glass. It has expanded in to many more categories past the initial Photoshop Tutorials and is now visited by more than
photoshop galaxy: Wedding Couple in Wine Glass
placing the wedding couple inside a wine glass. This is a very easy Photoshop effect to create, Photoshop Tutorials: The wedding couple.
Photoshop: Photoshop Classic Effect: Wedding Couple in ...
Learn how easy it is to create this classic wedding photography effect in Photoshop, placing a wedding couple inside a wine glass. Not into wedding photography?
50 Wedding Photoshop TutorialPhotoshop Website - Tutorials ...
1.Wedding Couple in Wine Glass. 2.Wedding Movie Poster from Digital 3.Retouching pictures. 4.Masked Overlay Diffusion. 5.Wedding layout. 6.Photoshops Five
Photoshop Classic Effect: Wedding Couple In A Wine Glass ...
Learn how easy it is to create a classic Photoshop effect, placing a wedding couple inside a wine glass. Or use this same technique to place any image inside any
Photoshop Tutorials: Wedding Couple in Wine Glass
In this Adobe Photoshop tutorial, we're going to look at a classic Photoshop effect for wedding photography, placing the wedding couple inside a wine glass.
Wedding Couple in Wine Glass Photoshop Tutorial
In this Photoshop Effects tutorial, were going to look at a classic Photoshop effect for wedding photography, placing the wedding couple inside a wine
Travelling is my life
ConversionConversion EmoticonEmoticon