Last updated Mar 14, 2003.
Before we get started, let's talk a little about what red eye is and where it comes from. Red eye is, well, when eyes look red in a photo. People often think that it's the color of the flash or light coming from somewhere, but the real explanation is a little grosser than that. Red eye is actually caused by light from a flash traveling through the iris and illuminating the retina at the interior back of the eye. This is actually red in color due to its blood vessels (yuck). The camera then captures that redness on film or (in our case) to your cameras digital memory card.
Red eye is most common in photos shot by amateur photographers or people using small point-and-shoot cameras. The pros usually avoid this problem by using flashes that are mounted above a lens or by working in better lighting.
Now that you know more about red eye than you ever wanted to know, let's take a look at how to fix it in your digital photos. First, you'll need a photo that has red eye in it. Just in case you don't have an abundance of these photos (like I do) feel free to download the image I'm using here. If you really want to work with your own images, just go take a photo of a person in a low light situationlike outside at night or inside in the evening and you'll probably see some red eye pop up in your photos, too.
- Launch Photoshop CS2 and open your photo that contains red eye. You
don't need to do this, but I always find it easier to select the Zoom tool
and zoom in on the eyes so that theyre the only things I see on the
screen.

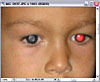
Step 1 A photo of my demonized son with some obvious red eye problems.
- Once you're zoomed in, go ahead and take a look in the toolbox. You won't see the Red Eye tool right away because it is hidden beneath one of the other tools. Look right below the Crop Tool and you'll see the new Spot Healing Brush. If you click and hold your mouse down on that tool, you'll see a little pop-out menu and the Red Eye tool will be the one at the bottom.
- Okay, now that you've got the tool selected, click once on the red part
of the left eye. Watch in awe as the red is automatically removed from the eye.
It doesn't get much easier than that, does it? The tool basically looks at
the red surrounding the area that you clicked and removes it from the photo. The
beauty of this tool though is that it leaves the rest of the red alone in your
photos so if someone is, say, wearing a red shirt, it won't remove the
color from the shirtjust from the eyes.
Step 3 Clicking once with the Red Eye tool removes the red from the left eye.
I could just end the tutorial here and wish you luck. Honestly, using the Red Eye tool is really that easy. But there are a few options to be aware of when you're using it in case the eyes don't look as good after you remove the red from them. Let's take a look at those options next.
- Let's assume that you still have the Red Eye tool selected in the
toolbox. If you switched tools, then go ahead and select it again. Now, look up
in the options bar at the top of the window. You should see that there are a few
options associated with the Red Eye tool here.

Step 4 The options bar contains various settings used for the Red Eye tool.
- The first scenario you may run into is when the default settings of the Red
Eye tool don't remove all of the redsometimes you may see a fringe
or a hint of red hue remaining. Don't worry, because it's easy enough
to fix. Just increase the Pupil Size setting and try the process again. Do this
until you're happy with the result and all of the red is gone.

Step 5 Adjust the Pupil Size setting based on how big of an area is still showing up in the red.
- Next, many times when fixing red eye with the Red Eye tool, Photoshop will
turn the red eye into gray or dark gray eye. In many cases, you won't
notice it because the color surrounding the red eye may be gray itself. However,
if the photo has a very dark black pupil, then you may want to try to match that
color better. Do this by changing the Darken Amount. Honestly, here I usually
just change it to 100%. Repeat Step 3 again to fix the red eye and see how the
eye looks. If its too dark, then you may want to try a setting in between
50 and 100 like 75% (yes, I know I'm good at math, aren't I?).

Step 6 Adjust the Darken Amount to make the pupil a darker gray or black.
- Thats really all there is to it. All thats left to do is repeat the process on the right eye. However, just for the sake of showing you different ways of using this tool, try this way instead. Instead of just clicking once on the red eye with the Red Eye tool, click and drag a square selection area around the red eye with the Red Eye tool this time. This constrains the tools effect to just the area youve selected. If there was a lot of red area around a person's eye to begin with, then you may want to use this method so Photoshop doesn't get too confused. It really is a trial and error process to find which method works best for you.
As you can see, fixing red eye in Photoshop CS2 is actually pretty darn simple. I know I showed you a few different options, and the red eye that pops up in your photos may be different for each photo, but the nice part about using the new Red Eye tool is that it's easy. If one way doesn't work, chances are you didn't sink a whole lot of time into it so you can just undo and try it again quickly. Happy red eye removal!
Photoshop Reference Guide | Remove Red Eye with the Red ...
Remove Red Eye with the Red Eye Tool . Last updated Mar 14, 2003. Before we get started, let's talk a little about what red eye is and where it comes from.
Photoshop Reference Guide | Removing Red Eye | Peachpit
red_eye.jpg. Once you have the red eye image open in Photoshop CS, the first step is to select the Color Replacement Tool from the Toolbox (see screenshot below):
How To Remove Red Eye In Adobe Photoshop Cs4 Or Cs5 ...
How To Remove Red Eye In Adobe Photoshop Cs4 Or Cs5 and read our other article related to How To Remove Red Eye In Adobe Photoshop Cs4 Or Cs5, at manual guide
Photoshop How-To: Five Ways to Reduce Red-Eye ...
There are almost as many ways to minimize red eye using Photoshop as there are people using Photoshop. Ask a group of photographers which is the best way to minimize
Red eye tool - Adobe Photoshop CC for Photographers
there is also a really good red eye removal tool in Camera Raw that To use the tool just click on the red area of the eye. Photoshop can then automatically
photoshop remove red eye
Photoshop Reference Guide | Remove Red Eye with the Red Remove Red Eye with the Red Eye Tool . Last updated Mar 14, 2003. Before we get started, let's talk a
Photoshop 5: Adding Red Eye Removal Action
See Free Photoshop Action for Red Eye Removal. Find The PC Guide helpful? Photoshop 5: Adding Red Eye Removal Action
Free Photoshop Action for Red Eye Removal
Download a free red eye removal action for Adobe Photoshop. About.com. Food Southern Food; A Quick Guide to Using Photoshop Actions in Photoshop Elements;
Photoshop Elements Help | Retouching and correcting
You can also automatically fix red eye by clicking Auto Correct in the Red Eye Removal tool Photoshop Elements compares nearby image content to
55 Best Eyes Photoshop TutorialsPhotoshop Website ...
19.How to fix red eyes with Photoshop. 20.Remove Red Eye. 1.Retouching Eyes in Photoshop 2.Remove Glasses Digitally in Photoshop! Retouching Tutorial.
Travelling is my life
ConversionConversion EmoticonEmoticon