Eyes are the mirror of the soul, or so they say, but also eyes are the essential part of a painting because they give character, emotion, depth to your image if done properly. This tutorial is intended for beginners and light intermediary users, people who are familiar but do not yet excel in digital painting and need a few pointers on how to paint in a Photoshop environment.
Important note: I paint all of my work using a computer tablet, so there is no guarantee that youll go trought these tutorials successfuly when using a mouse. If youre serious about learing to paint on the computer try and buy a tablet. It doesnt have to be a Wacom, there are many other companies that make completely decent pen tablets (Genius for example) at an affordable price.
Step one: Drawing the basics
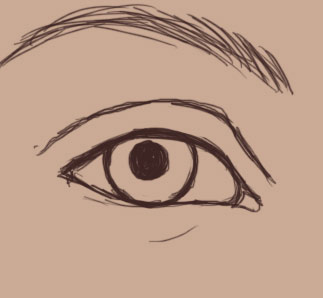
Let us start with the simplest of sketches. As you can see it doesnt look like much, but thats not relevant seeing how you will paint over it anyway. The important thing is that you have the basic elements covered; the iris, the eyeball, the lid etc. Now, instead of using a plain white background Ive went for a flesh color background, because it will be much easier to paint with. Also my sketch color is not black. Black ruins skin tones, so use dark brown instead.
Basic anatomy tips: The biggest mistake one can make when drawing eyes it to draw a completely almond shape eye or make the eye too round. Eyes by definition are not purely geometrical so bare that in mind when starting out. Look at your own eye and see the line of it. Is it round or almond shape? Of course not, so dont draw them that way.
Step two: Getting started
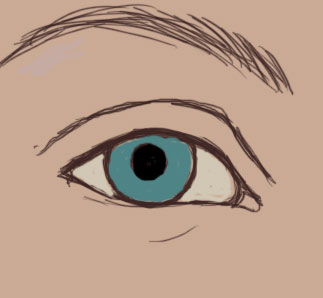
Now lets continue with the coloring. Ive picked out a random color for the eye iris, seeing how it will change anyway. The important thing to know in this step is never to paint the eyeball in pure white. NEVER. The eyeball like all other objects in reality has its shadows and highlights, it also has small blood vessels steaming out to the surface (especially if you havent slept much) so that all ads to the color map of the eyeball.Start with some warm gray, perhaps with pinkish tones (just slight), or any other light, non white color depending on the atmosphere of your picture. Determine first whether your painting will have a warm or cool hue to it and take it from there. For the purpose of this tutorial, you can simply sample the color from the image on the left.
Step three: Adding shades and light
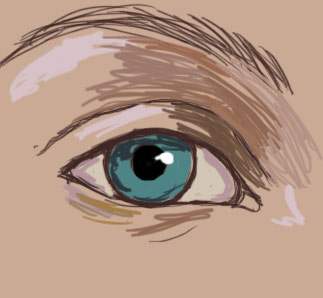
Now lets color this. Ive added various tones of skin colors to the mix in order to create a base for the shadow and highlight regions. This part is essential because it provides grounds for your future steps. If the coloring is unnatural then the rest of the picture will be like that, or youll have to repeat the coloring step later on. Since I want to keep this tutorial precise and under 15 steps, Ive carefully thought about the coloring and light/shadow placement.
Important : Contrary to popular opinion, the skin consists of many colors warm and cold, it all depends on the lighting, the fact that our skin is filled with veins and arteries and blood vessels. So when painting, bare this in mind. Never paint with just light and dark variants of one color. Add reddish tones, yellows, for highlights, mix cyan and purple tones with gray for shadows. Ive put some more conservative combinations for the purpose of this tutorial, but in the future dont be afraid to try out more expressive color choices (see color management tutorial).
Step four: Smudging the colors
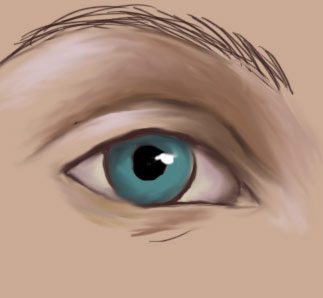
Time to use the smudge tool. If you plan on seriously learning how to paint in Photoshop, you will come to realize the importance of the smudge tool. It is the main tool in the work process and without it mixing colors is a dull and often fruitless endeavor. Smudge all of the colors using small, round motions. Even here you dont have to be awfully precise, because the full blending will be complete in the next step For me personally the optimal strength of the smudge tool is somewhere between 50% and 80% ( I usually set the tool at 73% strength, because that suits my tablet pen best; it may be different with your tablet) depending on the amount of smudging I need done.
Step five: The importance of gaussian blur
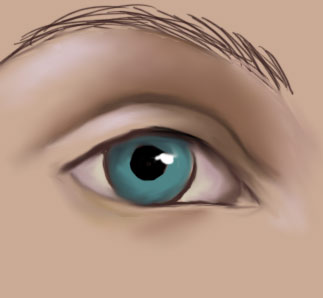
Now its time to use the Gaussian Blur filter (Filters/Blur/Gaussian blur). For me it is (besides the smudge tool) the second essential tool in Photoshop. Using the lasso tool select logical patches of the painting. By logical I mean portions of the picture where you need to blend in two colors. Also the amount of Gaussian blur depends on two things. How much smudging and blending youve done in the previous step and how big the painting and selected part is.This usually means using a value between 1 and 3. Also this is the last step where you are allowed to be messy. From now on precision will also be important.
Step six: Painting the Iris
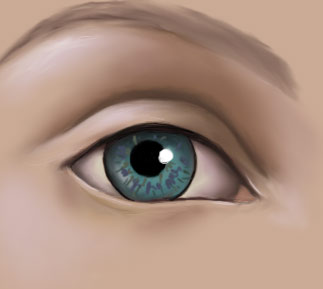
The human iris is the most critical part of the human eye when it comes to painting. If you dont succeed in this step it will be very hard to give your work realism and the painting will start to look like some flat anime. Not that there is anything wrong with Anime, but make an effort to do this right. Sure, there are some 5 step Photoshop tutorials on how to paint them using various PS filters, however, most of the results look sterile and completely unnatural and if youre anything like me, youll eventually forget how to do it anyway. So how does one paint the iris? Surprisingly enough, its is not all that difficult once you get the hang of it.With the exception of dark and brown eyes, most eyes dont consist of just one color but tend to have many freckles of color in it and not just towards the center, but also all around it. So take a small brush and start adding dots and lines all over the iris. Since I chose a bluish base for the eye color I now started to add dabs of purple, subdued green and a touch of ocker. If youre not sure exactly how to take a mirror and analyze your eyes. See the textures. This part is actually fun. ![]()
Step seven: Still painting the Iris
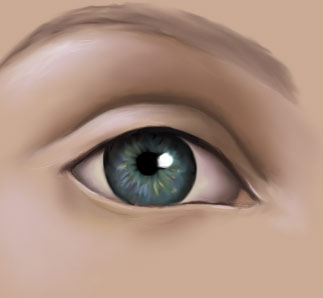
Here comes the tricky part. All of these freckles of color need to be blended in properly. Although th ere is no way to do this wrong, you will still need some time to produce optimal results.
Step eight: Adding depth to the eyes (the glassy effect)
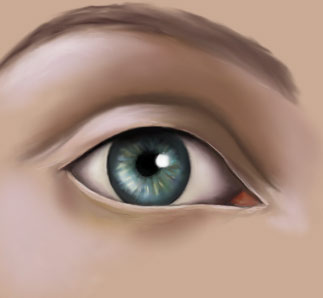
Lets bare in mind that the Iris is not flat, on the contrary its like a glass surface and it behaves like a convex lens. Have you ever done an aqua button tutorial, or how to make glass? If you have youll come to realize that the principles dont differ so much. You have a point where the light enters Point A ( the round white dot on the right of the iris) and where it spreads Point B (the lower left part of the iris) and the rest of it goes from dark (around the point of light entry) to light (all around point B). To simplify it Ill do a step by step explanation:
- Determine a light direction and source by adding a white circle on the iris usually somewhere near the pupil.
- The parts of the Iris the are near the top eye lid should be darker then the rest of the eye because the lid and lashes will give it some shadow. Then paint the light side (B) just opposite of the light source. You do that by adding a new layer and painting the white surface on it, smudge/blur it.
- Then lower the opacity so that you can see the iris texture on the layer underneath. Or you may use the Color dodge tool on your main menu. Either way the results will be similar. You can also try to use Overlay or Soft light on your white layer (B), with some middle level opacity.
Step nine: Adding the eye lashes
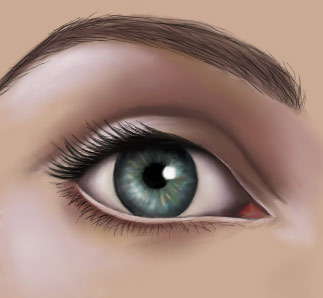
Now it is time to add some eyelashes to the painting. Generally it is best if you make a separate layer for the lashes, because it will get messy otherwise. Bare in mind when it comes to drawing lashes that they are never perfectly separated, they intertwine, get stuck together, some stand up tall, others slope down. In terms of painting try using a pressure sensitive brush, or just using a regular brush and then taking the smudge tool at some high level (like 80%) and just brush up in the direction you desire.Important : Women make their lashes go upwards because of the use of mascara, but in truth the eye lashes rarely swirl up on their own, but rather they sometimes tend to slightly slope down. This is obviously more noticeable in male eyes.
Step ten: A few thoughts on image modification
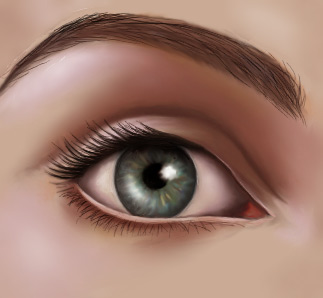
So ok, if youve managed to successfully complete these above steps, youre probably feeling very good a bout yourself. But dont congratulate yourself too much because there is still a lot of work to do. Ive added some more red and yellow using the color balance tool (CTRL + B), but that part is up to you. Modifying your images with color balance, curves (CTRL + M), and levels (CTRL + L)is a process similar to childs play. You experiment, discover, learn. And this you will do on your own. I strongly believe that you need to work on these steps alone in order to get some creative experience. Otherwise, youre just following a manual and thats no different then learning how to set up your DVD player. Whats missing on this picture? Well, the answer is - texture. The skin is too smooth, everything looks eye candy perfect and thats just not the way real life works. So in the next step we must learn how to add texture and realistic depth to an image.
Step eleven: Adding texture
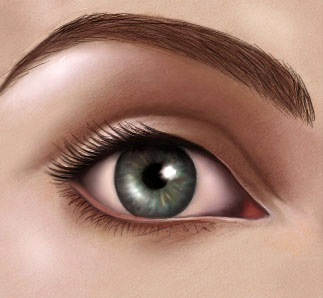
This is the least painterly part of the process and it involves a lot of image and layer manipulation. For starters find a photo of human skin. A lot of them are available on the net for free download, or if your have a photo camera, take a snap of your own skin. This is by far the simplest way of adding a texturized feel to your image, without having to spend a lot of time on it. I will repeat the steps I have taken in order to finish this portion of the tutorial, but bare in mind that it will probably be different for you (different skin image, painting, colors etc). Dont be afraid to improvise. First off the skin image was pasted into a separate layer, then put the layer to have a Soft light impact on the overall image. I also set the skin layers opacity to 77% and erased portions of the texture that covered the eyeball, iris and lashes. Obviously, this made the image too orange and saturated, so I lowered the saturation (CTRL+U) of the eye layer until I got a good result. Then I lightly smudged the parts of the texture that I thought didnt work for the picture (such as in the crease between the lid and lower arcade). Then I copied the texture layer, put it to be Overlay and then completely desaturated it (made it gray). Turned the opacity to 23% and the fill opacity to 63% and smudged again the parts I didnt like.
End of the road
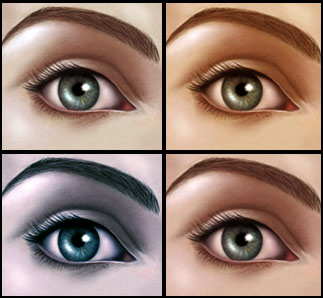
Technically there is no such thing as the end of the road when it comes to painting. Youre done when you choose to be done (or in this case when I tell you to) but even then there will always be room for perfecting your creations. Now that you have learned the basics to painting human eyes and faces you can use that knowledge to put your own ideas to life and how youll measure up is entirely in your hands.In some future tutorial we will concentrate on expressions and conveying emotions in your paintings,because that is a whole new universe to learn about.
Copyright 2006© Jelena Jovovic, All rights reserved.
This tutorial was written by Jelena Jovovic exclusively for Photoshop-Freebes.com site.
Photoshop Tutorials: How to paint a human eye tutorial ...
Eyes are the mirror of the soul, or so they say, but also eyes are the essential part of a painting because they give character, emotion, depth to your image if done
Photoshop Tutorial: How to Paint a Realistic Human Eye
How to Paint a Realistic Human Eye currently viewing photoshop tutorials from Photoshop Lady This tutorial will introduce you to paint a wolf for your
Photoshop Tutorial: Simple Way to Paint a Human Eye
Simple Way to Paint a Human Eye currently viewing photoshop tutorials from Photoshop Lady This tutorial will introduce you to paint a wolf for your information.
35 Best Eye Tutorials On Photoshop
2.Changing of the eye color 3.Photoshop Makeup Tutorial a Human Eye in Illustrator. 12 one post .Eg 42 Tutorials On Hair or 35 Best Eye Tutorials On Photoshop
How to paint a human eye Photoshop Tutorial :: Brushes ...
Title: How to paint a human eye Photoshop Tutorial Author: photoshop-freebies Added: 02/02/2009 Find More Photoshop Tutorials for free: Photo Manipulation, photo
Photoshop Tutorials > Drawing the Human Eye in Photoshop ...
Drawing the Human Eye in Photoshop. Unlock this full tutorial and more professional Photoshop tutorials today. Become a member. Painting eye lashes .
How to paint a human eye tutorial | COMPUTER TREASURE
How to paint a human eye tutorial . 0 people who are familiar but do not yet excel in digital painting and need a few pointers on how to paint in a Photoshop
Phtoshop Tutorial : Paint the Human Eye | All CG Tutorials
by Cat Reyto. This Photoshop tutorial is about how to paint Human Eye in photoshop. Professional illustrator Cat Reyto offers the tutorial below on how to paint the
CGSociety - Tutorial: How to Paint Realistic Eyes
How to Paint Realistic Eyes. Painting Realistic Eyes by Linda Bergkvist has been one of our most popular tutorials.
Change the color of eyes in photoshop tutorial
Im very excited to bring you my latest Photoshop tutorial. Paint out the areas of the eyes Join our list to receive more tutorials and tips on Photoshop.
ConversionConversion EmoticonEmoticon