In this tutorial we are going to learn the best way to cut out difficult images from their background in Photoshop. Im not talking about solid shapes and people against green screens. Im talking about hair and irregular edges against less-than perfect backgrounds. You know, the kind of thing that you have to deal with in the real world, not just for tutorials. As you know, here at photoshopCAFE we are all about keeping it real and tackling real-world stuff rather than eye-candy that you cant actually use.
So lets have a stab at extracting a woman wearing a feather head dress. To make it more fun, we will use a colored background that is similar in color to the feathers one one side, and completely different on the other side. Sound challenging enough? Lets do it!
We also have another method of extracting in this free video tutorial
Step 1
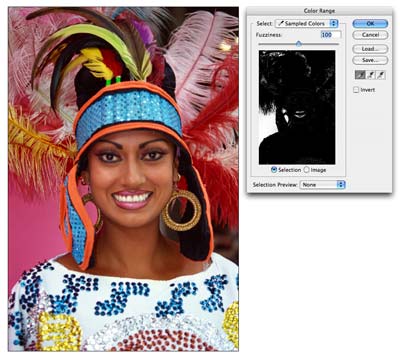
Make a duplicate layer of the image. This way the original is preserved on the background and we are working on a duplicated layer. Hide the background by clicking off its visibility icon. Choose Select>Color Range from the Menu. When the Color Range Dialog box open, choose the Left Eye Dropper tool and click on the background color in the image window (pink). You will see the selected color turn white in the dialog box. Move the Fuzziness slider until the image is mostly black and the background is a clean as you can get it. Tip: To add a color to the selection click on the eyedropper tool with the plus sign and click in the image. Click ok
Step 2

With the selection active, switch to the Channels palette. Click the save selection as channel button, its the second one to the left on the bottom of the channels palette. A new alpha channel will now be visible. Press Ctrl/Cmd+D to Deselect and click on Alpha 1 in the channels palette. The main window will now turn black and white. The advantage of using a channel is the ability to fine tune the selection without effecting the original image. Black represents the areas that we want to keep and white, the areas to be discarded.
Step 3

Notice that there are areas of gray, these would be semi-transparent and need to become solid black and white (except for areas that should be semi transparent such as soft edges). There are tiny dots also visible, there will make for a very messy selection. Here is a quick solution that I have come up with: Click Image>Adjustments>Levels..
In the levels Dialog box, click the black point slider on the left and drag it to the right until the gray areas have become a solid black, Slide the White point slider to the left until the whites are nice and clean and the grainy effect has gone. Click ok to apply.
Step 4
 Time to fine tune the mask. Choose a black brush and make the edge hard. Paint over all the areas that belong in the object to mask out. Use a larger brush for large areas and a smaller brush for finer detail such as around the feathers. Use a white paint color to paint out the areas that should be removed.
Step 5
 Sometimes it can be hard to guess which part of the image belongs in the foreground and a peek at the original image is needed. Click on eye icon to the left of RGB at the top of the Channels palette (Fig 5). The original photo is now visible and the mask appears as a reddish color. Click the eye icon to go back to the mask view. The mask can also be hidden by toggling the eye (visibility icon). Keep going until you have a clean mask.
Step 6
Hold Cmd(Ctrl PC) and click on the Alpha 1 thumbnail. You will now see an active selection. Click on RGB to see the color image. Open the layers palette.
Select the working layer and add a layer mask. The masked area of the backround will now be removed to reveal a nice clean masking effect.
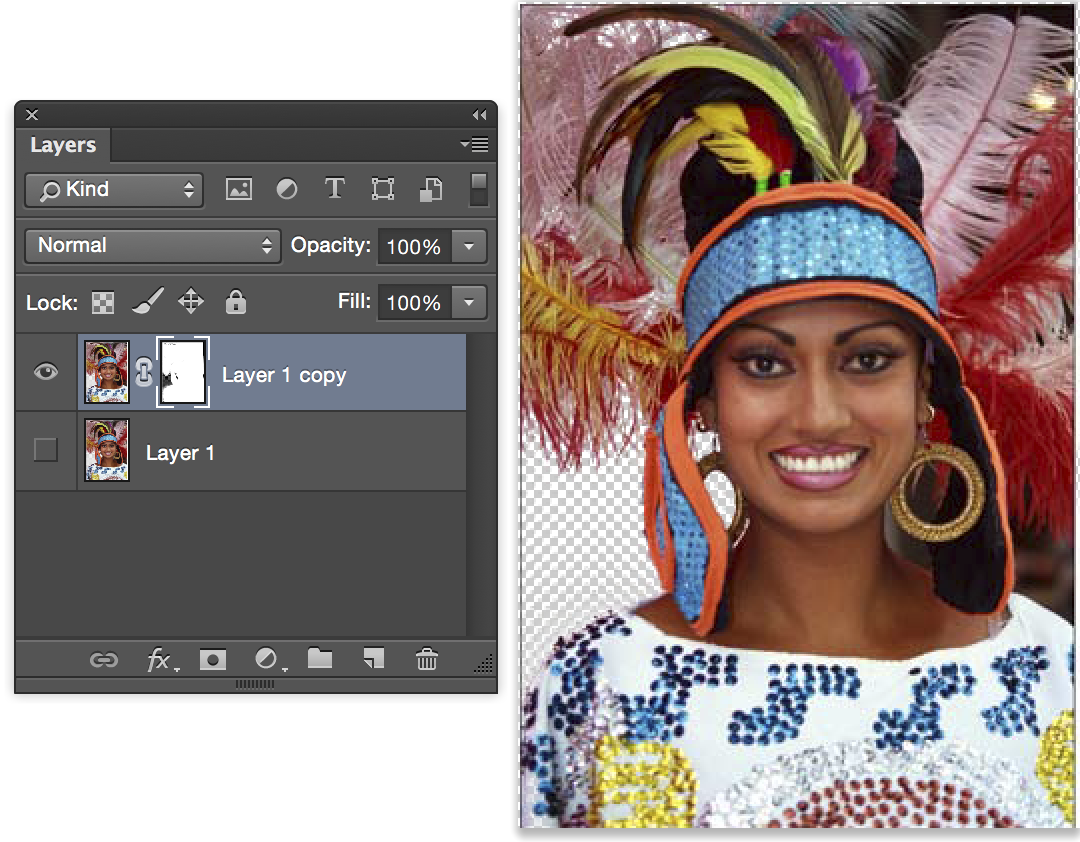
If it looks the opposite, click on the layer mask and press Ctrl/Cmd+I to invert the mask. You can touch up the mask by painting with black or white to add or remove portions of the image.
At this point In am only worried about removing the pink background on the left.
Step 7
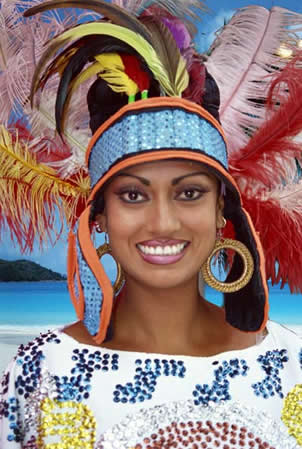
If there are areas that still need to be removes such as on the right side of this image, repeat the proceeding steps. Because each image is unique, some will need several passes and some can be done in a single pass. As you can see, this technique is very effective and the image can be dropped onto any background. Look at the top left of the image to see how precise the cut out is on the detailed feathers. Try that with the pen tool!
Get in-the-know!
Join our list to receive more tutorials and tips on Photoshop. Get exclusive tutorials, discounts and the free super guides. No spam, all content, no more than once a week.
Masking out Difficult Images in Photoshop Tutorial ...
In this tutorial we are going to learn the best way to cut out difficult images from their background in Photoshop. Im not talking about solid shapes and people
PhotoShop Tutorial - Masking out Difficult Images in Photoshop
Welcome to Photoshop Tutorials. We hope you find the tutorials on our website useful. We update the site weekly so make sure you come check us out at least once a week.
Using Channels To Mask Out Images In Photoshop ...
Using Channels To Mask Out Difficult Images In Photoshop Photoshop CS5 Tutorials & CS5 Resources See our Photoshop CS5 Resource Center for Free Photoshop CS5
Masking out Difficult Images in Photoshop Tutorial
In this tutorial we are going to learn the best way to cut out difficult images from their background in Photoshop. Im not talking about sol
Masking out Difficult Images in Photoshop
photoshop tutorial
Masking out Difficult Images in Photoshop | Photoshop Basics
Masking out detailed images can often be a real pain if you dont know what you are doing. This tutorial will show you the way to get around this often difficult task.
Photoshop tutorial:Masking out difficult images in Photoshop CS6
Learn how to do fast selection in photoshop, With quick selection tool now you can make your selection very fast. For more videos on photoshop Subscribe to
Masking out Difficult Images ~ photoshop vision
Tutorials. 3D effects; Photo effects; Basix; Quick Tips. Photo effects; Text effects; Videos. Photo effetcs; Text effects; Downloads. Photoshop Actions; Masking
Photoshop Tutorial Masking Out Difficult Images In ...
Masking out Difficult Images in Photoshop. Tweet. Masking out Difficult Images in Photoshop. It would be very difficult and time consuming to separate this image from
masking Archives - PhotoshopCAFE - Learn Photoshop ...
Masking out Difficult Images in Photoshop Tutorial. We will use Channels to help mask out a complex objects with clean edges. This technique will also save you a lot
Travelling is my life
ConversionConversion EmoticonEmoticon