Introduction
One of the most common questions I am asked is "How do you move AutoCAD drawings into Adobe Photoshop?". In fact, I have been asked it so frequently recently that I have created this tutorial, which I hope will form the definitive answer.
There are many reasons why you might want to move your AutoCAD drawings into Adobe Photoshop. You may have realised by now that although AutoCAD is great for creating accurate, clear and intelligent drawings, it often is found wanting when it comes to presentation. Various add-on applications have been written to improve and extend the use of AutoCAD into the presentation arena. M-Color is a good example of such an application. However, I think most people would now accept that if you want ultimate control over presentation drawings, you have to move away from AutoCAD's vector DWG file format and use a raster (pixel) based application, of which, Adobe Photoshop is probably the best known example.
The two illustrations on the right demonstrate the problem. The outline image was drawn in AutoCAD using polylines. This sort of accurate drafting is very difficult to achieve in Photoshop but AutoCAD makes it easy. However, if we want to create any kind of illustrative material based upon the outline, like the example shown far right, we have to leave AutoCAD and move to Photoshop where we can make the most of the raster imaging tools. Neither one application could have successfully completed the job alone. It is true to say that AutoCAD and Photoshop make perfect partners in a workflow aimed at creating accurate presentation drawings. AutoCAD looks after the "accurate" and Photoshop deals with the "presentation". Have a look at the Artchitect web site for more examples of AutoCAD and Photoshop working hand-in-hand.
Top of page
Overview
The truth of the matter is that there is not a single answer to the question of how to move from AutoCAD to Photoshop. It all depends upon the required resolution, the quality of image and whether you are exporting line drawings or rendered images. This tutorial explains a number of techniques which cover all of the above issues.
Whatever method you choose, the trip from AutoCAD to Photoshop involves the conversion of a Vector image (geometry) to a Raster image (pixels). Inevitably some compromises have to be made but it is now possible to create high resolution, high quality Photoshop images from AutoCAD drawings. As with all things in life, though, quality comes at a cost. The highest quality results are also the most complicated to achieve.
This tutorial covers 4 techniques for moving from AutoCAD to Photoshop. The techniques covered are not interchangeable since the outcome of each is different so you need to know what you want before you decide which is right for you. I suggest that you read through the whole tutorial to get a good feel for what's on offer. However, I set out some guidelines below to help in making the correct choice.
- You just need low resolution images for inclusion on a web page or for small images in printed documents. Use the Quick and Simple method.
- You need high resolution images of line work but you don't need control over line weights. Use the Export to EPS method.
- You need high resolution and high quality images of line work and you need control over line weight. Use the Plot to EPS method and see the Matching Scales and Pixels tip.
- You need high resolution rendered images or rendered images with additional channel information. Use the Render to File method and see the Using Channel Information tip.
The term "High Resolution" is used here to describe images with pixel dimensions larger than the display on your computer monitor and "Low Resolution" describes images with pixel dimensions smaller than the display on your monitor.
Top of page
Quick and Simple (Print Screen)
The quickest and simplest way to move from AutoCAD to Photoshop is to use the Windows clip board. The Windows operating system allows you to take a "screen grab" (essentially, a snapshot of what you see on your monitor) and save that as an image to the clip board. This image can then be pasted into a new document in Photoshop.
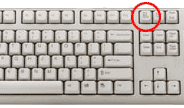 To do this, all you need to do is make sure that your AutoCAD drawing is displayed on the screen as you would want to see it in Photoshop. Then press the Print Screen button on the keyboard. On a standard keyboard, this button is always located to the right of the F12 key. See the illustration on the right.
If you are using a recent version of Windows and the option is turned on, you will see a small message box telling you that the print screen operation has worked. If you are using an older version of Windows or if the Print Screen notification has been turned off, you will be given no indication that anything has happened at all.
Now, open Adobe Photoshop if it is not already open and create a new document, from the pull-down menu or Ctrl+N from the keyboard. When the New dialogue box appears, simply click the OK button, do not change any of the settings. Photoshop is relatively smart and when you create a new document, it looks to see if there is an image on the clip board. If there is, Photoshop sets the Width and Height parameters to the pixel dimensions of the image on the clip board, assuming that you might want to paste this image.
Next, paste the clipboard image into the new document, from the pull-down or Ctrl+V from the keyboard. You should now see your screen grab appear. Notice that as well as the AutoCAD drawing area, you also have the toolbars and command line. In fact, everything that was visible on screen when you pressed the Print Screen button is copied to the clip board. The illustration below shows a typical screen grab.

Once you have the image in Photoshop, you can use the crop tool ![]() to remove the borders, toolbars, command line etc. However, you may also notice that when you pressed the Print Screen key, the UCS icon and the cursor were both visible in the AutoCAD drawing area and consequently, they are also in the pasted image. Of course it may be possible to paint them out using the appropriate Photoshop tools but a better option is to remove them at source.
to remove the borders, toolbars, command line etc. However, you may also notice that when you pressed the Print Screen key, the UCS icon and the cursor were both visible in the AutoCAD drawing area and consequently, they are also in the pasted image. Of course it may be possible to paint them out using the appropriate Photoshop tools but a better option is to remove them at source.
First of all, you can turn off the UCS icon before using Print Screen. See the Settings section of the UCS Icon tutorial to find out how to do this. Secondly, make sure that the cursor is moved out of the AutoCAD drawing area when you use Print Screen. Having taken these two simple steps, you will find that you can get a decent image of your AutoCAD drawing into Photoshop.

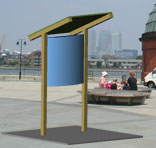 The illustration above shows the final image in Photoshop with the UCS icon and the cursor removed before using Print Screen. This image can now be manipulated in any way you want using any of the Photoshop tools and filters.
The illustration on the left shows the AutoCAD model on a photographic background, created using Photoshop layers. This is just one of the many things you can do with your AutoCAD drawing once you get it into Photoshop.
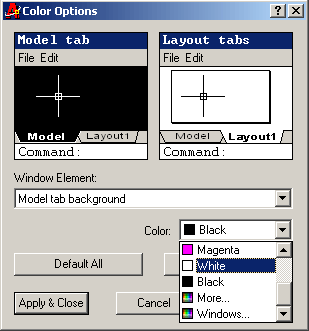 Remember that you are not tied to the standard background color (black) in AutoCAD. If you want an image on a white background or any other colour, simply change the AutoCAD background colour. To do this, select from the AutoCAD pull-down menu and click the Display tab in the Options dialogue box. In the Window Elements section, you will see the Colors button, this will take you to the Color Options dialogue box.
Set the Window Element to "Model tab background" and then select a colour from the Color drop-down list. The list only shows the AutoCAD standard colours but you can set the background to any custom colour by selecting Windows from the list and then using the standard Windows colour palette.
The Print Screen method is one that will work in any situation and with any type of AutoCAD drawing, whether it be line work, shaded solids or rendered. However, it has one major drawback. If you use Print Screen, you are fundamentally tied to the maximum resolution of your monitor. If you are working at say, 1280x1024, that's the largest image size (in pixels) that Print Screen can deliver and you always know that you will lose some of that to toolbars and the like. If you need a higher resolution image of your AutoCAD drawings, you will have to use a different method.
Top of page
Encapsulated PostScript Files
Probably the best file format to use when moving line work from AutoCAD to Photoshop is the EPS (Encapsulated PostScript) file format. This is because EPS is actually a vector file format. The rasterisation takes place within Photoshop and you can control the size and resolution of the resulting image. AutoCAD offers two methods for creating EPS files from drawings. The simplest method involves using the Export command and that is the method we will cover next. The second method involves plotting to an EPS file using a dummy plotter configuration. Although this second method sounds a little complicated, it is well worth trying since it produces superlative results. We will cover that method later in this tutorial.
Top of page
Exporting to EPS
This next method is only really suitable for line work. However, it is relatively quick and easy and it gives moderately good results as long as you don't need high resolution images with fine control over line weight.
First of all, arrange your AutoCAD drawing within the drawing area so that you can see everything you want to export. Exporting to EPS works like the Plot Display option so that if there are objects in your drawing that are off screen, they won't be exported. If you want to export the whole drawing, use the Zoom Extents command ![]() before you start.
before you start.
Next, select from the pull-down menu. When the Export Data dialogue box appears, set the "Files of type" to "Encapsulated PS" using the drop-down list. Next, select a suitable location for the file you are about to create and give the file a name. Finally, click the Save button to create the EPS file.
When the exported file is opened in Photoshop, the result can be quite crude. The two images above show the comparison between the original AutoCAD image and the exported image in Photoshop. In some cases, you can improve upon this by using the PostScript Out Options dialogue box. This dialogue box allows you to set the notional paper size of the exported image and this will help to bring the raster line width down in relation to the overall size of the image. You can also play about with the scale settings but generally, it is very difficult to control the resulting line weights. Setting the line weights by layer has no effect when using Export, all lines end up with the default weight.
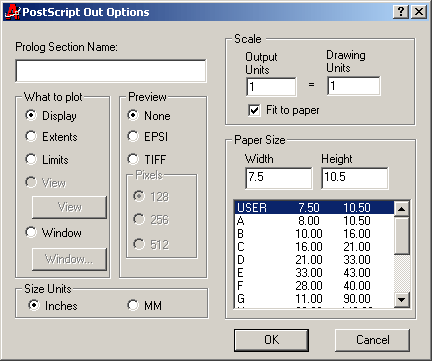 To access the PostScript Out Options dialogue box (which is extremely well hidden), select from the pull-down menu, set the file type to "Encapsulated PS" and then click
 ![]() at the top right of the Export Data dialogue box. Select from the menu. If you are using AutoCAD 2000, the dialogue box is accessed using the Options button. The resulting dialogue box is shown above. Notice that you can also set "What to plot" by changing the default (Display) to Extents, Limits, View or Window. This can be very handy if you just want to export a specific section of a drawing.
at the top right of the Export Data dialogue box. Select from the menu. If you are using AutoCAD 2000, the dialogue box is accessed using the Options button. The resulting dialogue box is shown above. Notice that you can also set "What to plot" by changing the default (Display) to Extents, Limits, View or Window. This can be very handy if you just want to export a specific section of a drawing.
You may find that using the export to EPS option suits your purposes fine, despite the limitations. However, on many occasions, you will find that the results are simply not good enough or perhaps you want the resulting image to display the different line weights that you have set in AutoCAD. The best way to achieve superb and controllable results when converting from AutoCAD to Encapsulated PostScript is to use the plotting option.
Top of page
Plotting to EPS
Plotting to EPS files is no more complicated than plotting to a physical plotter. In fact, there are actually fewer parameters to configure so in some senses it's easier. In order to plot to an EPS file, you must first set up a logical PostScript plotter, assuming that there isn't already one on your system. This is a relatively simple process. The Setting up a PostScript Plotter tutorial gives you a step-by-step guide. If you are not sure whether you have a PostScript plotter or not, see Checking your Plotter for details.
Once you have confirmed the existance of an EPS plotter on your system, select from the pull-down menu or ![]() from the Standard toolbar.
from the Standard toolbar.

When the Plot dialogue box appears, click the Plot Device tab. The first thing you must do is set the plotter name to your PostScript plotter in the Plotter configuration section. Second, enter a file name and third, set the location of the file in the Plot to file section. To change the file location, click ![]() and use the Browse for Folder dialogue to set the folder where you want the file saved.
and use the Browse for Folder dialogue to set the folder where you want the file saved.
Now, click the Plot Settings tab and make settings such as paper size, orientation and scale. Pay particular attention to the paper size setting because when you open the file in Photoshop, you will want to create a page of the same size. This will enable you to maintain the scale of the drawing when you print from Photoshop.
Don't forget to preview the plot before committing yourself. When you are happy with the plot preview, click OK to write the EPS file.
The images above show the relationship between the original AutoCAD drawing and the rasterised EPS file in Photoshop. As you can see, the resulting line quality is at least as good, if not better than the original. In fact, with a bit of care and practice, you should be able to create high quality raster images from AutoCAD vector drawings. Once the images are in Photoshop, it is relatively easy, using Photoshop tools, to create nicely finished images. The image shown below is just one example of what's possible.
So, now that you know how to create high quality EPS files using a logical plotter, you need to know how to open those files in Photoshop so that you can start making beautiful images.
Top of page
Opening the EPS file in Photoshop
The next most common question I am asked after "How do you move AutoCAD drawings into Adobe Photoshop?" is "How do you maintain the scale of a drawing when moving from AutoCAD to Photoshop?". Actually, the answer is quite simple and Photoshop deals with it almost automatically.
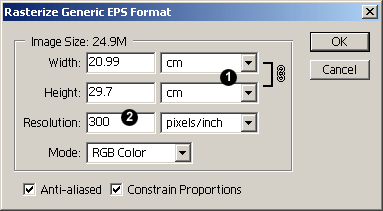 In Photoshop, select from the pull-down menu. Use the Open dialogue box to find the EPS file and click the Open button. You should now see the Rasterize Generic EPS Format dialogue box as shown on the right.
You must now change both the Width and Height parameters so that they show the paper dimensions. These should automatically match the paper size you set in AutoCAD. This information is stored in the EPS file, so that what you see in AutoCAD should be what you get in Photoshop. In the example shown here, you can see that the paper size is A4 in portrait format.
The next thing you need to consider is the resolution of the image. Curiously enough, the resolution does not affect the scale of your drawing but it will affect the quality of the final image. If your final artwork will be printed, you should set the image resolution to the same vale as the print resolution of your printer. This will ensure maximum quality when the final print is made. Once you have set the Height, Width and Resolution parameters, click the OK button to start the rasterisation process. This normally takes just a few seconds but will vary depending upon the image dimensions, the resolution and the speed of your computer. Progress is shown on the status bar at the bottom of the screen. ![]() When rasterisation is complete, the image appears in a new window.
When rasterisation is complete, the image appears in a new window.
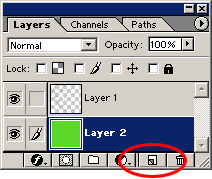 When the image appears, you will see that your AutoCAD lines are drawn on a floating layer (there is no background layer). You will also notice that the rasterised lines appear on a transparent background so you can see the grey and white checker pattern. This is very convenient because it means you can easily create a new layer, drag it below Layer 1 and fill it with whatever colour or effect you like.
Before we finish talking about opening EPS files in Photoshop, it's worth considering the options in the Rasterize Generic EPS Format dialogue box that we didn't cover earlier. If you look at the dialogue box again, you will see that there are 3 additional options; Mode, Anti-aliased and Constrain Proportions.
You can use the Mode option to control the colour mode of the incoming file. Although RGB Color is probably the best option for most circumstances, you can choose from a number of others. However, this isn't a critical decision because if need be, the colour mode can always be changed at any time after the image is created by selecting from the pull-down menu.
Probably the most useful is the Anti-aliased option. EPS files are anti-aliased by default and this results in smooth-looking lines. However, sometimes it is useful to be able to turn this feature off. It is particularly useful if you want to use the rasterised lines to form the boundaries of selected areas using the Magic Wand tool ![]() . Lines created without anti-aliasing will facilitate accurate and discrete selections. The two images above show the difference between anti-aliased lines (on the left) and lines drawn without anti-aliasing (on the right). The images are magnified X2 to demonstrate the difference more clearly.
. Lines created without anti-aliasing will facilitate accurate and discrete selections. The two images above show the difference between anti-aliased lines (on the left) and lines drawn without anti-aliasing (on the right). The images are magnified X2 to demonstrate the difference more clearly.
Finally, the Constrain Proportions option allows you to modify the aspect ratio of the new image. In other words, it removes the link between width and height. I would caution against this unless you have a specific reason. Changing the aspect ratio of the incoming image can affect the scale of the printed image.
Top of page
Render to File
The EPS file format is great for transferring line images from AutoCAD to Photoshop but it isn't much use if you need to transfer a shaded or rendered image. For that, we must use a different approach.
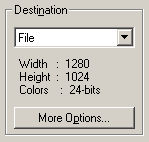 As you have probably discovered, if you have used the AutoCAD renderer, the rendered image appears on the screen so that you can see the results. This option works fine if you intend to use Print Screen to transfer the image to Photoshop. However, this is only the default option and you can direct the rendered image to other destinations. If you look at the Render dialogue box, you will notice that there is a section called "Destination". By default, the destination is set to Viewport. This means that the rendered image will be displayed in the current viewport. If you click the down-arrow, you will see that there are two other destinations, "Render Window" and "File".
The Render Window option causes the rendered image to be displayed within a separate render window. The render window is useful for certain things; for example, you can print a rendered image directly from the render window and this is the only way that this can be done from within AutoCAD. You can also save rendered images to file but the range of options is very limited. In fact, you can only save BMP format files.
The File option is much the better option for creating high resolution rendered images because it offers a range of parameters that give a great deal of control over file format, colour depth and image size.
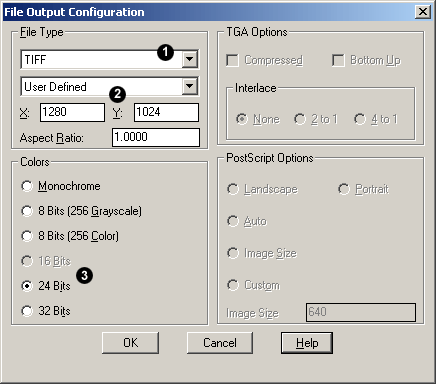 Rendering to file is no more difficult than rendering to viewport. Simply make all the usual settings in the Render dialogue box for the type of render you want and then set the destination to "File". When you do this, you will notice that the More Options button becomes active. Click on this button to display the File Output Configuration dialogue box, shown on the right.
Setting the raster file output parameters is a simple 3-step process, described below.
- From the first drop-down list in the File Type section of the dialogue box, select your preferred raster file format. There are a number to choose from. If you are not sure which one is right for you, I suggest using TIFF (Transfer Image File Format) since this is probably the most widely compatible format.
- Now, click on the next drop-down list under File Type and select a size for the rendered image. These sizes are expressed in pixels. Most of the preset sizes are relatively modest and if you want to create an image with large pixel dimensions that is capable of being printed in high quality (usually 300dpi), you will need to set the size to "User Defined" and then enter the required dimensions in the edit boxes labelled "X" and "Y".
- Finally, select the required colour depth. For most purposes the "24 Bits" option will give you what you need. 24 bit colour depth, also known as "True Colour", uses 16 million colours to describe raster images and is widely compatible. The 32 Bits option does not add any more colour information but it can be used to store additional channel information. In fact, if you intend using your rendered images in Photoshop for photomontage purposes, using a 32 bit colour depth may well be advantageous. AutoCAD uses the additional information to store an alpha channel that can be used to define a selection in Photoshop. See the Tips & Tricks section to find out how this works.
Once you have set all the necessary parameters in the File Output Configuration dialogue box, click the OK button to return to the Render dialogue box. Provided you are happy with the other render settings, click on the Render button. Since you have specified the destination as "File", you now see the Rendering File dialogue box where you can specify the file name and location. When you click the Save button, the AutoCAD drawing will be rendered and written to the specified file. You will not see the rendered image appear in the viewport, so don't assume that something has gone wrong. In fact, this is a rather annoying feature since it means that there is no preview of the rendered image. I suggest that you keep the render destination set to Viewport so that you can preview the rendered image and then change to File when you are happy with what you see. That way, you know what you are going to get.
The final step in this process is a very simple one. Start Adobe Photoshop (or any other image editor) and open the file you just created, from the pull-down menu.
Be aware that there are a number of render types selectable from the Render dialogue box. The two images above illustrate the range of render effects available. The default render type gives an effect similar to Gourad shading and there are no materials, no lights and no shadows. The Photo Raytrace render type gives the best render quality that AutoCAD can muster and this includes materials (if assigned), lights (if existing) and shadows (if configured).
Top of page
Tips & Tricks 
Matching Scales and Pixels
There may be many occasions when you want to match the scale of an EPS file to an existing raster image. This is a very common requirement when dealing with maps. You may have drawn some information in AutoCAD and you then want to overlay it onto a raster plan or map base in Photoshop. The illustrations below show a typical example. The results of a topographical analysis created in AutoCAD are shown on the left and this data needs to be overlaid on an Ordnance Survey 1:50,000 raster map tile in Photoshop, shown on the right.
Initially, this seems rather a conundrum but in fact, all we need to know is the map scale and the resolution of the raster image. Since we know the map scale (in this case 1:50,000), all we need to find is the resolution of the raster map. Even this is relatively straight forward.
We know that the grid lines on the raster map are 1km apart. We also know that the grid lines on a printed 1:50,000 scale map are 2cm apart. All we need to know now is how may pixels there are between the grid lines on the raster image. This can be achieved using the Measure tool ![]() in Photoshop. If we measure the distance between grid lines, we find that there are 200 pixels per kilometer. This is consistent with the overall dimensions of Ordnance Survey raster maps. The 1:50,000 data set comes in 20km x 20km tiles and each tile measures 4,000 pixels x 4,000 pixels. A quick calculation confirms our measurement. Now that we know this, we can calculate the resolution. If there are 200 pixels per kilometer and each kilometer prints at 2cm, the resolution must be 100 pixels per centimeter. See the Ordnance Survey web site for more information on the 1:50,000 raster map series.
in Photoshop. If we measure the distance between grid lines, we find that there are 200 pixels per kilometer. This is consistent with the overall dimensions of Ordnance Survey raster maps. The 1:50,000 data set comes in 20km x 20km tiles and each tile measures 4,000 pixels x 4,000 pixels. A quick calculation confirms our measurement. Now that we know this, we can calculate the resolution. If there are 200 pixels per kilometer and each kilometer prints at 2cm, the resolution must be 100 pixels per centimeter. See the Ordnance Survey web site for more information on the 1:50,000 raster map series.
 So, we must now print the AutoCAD drawing to an EPS file at a scale of 1:50,000 and then open the resulting file in Photoshop at a resolution of 100 pixels/cm.
In AutoCAD, plot the drawing to EPS, setting the scale to 1:50,000 or 1mm = 50000 drawing units (assuming that your drawing units are in millimeters). In most cases the drawing unit used for mapping data is the meter. If this is the case, your scale should be set to 1000mm = 50000 drawing units. Select an appropriate paper size and make sure that you preview the plot to ensure you get what you expect when you open the EPS file.
Of course, all of the above assumes that you will be plotting from Model Space, which is probably the simplest thing to do but you can plot from a Paper Space layout if you want to. In this case, you will need to scale the view in the viewport rather than the plot.
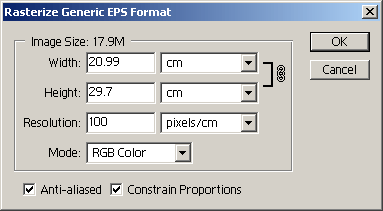 In Photoshop, open the EPS file you just created. from the pull-down menu. Select the EPS file and when you see the Rasterize Generic EPS Format dialogue box, ensure that the Width and Height are expressed in centimeters and that the Resolution is expressed in pixels/cm. Once you have done this, you can set the resolution value to 100. The dialogue should now look like the one shown on the above. Click the OK button to rasterise the file. This may take a couple of minutes if the required pixel dimensions are large.
Once you have both the map base image and the imported EPS image in Photoshop, you can use the layers palette to drag the EPS layer and drop it over the map base. Make sure that the colour mode of the two images is the same otherwise nothing will happen. Ordnance Survey raster maps tend to be saved in Index Colour so you may have to change the mode to RGB Colour. You should find that the image created from your AutoCAD drawing corresponds exactly to the scale of the underlying image. All you need to do now is position the image accurately over the map base to create a perfect match.
One final tip worth mentioning at this stage is that if you have mapping information that you want to combine with an underlying map, consider setting the layer blending mode to "Multiply". The illustrations above show the effect of the layer blending mode set to "Normal" (the default) on the left and set to "Multiply" on the right.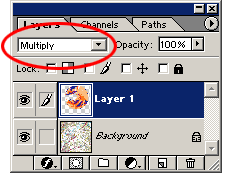 Notice that although the colour remains strong, you can see the underlying detail. This gives a much better effect than simply reducing the opacity of the layer.
To set the blending mode of a layer, click on the layer name in the Layers palette to make that layer current. Then, click the down arrow at the top left of the Layers palette and choose from the list of blending modes. As you will see, there are lots of them. If you haven't come across the layer blending mode options before, try them out and see the various effects you can create.
Using Channel Information (32 bit colour)
You may have noticed that when you set the colour depth for a render to file, some of the file formats offer a 32 bit colour option. You may well wonder what the point of this is when a 24 bit colour depth will give a "True Colour" result. The truth is that the extra data space assigned to each pixel in a 32 bit image is not used to store extra colour information but it can be used for other things.
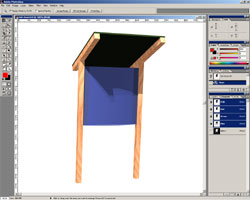 When AutoCAD renders at 32 bit colour, it uses the extra data to save "channel" information. This channel information can be used for various things but most commonly it is used to create selections. When AutoCAD renders in 32 bit colour, it sets rendered pixels as selected and background pixels as unselected. So, for example, as well as knowing what colour it is, each pixel also knows whether it is selected or not selected. We can use this extra information in Photoshop to quickly select the rendered object. This is really useful if you intend to place your render onto a photographic background.
To test this out, try rendering some 3D object in AutoCAD using the 32 bit colour option and open the resulting file in Photoshop. On first inspection, the image looks just like any 24 bit image. However, if you click on the Channels tab on the Layers palette, you will see that in addition to the usual four RGB channels, there is an extra channel called "Alpha 1". Channels that contain selection information are often referred to as "Alpha Channels".
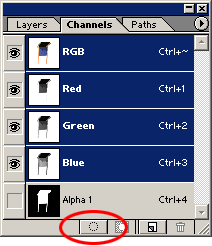 You can use this alpha channel to quickly and easily create a selection of the rendered object. There are two ways this can be done. Firstly, select from the pull-down menu. When the Load Selection dialogue box appears, you should see that the Channel value is set to "Alpha 1". Click the OK button to make the selection. You should now see the familiar selection marquee appear around the rendered object. The second method has the same result but uses the Channels Palette. Select the Alpha 1 channel in the list of channels. You will see the image turn black and white (selected pixels are white and unselected pixels are black). Now, click the "Load channel as selection" button at the bottom of the palette. The selection marquee appears but the image remains black and white. Select the RGB channel, at the top of the list to return to normal view. You can now cut and paste in the usual way.

Now that you have selected the rendered object, it is easy to cut and then paste it over a photographic background to create a simple photomontage like the one shown above.
Other Resources
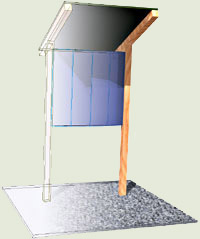 You will find plenty of free web resources for AutoCAD and for Photoshop but very few that cover the two applications working together. I hope this will change in the future because it seems to me that the AutoCAD/Photoshop workflow route is particularly fruitful. One of the few good resources can be found at ARCHIdigm where you will find the excellent Photoshop Gradient Masks over AutoCAD Drawings tutorial. This tutorial demonstrates a useful technique that can be used to give effects like the one shown on the right.
Top of page
Donate to CADTutor
If you found this tutorial useful, you might like to consider making a donation. All content on this site is provided free of charge and we hope to keep it that way. However, running a site like CADTutor does cost money and you can help to improve the service and to guarantee its future by donating a small amount. We guess that you probably wouldn't miss $5.00 but it would make all the difference to us.
ConversionConversion EmoticonEmoticon