If I were forced to give up all but one image adjustment tool, I would keep curves. Hands down. The curves adjustment tool is an integral part of every professionals knowledge base and image editing package.
Even if youve taken a good photo, chances are it can be improved or it needs to be adjusted to work in a collage or collection. Or even to just to intensify a mood. You can always make a good thing better and curves is a one-stop-shop way to do that.
With curves you are able to:
- Adjust the over-all contrast or tonal range
- Adjust the local contrast or tonal range
- Adjust the color
Lets jump in and find out how. Its simpler than it looks.
Overview
The idea behind Curves is all about remapping values. A pixel starts out at a certain brightness, and you change it to be brighter or darker.
The curves box opens as a straight line because you havent made any changes yet. That means that the brightness values before and after are the same. You will effect a change by changing the shape of the curve.
The points from left (bottom) to right (top) affect: blacks, shadows, midtones, highlights, and whites. By altering the position in these regions will affect the corresponding tonal range of your image. Leaving the line in the center will leave the tones unchanged.
You begin altering the brightness values by clicking once somewhere on the line. This will establish a point; this point can now be dragged to a different place within the grid, which causes that tonal value to change, either lighter or darker depending on whether you drag it up or down. The reason its a curve is so that the change blends smoothly throughout the image. An abrupt change in value can be very noticeable. The increasingly gradual change of the brightness values on either side of the change permit a very smooth and believable adjustment.
Its important to note, however, that you cant increase contrast in one region without decreasing it in another. The curves tool redistributes contrast. Therefore think of the image having a contrast allocation or budget and you need to decide how to best spend it.
Also, the curves tool will preserve the tonal hierarchy (unless you use uncommon negative slopes). That means that the brighter parts of the image will stay brighter even after your conversion just maybe not by the same amount.
Quick Tip
Keep effects on adjustment or separate layers to enable quick alteration or removal at any time during the color correction process. (Layer > New Adjustment Layer > Curves. Or at the bottom of the Layers panel.)
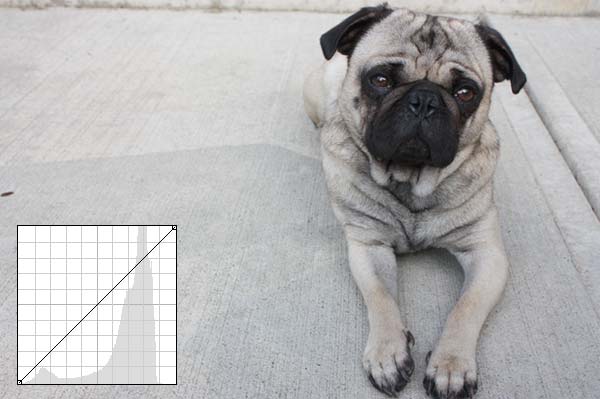
S- and Inverted S-Curves
Rollover Image
The S-Curve and the Inverted S-Curve are two curves most commonly used. The S-Curve adds contrast to the midtones while subtracting from the shadows and highlights. The Inverted S-Curve does the opposite.
Often in photography, its difficult to expose your image perfectly. Brightness or darkness in tonal ranges can benefit from optimization. The S-Curve is often useful in these cases not to mention, quick and simple.
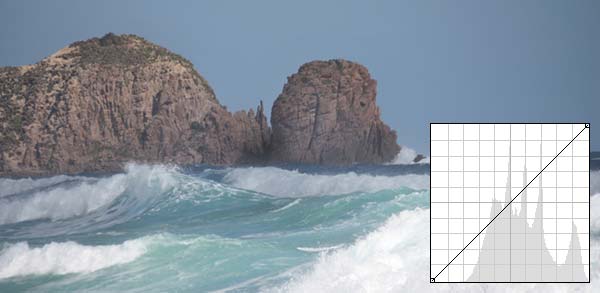
Empty Tonal Range and Histograms
Rollover Image
One very useful and important function of curves is to correct empty tonal ranges in the histogram edges (blacks and whites) or gaps in between (shadows, midtones, and highlights). An under exposed image can be helped by pulling in the black and white points to correct the exposure.
Or if there are gaps in between the tonal peaks you can decrease contrast in specific parts of your image thereby freeing up the contrast to be used in the more visible areas of your image.
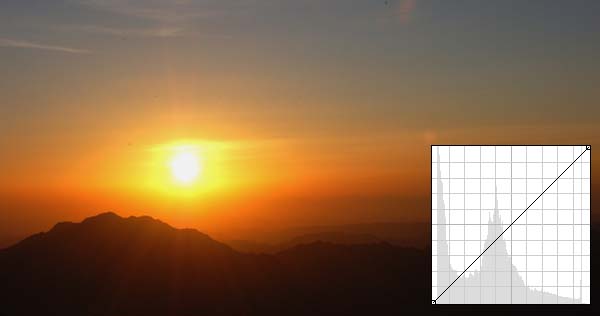
Clipped Highlights
Rollover Image
Images containing a bright light source, such as the sun, can often be harsh or posterized (also called color banding). Posterization of an image entails conversion of a continuous gradation of tone to several regions of fewer tones, with abrupt changes from one tone to another. This can create an unrealistic look, and often a smoother transition to white is preferred.
Correcting Color Balance
All curves thus far have been applied to RGB values of luminosity. But they can also be used on individual color channels to correct color casts in specific tonal regions. Often the color in an image is correctly balanced, but due to reflection or a light source with a varying temperature or color, you may see unwanted tints in a tonal region. Changing the white balance or adjusting the overall color would inadvertently harm the other tones. So we can selectively increase or decrease the amount of a color cast in the red, green, and blue channels to achieve perfect balance.
Any adjustments upward of the diagonal line in the red channel increase the red in the image. Lowering, below the diagonal line, increases the cyan. The other channels are the same: Upward in the green channel, green; lower, magenta. Upward in the blue channel, blue; lower yellow.
RGB color images should be thought of as being comprised of a composite channel and three grayscale channels containing the values of the three colors red, green and blue. This is shown in the example above of the red on the left, green in the middle, and blue on the right.
Window > Channels to see this on your image.

Rollover Image
You can see in the image above that there is a slight blueish cast in the color tone. Not to mention, the image is slightly washed out (improperly exposed).
As you can see, the sky is already quite white, so we wont want to effect the highlights and above. By lowering the curve in the midtones and shadows, without effecting the highlights, we solve the exposure problem. Then well get rid of the blue color cast: By lowering the blue in the low end, we eliminate the problem and the gowns go to black as they should be.
Note
If precise color adjustments arent required, simple color balance correction might be easier (Image > Adjustments > Color Balance).
Blending Modes
Also, curves adjustment layers (Layer>New Adjustment Layer> Curves) can be set to make curves only apply to a channel such as Color and/or Luminosity which allows for further, varied control. Another benefit is that it can make your adjustments more subtle through use of the opacity controls for the layer.
Notes
Practice makes perfect. The more you use the tools and techniques available to you the better youll get, improve your photography, and have fun.
Here are some things to remember when using the curves tool:
- Minimize use of the curves tool, as anything which stretches the image histogram increases the possibility posterization.
- Avoid the use of the curves tool on an already altered image.
- Perform curves on 16-bit images when possible. (Image > Mode > 16 Bits/Channel)
- For extreme levels of color correction, consider applying curves using LAB mode.
How To Use Curves in Photoshop | Tutorial9
The curves adjustment tool is an integral part of every professional's knowledge base and image editing package.
Curves in Photoshop explained Photoshop Tutorial ...
How to use curves in photoshop. In this photoshop tutorial, Colin Smith shows how to adjust photographs using curves, PhotoshopCAFE.com
Using the Photoshop Curves Tool - Cambridge in Colour ...
TUTORIALS: PHOTOSHOP CURVES. The Photoshop curves tool is perhaps the most powerful and flexible image transformation, yet it may also be one of the most intimidating.
Photoshop Pen Tool Guide | Tutorial9
Im going to show you how to use the Pen tool in Photoshop to create how to use pen tool and give curves by 2015 tutorial9
Curves :: Photoshop Tutorial Learn the Power of Curves!
http://www.tutvid.com/tutorials/photoshop/tutorials/curvesAdjustment.php Learn the basics of Curves http://www.tutvid.com/tutorials/photoshop
Adobe Photoshop Tutorials by Tutorial9
You can find here all the 59 tutorials by Tutorial9. The author's home page URL is http://www.tutorial9.net. Sort How To Use Curves in Photoshop.
Photoshop Tutorials - Photoshop Design Curve Tutorial
How To Use Curves in Photoshop Photoshop. tutorial9.net,8 Images, 1978 words. If I were forced to give up all but one image adjustment tool, I would keep curves.
Photoshop Tutorial: How to Use the Curves Tool Video
Photoshop Tutorial: How to Use the Curves Tool, About.com Graphics Software
Adobe Photoshop on Pinterest | 36 Pins
How To Use Curves in Photoshop | Tutorial9. tutorial9.net Pin it. Like. slrlounge.com. How to
How To Use Curves in Photoshop - StumbleUpon
How To Use Curves in Photoshop Facebook. Twitter. Discover a More Interesting World Loading Stumble
Travelling is my life
ConversionConversion EmoticonEmoticon