Written by Steve Patterson. In a previous Photoshop photo effects tutorial, we learned how to create a simple mirror effect with an image by flipping the right side of the photo horizontally to create a reflection of the left side. In this tutorial, well take the same general idea and go much further with it, creating interesting effects, designs and patterns by doing nothing more than flipping, rotating and mirroring the same image over and over again! Well also experiment with Photoshops layer blend modes to see how different blend modes can dramatically change our results!
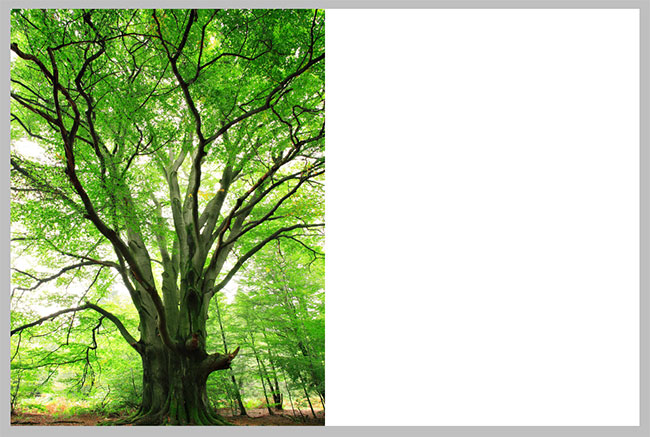
You can use any photo you like for this tutorial, but the effect tends to work best if you start with an image that already contains some sort of interesting pattern or design. Im going to use this photo of trees. Its the same image I used in the Adding Sunlight Through The Trees tutorial but it should work great thanks to all the tree branches heading off in different directions:

The original image.
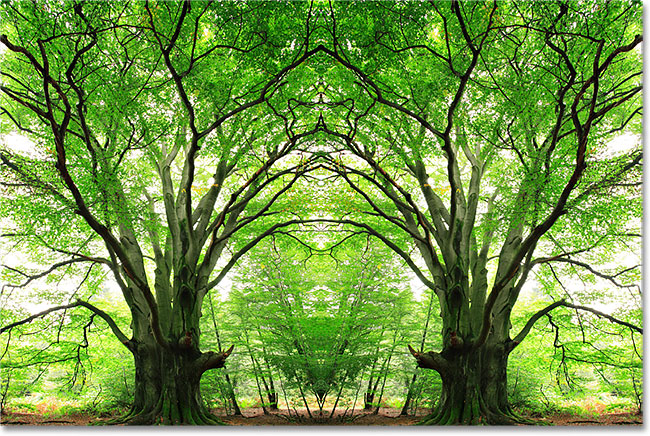
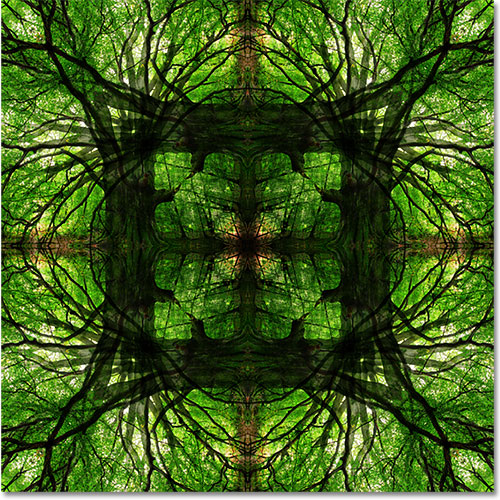
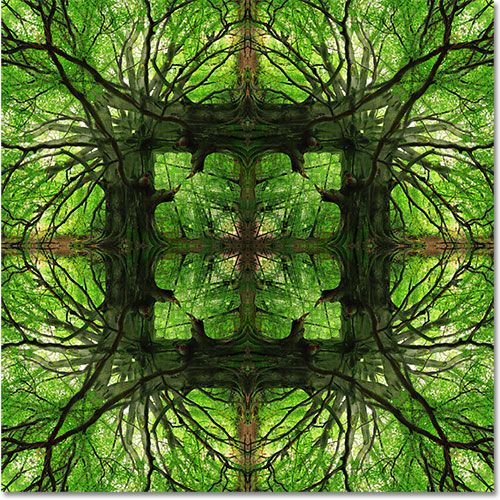
Heres just one example of the sort of design or pattern we can create from it in just a few easy steps. Every photo you try this with will give you different results:
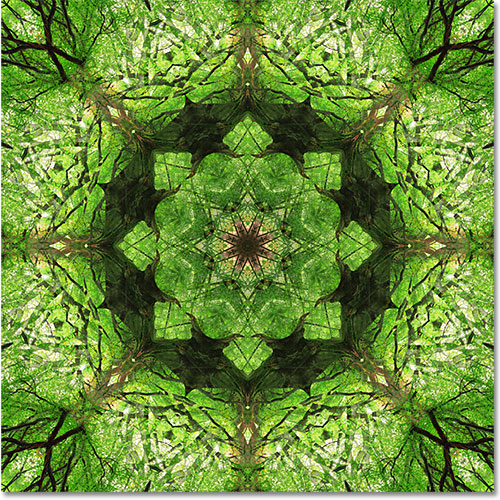
One possible design. Your results will depend on your photo and the blend modes you choose.
Important Note: Make sure you work on a copy of your image, not the original, when creating this effect since there wont be any way to get the original back later if you need it. To create a copy, go up to the File menu at the top of the screen and choose Save As, then save the image under a different name.
Ill be using Photoshop CS4 in this tutorial but any version should work. Lets get started!
Step 1: Switch To Full Screen Mode With Menu Bar
Before we begin, lets make a quick change to the way Photoshop is displaying our image so it will be easier to see what were doing as we make our way through the steps. By default, Photoshop displays images in floating document windows, which is usually fine. In this case though, since were going to be increasing our canvas size quite a bit, it will be easier for us to work in one of Photoshops full screen modes. Once youve opened the image you want to work with, go up to the View menu at the top of the screen, choose Screen Mode, and then choose Full Screen Mode With Menu Bar:

Switching to Full Screen Mode With Menu Bar will make it easier to see what were doing.
You can also cycle through all of Photoshops screen modes by repeatedly pressing the letter F on your keyboard. Full Screen Mode With Menu Bar will switch Photoshop to full screen, displaying a gray pasteboard area around your photo (the other Full Screen Mode will do the same thing but it hides the Menu Bar, as well as all of your palettes). To get back to the document window mode at any time, go back up to the View menu, choose Screen Mode, and then choose Standard Screen Mode, or simply press the letter F a couple of times.
Step 2: Crop Away Any Unwanted Areas Of The Photo
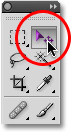
To begin, lets remove any areas of our image that we dont really need for the effect. In my case, I want to keep the trees themselves but the ground below them doesnt look very interesting and probably wont add anything to the final design or pattern, so Ill crop the ground away. Do do that, Ill select Photoshops Crop Tool from the Tools panel. I could also press the letter C on my keyboard to select it with the shortcut:
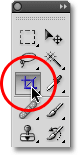
Select the Crop Tool.
With the Crop Tool selected, click and drag a cropping border around the area of the image you want to keep. In my case, Ill click in the top left corner of the photo to add a starting point, then while holding my mouse button down, Ill drag down and to the right to a spot an inch or so above the bottom right corner of the image. This will keep the trees inside the crop border, while everything along the bottom of the image will be cropped away:
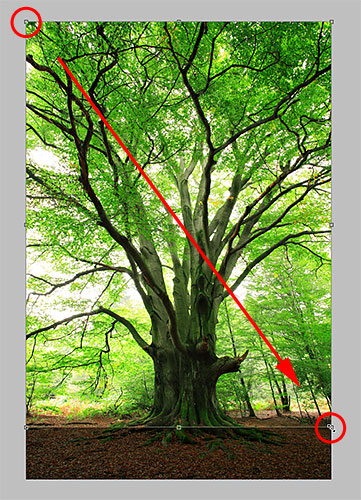
Click and drag a cropping border around the area you want to keep.
Press Enter (Win) / Return (Mac) when youre done to crop away the unwanted areas. Heres my image now with the ground along the bottom removed:
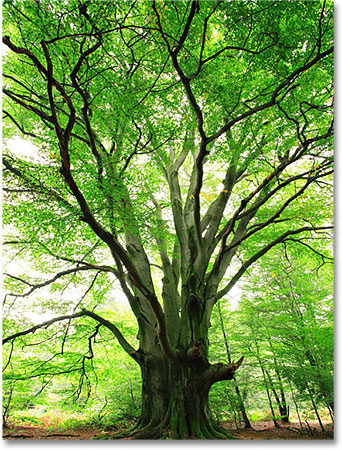
The remaining part of the image should create some interesting designs.
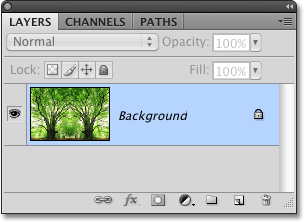
Step 3: Duplicate The Background Layer
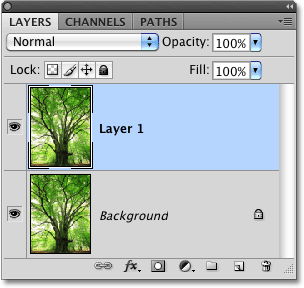
If we look in our Layers palette, we see that we currently have only one layer, named Background. This is the layer our image is sitting on:

Our Photoshop document contains just one layer at the moment.
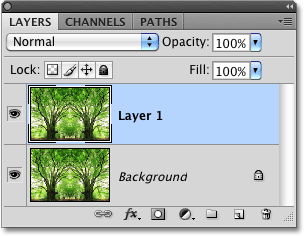
We need to create a copy of this layer. To do that, go up to the Layer menu at the top of the screen, choose New, then choose Layer via Copy. Or, for a faster way to duplicate a layer, press the keyboard shortcut Ctrl+J (Win) / Command+J (Mac):
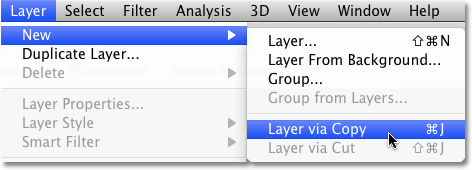
Go to Layer > New > Layer via Copy, or press Ctrl+J (Win) / Command+J (Mac).
Either way tells Photoshop to make a copy of the layer, and if we look again in the Layers palette, we see that sure enough, a new layer, which Photoshop has automatically named Layer 1, has been added above the original:
The new layer contains its own copy of the photo for us to work with.
Step 4: Double The Width Of The Canvas
Go up to the Image menu at the top of the screen and choose Canvas Size:
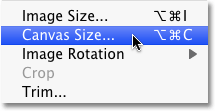
Go to Image > Canvas Size.
This opens Photoshops Canvas Size dialog box which we can use to add more canvas space around our photo. We need to double the current width of our canvas, and we want all of the extra canvas space to appear on the right side of our image. To do that, set the Width value to 200 percent and the Height to 100 percent (which will leave the height of the canvas at its current size). To force the extra canvas space to the right side of the photo, click on the left middle square in the Anchor grid:
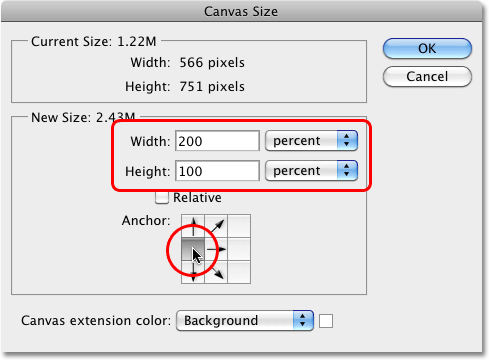
Enter 200 percent for the Width, 100 percent for the Height, and click on the left middle square in the Anchor grid.
Click OK when youre done to close out of the dialog box. Photoshop doubles the width of the canvas, adding all of the extra space on the right side of the photo. By default, Photoshop fills the extra canvas space with white:
The extra canvas space appears on the right side of the photo.
Step 5: Drag The Photo On Layer 1 To The Right Of The Original Image
Now that weve added our extra canvas space, we need to drag the copy of our image on Layer 1 into the new area. Select the Move Tool from the Tools palette, or press the letter V on your keyboard to select it with the shortcut:
Select the Move Tool.
Make sure Layer 1 is selected in the Layers palette (selected layers are highlighted in blue). Hold down your Shift key, then click inside the document and drag the photo on Layer 1 over to the right side of the original image. Holding the Shift key down as you drag will limit the direction you can move, making it easy to drag the photo horizontally. When youre done, you should see two copies of the photo sitting side by side each other:
Click and drag the copy of the image to the right of the original.
Step 6: Flip The Image On The Right Horizontally
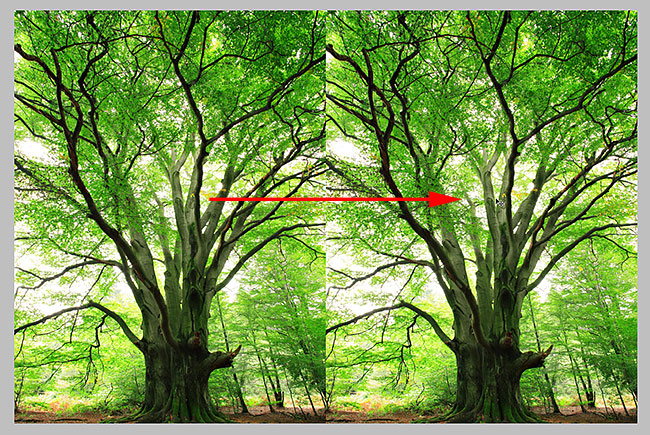
So far, all we have are two identical twins. Lets create our first mirror effect by flipping the image on the right horizontally so it appears as a reflection of the one on the left. Go up to the Edit menu at the top of the screen, choose Transform, and then choose Flip Horizontal:
Go to Edit > Transform > Flip Horizontal.
The photo on the right instantly becomes a mirror reflection of the photo on the left, creating our first effect:
The image on the right is now a mirror copy of the one on the left.
Step 7: Merge The Two Layers Together
So far, so good, but as they say, but weve only just begun. Lets merge our two layers into a single layer by going up to the Layer menu at the top of the screen and choosing Merge Down, or press Ctrl+E (Win) / Command+E (Mac) to select the Merge Down command with the keyboard shortcut:
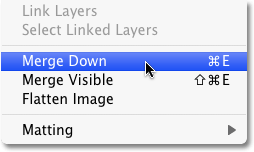
Go to Layer > Merge Down, or press Ctrl+E (Win) / Command+E (Mac).
Nothing will seem to have happened in the document, but if we look at our Layers palette, we can see that our two layers have been merged into a single layer:
The mirror effect is now contained on a single layer.
Step 8: Duplicate The Layer
Just as we did back in Step 3, lets duplicate the layer. Press Ctrl+J (Win) / Command+J (Mac) to quickly duplicate it using the keyboard shortcut. A copy of the layer appears above the original in the Layers palette:
Press Ctrl+J (Win) / Command+J (Mac) to quickly duplicate the layer.
Step 9: Double The Height Of The Canvas
Were going to create another reflection of our image, this time vertically. For that, we need to double the height of our canvas and have the new canvas space appear below our existing image. Lets once again bring up the Canvas Size dialog box by going up to the Image menu at the top of the screen and choosing Canvas Size. When the dialog box appears, set the Width to 100 percent (which will leave the width of the canvas at its current size) and the Height to 200 percent. To force the extra space to appear below the image, click on the top middle square in the Anchor grid:
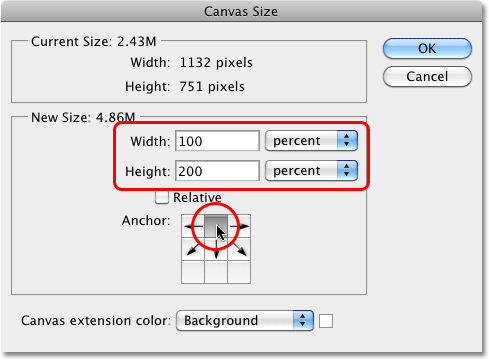
Enter 100 percent for the Width, 200 percent for the Height, and click on the top middle square in the Anchor grid.
Click OK to close out of the dialog box. Photoshop adds the additional canvas space below the image. If you cant see the entire canvas area because it has become too large to fit on your screen, go up to the View menu and choose the Fit on Screen command, or press Ctrl+0 (Win) / Command+0 (Mac). Photoshop will zoom the image out to whatever level is needed for it to fit:
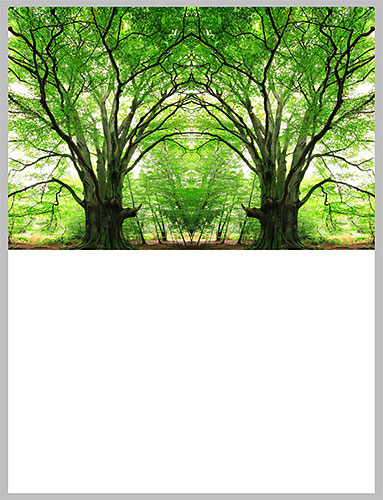
The extra canvas space has been added below the image. Press Ctrl+0 (Win) / Command+0 (Mac) to fit the document on screen if needed.
Step 10: Drag The Image On Layer 1 Below The Original
With the Move Tool selected in the Tools panel and Layer 1 selected in the Layers palette, click inside the document and drag the photo on Layer 1 down below the original image. Hold down your Shift key as you drag to limit the direction you can move, making it easy to drag the photo straight down:
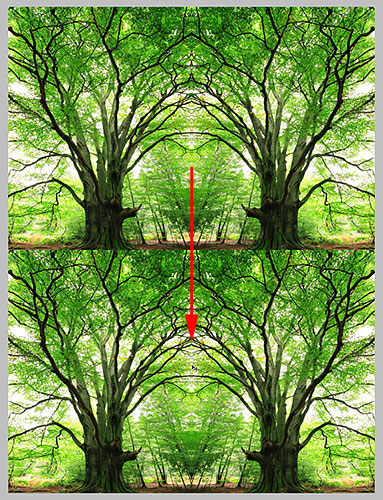
With the Move Tool selected, drag the image on Layer 1 down below the original image.
Step 11: Flip The Bottom Image Vertically
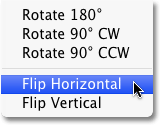
To turn the bottom image into a mirror reflection of the top image, go up to the Edit menu, choose Transform, and then choose Flip Vertical:
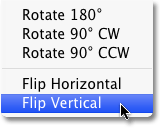
Go to Edit > Transform > Flip Vertical
We now have our second mirror reflection, this time vertically:

The bottom image is now a reflection of the top image.
So far, all weve been doing is making copies of the image and flipping them horizontally or vertically. Lets see how much further we can take things by rotating copies of the image and trying out different layer blend modes!
Step 12: Merge Both Layers Onto A New Layer
Lets merge both of our existing layers onto a brand new layer. To do that, hold down your Alt (Win) / Option (Mac) key and, while still holding the key down, go up to the Layer menu and choose Merge Visible down near the bottom of the list of options:
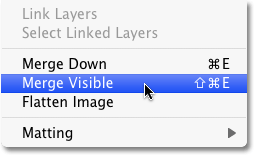
Hold down Alt (Win) / Option (Mac) and go to Layer > Merge Visible.
Normally, the Merge Visible command would have merged our two layers into a single layer, similar to the Merge Down command we used earlier, but by holding down the Alt / Option key as we select the command, we tell Photoshop to create a brand new layer and merge our existing layers on to the new layer. We can see in our Layers palette that we now have a third layer (Layer 2), and we can see in its preview thumbnail that it contains a merged copy of the images from the original two layers below it:
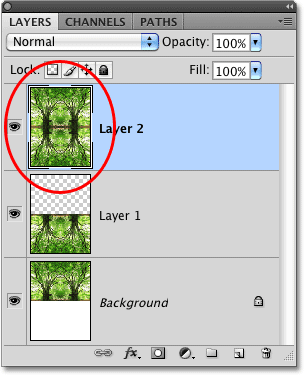
Holding down the Alt / Option key allowed us to create a merged copy of our layers without losing the original layers.
Step 13: Rotate The New Layer 90°
Go up to the Edit menu, choose Transform, and then choose Rotate 90° CW:
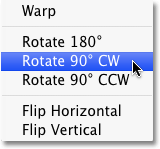
Go to Edit > Transform > Rotate 90° CW.
This will rotate the image on Layer 2 90° clockwise inside the document:
The new layer has been rotated 90° clockwise.
Step 14: Crop The Document Around The Rotated Image
Lets clean up the design by cropping the document around the rotated image. Hold down your Ctrl (Win) / Command (Mac) key and click directly on the preview thumbnail for Layer 2 in the Layers palette:
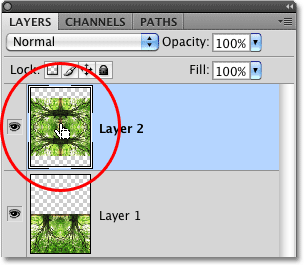
Hold down Ctrl (Win) / Command (Mac) and click on Layer 2s preview thumbnail.
This will place a selection outline around the rotated image in the document. With the selection outline in place, go up to the Image menu at the top of the screen and choose Crop:
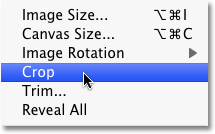
Go to Image > Crop.
Photoshop crops the document, removing the areas that extended above and below the rotated image. Press Ctrl+D (Win) / Command+D (Mac) to quickly remove the selection outline since we no longer need it:
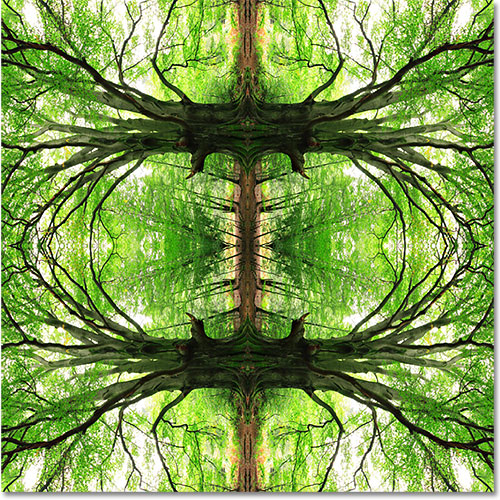
The document after cropping it around the rotated image.
Step 15: Change The Layer Blend Mode
At this point, things start to become a bit more experimental and a matter of personal taste. Currently, the image on Layer 2 is completely blocking the layers below it from view, which isnt what we want. We need to blend the layers together, and we can do that by simply changing Layer 2s blend mode. The blend mode option is located at the top of the Layers palette. By default, its set to Normal, with "Normal" meaning that the layer is not blending at all with the layers below it. Lets try out a few different blend modes and see what we get. Ill change my blend mode to Multiply:
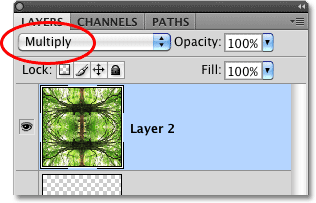
Changing the blend mode for Layer 2 from Normal to Multiply.
The Multiply blend mode does a nice job of blending my images together to create an interesting design, but its also darkened the image quite a bit:
Multiply creates an interesting but dark pattern.
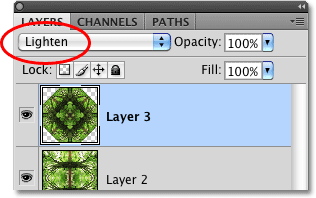
Ill try a different blend mode, Lighten, which should give me a much brighter effect:
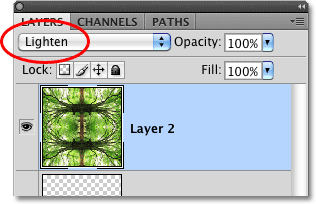
Changing the blend mode for Layer 2 to Lighten.
The Lighten blend mode has definitely brightened things up and given me another interesting design:
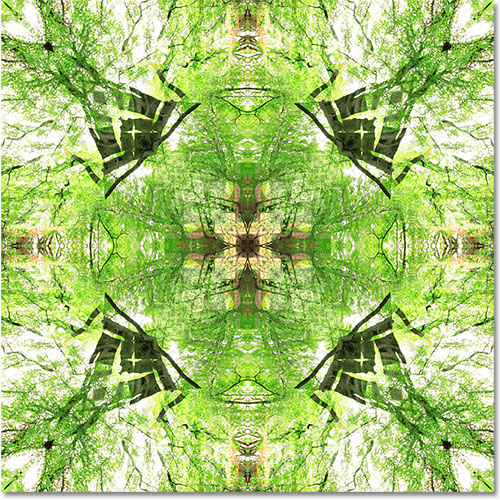
Lighten creates another interesting and much lighter design.
Obviously, I could go through each blend mode here and youll want to do just that on your own, but to save time, Ill try one more, the Darken blend mode:
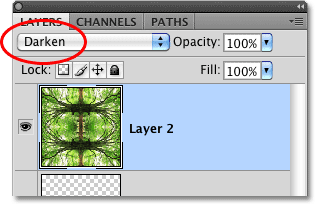
Trying a third blend mode, this time Darken.
In my case, I think Darken gives me the best results, but of course the blend mode you end up choosing could be different:
The Darken blend mode is, in my opinion anyway, the winner.
Lets try rotating one more copy of the image, changing the blend mode, and seeing what we get!
Step 16: Merge Both Layers Onto A New Layer
Once again, lets merge our existing layers onto a new layer. Hold down your Alt (Win) / Option (Mac) key just as we did before and, while still holding the key down, go up to the Layer menu and choose Merge Visible. A new merged layer (Layer 3) appears above the original layers in the Layers palette:
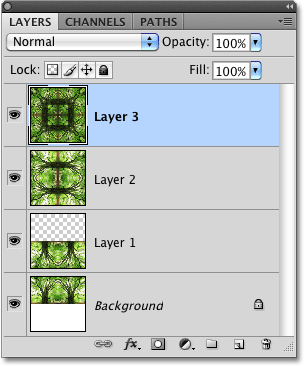
Photoshop always adds new layers directly above the layer that was previously selected (which was Layer 2).
Step 17: Rotate The New Layer 45°
With the new layer (Layer 3) selected in the Layers panel, go up to the Edit menu, choose Transform, and then choose Rotate:
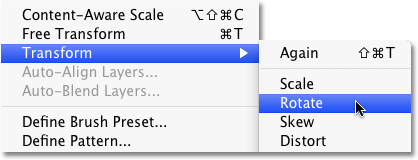
Go to Edit > Transform > Rotate.
The Options Bar along the top of the screen will change to display options for transforming the contents of the layer. Enter 45.0 into the Angle input box to tell Photoshop to rotate the image on Layer 3 by 45° clockwise:

Enter 45.0 into the Angle input box.
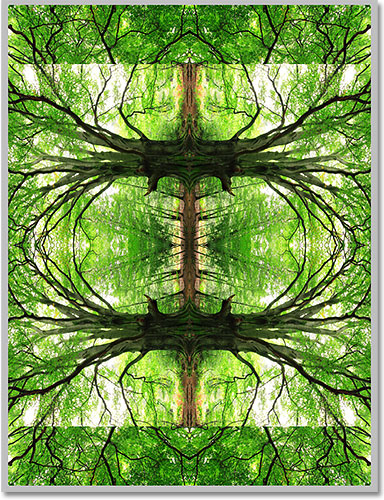
Press Enter (Win) / Return (Mac) once to accept the angle that youve entered, then press Enter (Win) / Return (Mac) a second time to exit out of the Rotate command. Heres my design with Layer 3 now rotated:
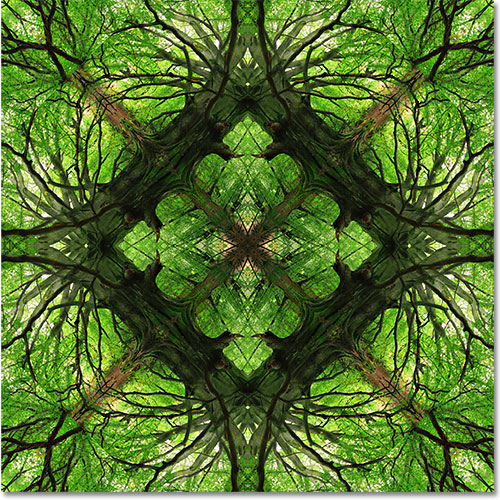
The effect after rotating Layer 3 by 45°.
Step 18: Change The Blend Mode
Finally, try out different blend modes just like we did before to see how each one affects the way the rotated image on Layer 3 blends in with the layers below it. Different blend modes will give you different results. After trying out a few blend modes on my own, Im going to choose Lighten this time:
Experiment with the blend modes to get different effects and patterns. Im going to go with Lighten.
And here, after a series of copying, dragging, flipping, merging, and rotating layers, and playing around with different blend modes, is my final result:
My final design.
And there we have it! Thats how to create interesting designs and patterns by flipping, rotating and mirroring images in Photoshop!
Download our tutorials as print-ready PDFs! Learning Photoshop has never been easier!
You May Also Like...
Flip, Rotate and Mirror Designs and Patterns in Photoshop
Learn how to create fun and interesting designs and patterns from a single image in Photoshop with simple transformations and blend modes!
Flip, Rotate And Mirror Designs And Patterns
Flip, Rotate And Mirror Designs And Patterns. Tool In Photoshops Camera Raw Download 50 Beautiful High Resolution Patterns for Photoshop Fun with silhouettes
Flip, Rotate and Mirror Designs and Patterns in Photoshop
Photo Effects: Flip, Rotate and Mirror Designs and Patterns By Steve Patterson, Photoshop Essentials.com Flip, Rotate and Mirror Designs and Patterns in Photoshop
Flip, Rotate and Mirror Designs and Patterns Adobe Photoshop
Flip, Rotate and Mirror Designs and Patterns. Report www.photoshopessentials.com In Adobe Photoshop, patterns are a great way to include fascinating repeating
Flip, Rotate and Mirror Designs and Patterns - Photoshop ...
Flip, rotate and mirror designs and patterns in Photoshop. - View Tutorial » submitted: 4 years and 45 days ago
Kowalski_tips n tricks: Flip, Rotate and Mirror Designs ...
Kowalski_tips n tricks: Flip, Rotate and Mirror Designs and Patterns in Photoshop
Photoshop: Flip, Rotate and Mirror Designs and Patterns in ...
In this Photoshop tutorial, learn how to create fun and interesting designs and patterns from a single image by repeatedly flipping, rotating and mirroring it, and
Photoshop Tutorials | Photoshop Essentials
Welcome to Photoshop Flip, Rotate and Mirror Designs and Patterns in Photoshop Learn how to create fun and interesting designs and patterns from a single
Flip, Rotate and Mirror Designs and Patterns in Photoshop
In this Photoshop tutorial, learn how to create fun and interesting designs and patterns from a single image by repeatedly flipping, rotating and mirroring it, and
Flip, Rotate and Mirror Designs and Patterns in Photoshop
Flip, Rotate and Mirror Designs and Patterns in Photoshop. In this Photoshop tutorial, learn how to create fun and interesting designs and patterns from a single
Travelling is my life
ConversionConversion EmoticonEmoticon