Written by Steve Patterson. In this Photo Effects tutorial, well learn how to create a miniature effect in Photoshop CS6 using its brand new Tilt-Shift blur filter. Tilt-shift camera lenses are often used with architecture photography to prevent perspective distortion, or with landscape or product photos to control the plane of focus, but they can also be used to make real life scenes look more like tiny miniature sets, transforming full size people, cars, buildings and so on into little mini versions of themselves. It works by creating a shallow depth of field, the kind youd expect to see with macro photography, so your real life photo ends up looking more like a miniature scene shot up close with a macro lens.
This effect works best with a photo taken from high overhead and looking down on your subject at an angle. Youll also want a photo where everything is initially in focus, since were going to adjust the depth of field ourselves. Heres the image Ill be using:
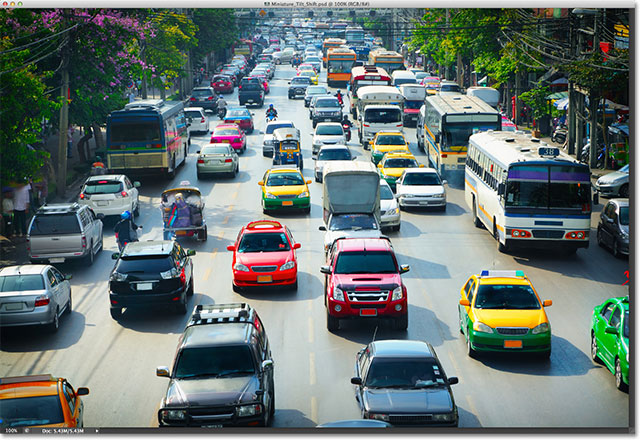
The original image.
And heres what the final miniature effect will look like:
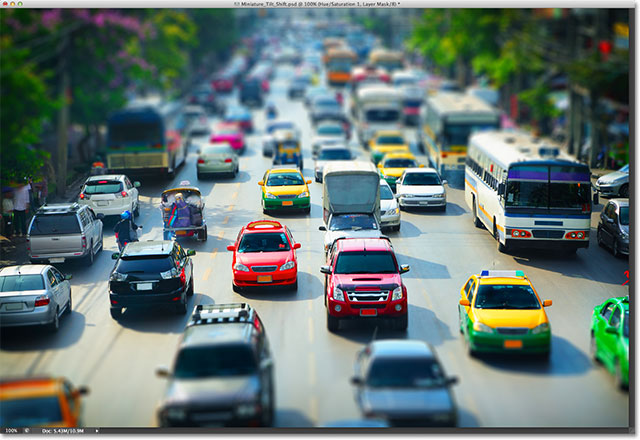
The final result.
Lets get started!
Step 1: Duplicate The Background Layer
Lets begin as we usually do by making a copy of our original photo which will serve as our working copy of the image so we dont end up making changes to the original. We can see in my Layers panel that my original image is sitting on the Background layer:
The Layers panel.
Make a quick copy of your Background layer by pressing Ctrl+J (Win) / Command+J (Mac) on your keyboard. If we look again in the Layers panel, we see a copy of the layer, which Photoshop has named Layer 1, sitting above the original:
Layer 1 appears above the Background layer.
Step 2: Select The Tilt-Shift Filter
With Layer 1 active in the Layers panel (highlighted in blue), select the Tilt-Shift filter by going up to the Filter menu in the Menu Bar along the top of the screen, choosing Blur, and then choosing Tilt-Shift:
Go to Filter > Blur > Tilt-Shift.
This opens the Blur Gallery, with the photo appearing in the large preview area that takes up most of the screen. Most of the controls we need for adjusting our blur effect can be found in this preview area, but youll find a few more options and controls for the Tilt-Shift filter in the Blur Tools panel in the top right corner of the gallery:
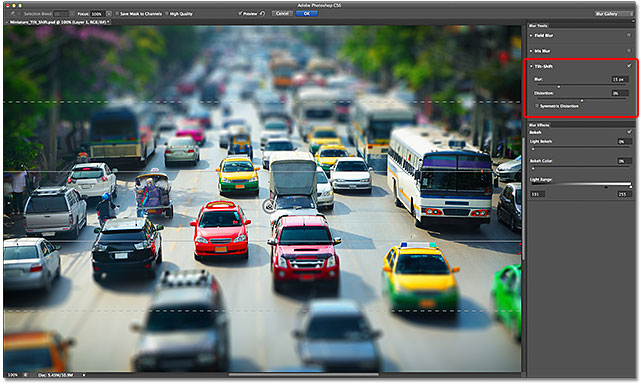
The Blur Gallery.
Step 3: Adjust The Blur Amount
If youve already read through our tutorials on the other two new blur filters in Photoshop CS6 Field Blur and Iris Blur then much of what were seeing in the preview area will look familiar to you. The dots, lines and circles overlaying the image are all part of the same pin which is used to control various aspects of the blur effect (its called a pin because we can "pin" multiple copies of it to the image if needed for even greater control over the effect).
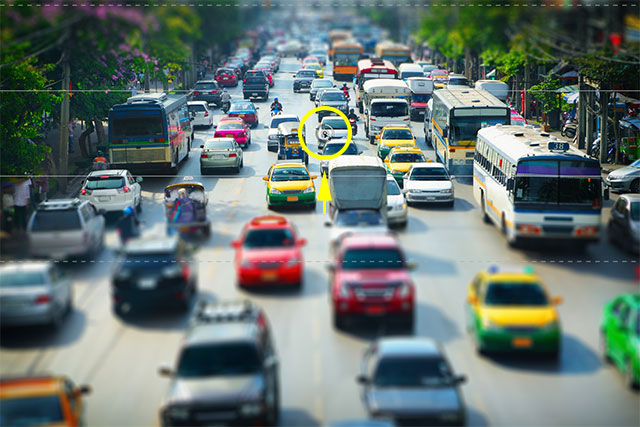
If you look at the center point of the pin, youll see an outer ring around it. This outer ring acts like a dial that lets us adjust the blur amount simply by turning the dial in one direction or the other. Move your mouse cursor over the ring, click and hold your mouse button, then drag either clockwise or counterclockwise around the ring to increase (clockwise) or decrease (counterclockwise) the blur amount. The HUD (Heads-Up Display) will show you the current blur amount in pixels, and Photoshop will give you a live preview of the effect as you turn the dial. Im going to set my blur amount to around 12 px. The amount you use will depend largely on the size of your photo:
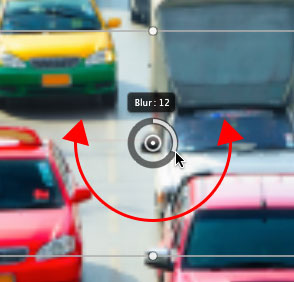
Adjusting the blur amount by rotating the dial.
If you prefer, you can also adjust the blur amount using the Blur slider in the Blur Tools panel in the upper right of the gallery. Drag the slider towards the right to increase blurring or to the left to decrease it. As with the dial, Photoshop gives you a live preview of the effect as you drag the slider. The slider and the dial are tied to each other so moving one automatically moves the other:
The Blur slider can also be used to set the blur amount.
Heres what my image looks like in the preview area with the blur amount set to 12px. If we were using one of Photoshops more traditional blur filters like Gaussian Blur, the entire photo would appear blurred, but with Tilt-Shift, thats not the case. In fact, the horizontal area in the center of my image has not been blurred at all. Notice the two horizontal solid lines directly above and below the pins center point. The area in between these two lines remains sharp and focused, completely protected from the blur effect, and this becomes our plane of focus. Everything above and below the plane of focus is blurred. Well learn how to adjust the location and size of this protected area in a moment:

The preview of the image so far.
Step 4: Move The Pin If Needed
By default, Photoshop places the pin in the center of the image, but we can move the pin anywhere we want. To move it, click on the pins center point, keep your mouse button held down, then drag it to where you need it. The entire blur effect, including the protected plane of focus, will move along with it. For example, Ill move my pin up higher in the image, and here we can see that the protected area has moved higher up as well:
Click and drag the pin where you need it.
In my case though, I actually want my pin to be back where it was in the center of the image. Photoshop gives us one level of undo with the Tilt-Shift filter, meaning we can undo the very last thing we did, so Ill undo my last step by pressing Ctrl+Z (Win) / Command+Z (Mac) on my keyboard. This returns my pin, and the entire blur effect, back to its original spot:
The pin is back in the center of the image.
Step 5: Resize The Protected Area
As weve learned, the protected area is the area between the two solid lines. We can resize this area simply by moving the lines. If you look closely, youll see a small dot in the center of each line. Click on the dot, keep your mouse button held down, then drag the dot up or down to reposition the line. The Tilt-Shift filter actually lets us rotate the lines as well, but thats not usually what we want to do for this effect, so to avoid rotating the protected area, press and hold your Shift key as you drag the dots. This will make it easier to drag straight up or down:
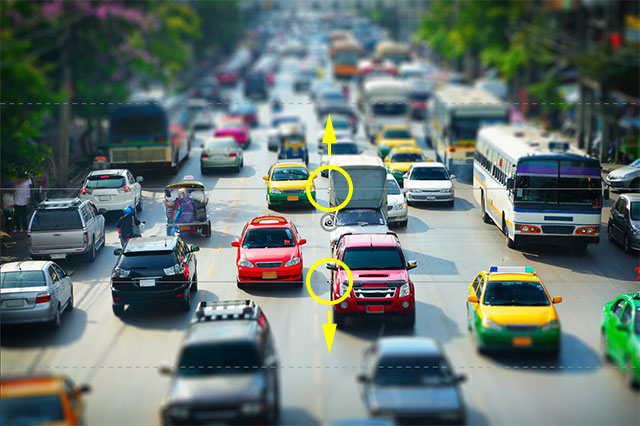
Hold Shift, then click and drag the points to resize the protected area.
Step 6: Resize The Transition Area
In addition to the two solid lines, theres also two dashed lines closer to the top and bottom of the image. These dashed lines mark the points where the blur effect reaches full strength. The area between a solid line and a dashed line is the transition area. The blur effect begins at minimal strength at the solid lines and then grows progressively stronger as we move closer, either up or down, to the dashed line where it hits full strength. The areas outside the dashed lines then have 100% of the blur effect applied to them.
To adjust the size of the transition areas, simply click and drag the dashed lines up or down. Moving them closer to the solid lines will create more noticeable, abrupt transitions between the blurred and non-blurred areas, while moving them away from the solid lines gives you softer, smoother transitions:
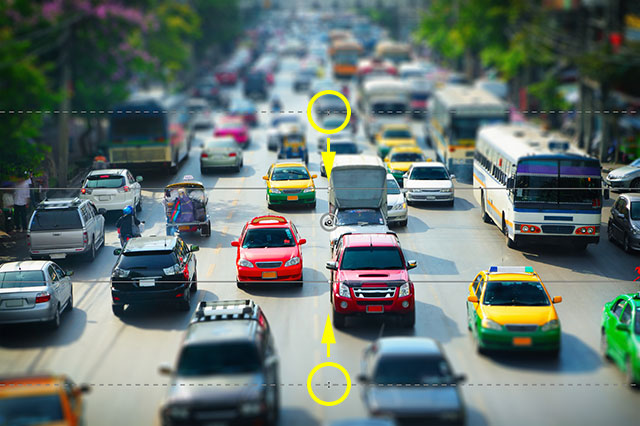
Click and drag the dashed lines to resize the transition area for the blur effect.
Step 7: Add Distortion (Optional)
One option available to us thats only found in the Blur Tools panel is Distortion, which lets us add a slight motion effect to the blur. By default, the Distortion slider sits in the center at 0%, which means no distortion is being applied. Dragging the slider to the right of center will add a bit of a zoom effect to the blurring, while dragging the slider to the left of center will add a spin or radial effect. Also by default, Photoshop only applies the distortion to the blur effect in the bottom part of the image. If you want to include the top part as well, you need to check the Symmetric Distortion option below the slider:
The Distortion options in the Blur Tools panel.
Heres an example of what my image looks like with some zoom distortion applied (with the Symmetric Distortion option checked). You may or may not want to use distortion with your image, but in my case, I dont think it really adds anything to my effect so Im going to drag my slider back to center (0%) to turn the distortion off:

Use the Distortion option to add some zoom or spin motion to the blur.
Hiding The Pin Overlay And Viewing The Original Image
All of these lines, dots and circles covering up our image in the preview area can make it tough to judge what the blur effect really looks like. To hide the pins overlay and view just the image itself, press and hold the letter H on your keyboard. With the key held down, the pin is temporarily hidden from view. Release the key and the pin reappears.
You can also go back and view your original image at any time to compare it with your current blur effect. Simply uncheck the Preview option at the top of the Blur Gallery, or press the letter P on your keyboard, to turn the preview off and view the original image. Re-select the Preview option, or press the letter P again, to turn the preview back on and view the blurred version in the preview area:

Check and uncheck the Preview option to switch between the original and blurred versions of the image.
Step 8: Apply The Blur
When youre happy with the look of your blur effect, press Enter (Win) / Return (Mac) on your keyboard to apply the blur to the image and exit out of the Blur Gallery:

The image after applying the Tilt-Shift filter.
Step 9: Add A Hue/Saturation Adjustment Layer
Lets finish off our miniature effect by boosting color saturation in the image, which will help give everything more of a hand-painted model look. Add a Hue/Saturation adjustment layer by going to the Adjustments panel and clicking on the Hue/Saturation icon (far left, second row):
Select Hue/Saturation in the Adjustments panel.
The new Hue/Saturation adjustment layer appears above Layer 1 in the Layers panel:
The Layers panel showing the new adjustment layer.
Step 10: Increase Color Saturation
The controls for the Hue/Saturation adjustment layer appear in the Properties panel. Click and drag the Saturation slider towards the right to boost the overall color saturation. Keep an eye on your image as you drag the slider so you dont take things too far. Im going to set my Saturation value to +20:
Dragging the Saturation slider.
And with that, were done! Heres my original image once again for comparison:
The original image.
And here, after boosting color saturation, is my final miniature effect using the new Tilt-Shift blur filter in Photoshop CS6:
The final effect.
And there we have it! Thats how to create a miniature effect with the new Tilt-Shift blur filter in Photoshop!
Download our tutorials as print-ready PDFs! Learning Photoshop has never been easier!
You May Also Like...
Miniature Effect With Tilt-Shift In Photoshop CS6
Miniature Effect With Tilt-Shift In Photoshop CS6 well learn how to create a miniature effect in Photoshop CS6 using its brand new Tilt-Shift blur filter.
Photoshop CS6 Tutorials: Create Tilt-shift photography
[] // ]]> Photoshop CS6 Tutorials: Create Tilt-shift photography [] [] source You can create a Miniature Model Effect in photoshopcs6,
Tilt-Shift Effect in Photoshop CS6 IceflowStudios ...
is Tilt-Shift! Tilt-Shift Effect in Photoshop CS6. 26,784. views. 51. SHARES. For those who are unfamiliar with tilt-shifting,
Miniature Effect With Tilt-Shift In Photoshop CS6
Miniature Effect With Tilt-Shift In Photoshop CS6 November 6 well learn how to create a miniature effect in Photoshop CS6 using its brand new Tilt-Shift blur
Tilt-Shift Miniature Effect in Photoshop - Dreamstale
Learn how to quickly create a tilt-shift miniature effect in Photoshop. Create cool miniature scenes with Photoshop CS6.
Miniature Effect With Tilt-Shift In Photoshop CS6 | Mobile ...
we'll learn how to create a miniature effect in Photoshop CS6 using its brand new Tilt-Shift blur Miniature Effect With Tilt-Shift In Photoshop CS6
Tilt Shift Miniature effect with Photoshop CS6
in Photoshop CS6 to create a miniature effect, that mimics a tilt-shift the blur gallery in Photoshop CS6 to create a miniature effect,
Tilt-shift filter in Photoshop CS6 - Source for Miniature ...
Diorama Illusion Effect Miniature Faking Examples 13 more examples If you are both the photo editor fanatic and tilt shift lover, Adobe Photoshop CS6 has
Use Tilt-Shift in Photoshop | Adobe | Creative Bloq
village using the filter Tilt-Shift in Photoshop. Tilt shift in Photoshop began with CS6, which introduced a brilliantly simple Tilt-shift Blur effect
Tilt shift miniature model effect with Photoshop ...
Tilt shift miniature model effect with Photoshop. Here you can see a Photograph that I shot with a tilt-shift lens to get this effect Get your free 77 page
Travelling is my life
ConversionConversion EmoticonEmoticon